Today, after a fairly long delay where we were recovering from an injury but also doing the Oak timber Survey and Ordering, we resumed our task of creating more rafters for the roof. This time, it was the turn of the “P” section over the Great Room. We chopped up the collection of CLS timber lengths we had in the workshop and produced 12 individual pieces to do P5 through to P10 and P16 through to P21. Then, the large pile of plywood webbing strips were also cut and sliced including cutting in the notches on all 12 sets and ended up with a collection of webbing, ready for the assembly.
Then it was the usual job of bringing in polystyrene foam strips, 12 of them, then cleaning up the workshop and refilling the glue dispenser bottle too.
By the end of the day, we managed to complete three rafters, P5, P6 and P7. Tomorrow, we will take outside as many of the “H” rafters and get them installed up into the structure before lunch and then continue in the workshop to carry on making the remaining 9 “P” rafters during the afternoon and avoid the short daylight hours. We should get the rafters for both “P” and “H” all installed by Thursday and Friday and that will be it for the rest of the year as we can relax and celebrate Christmas and New Year and start fresh again in January!
Blog
-
Work Begins on “P” Section of Roof
-
Oak Shelter Constructed
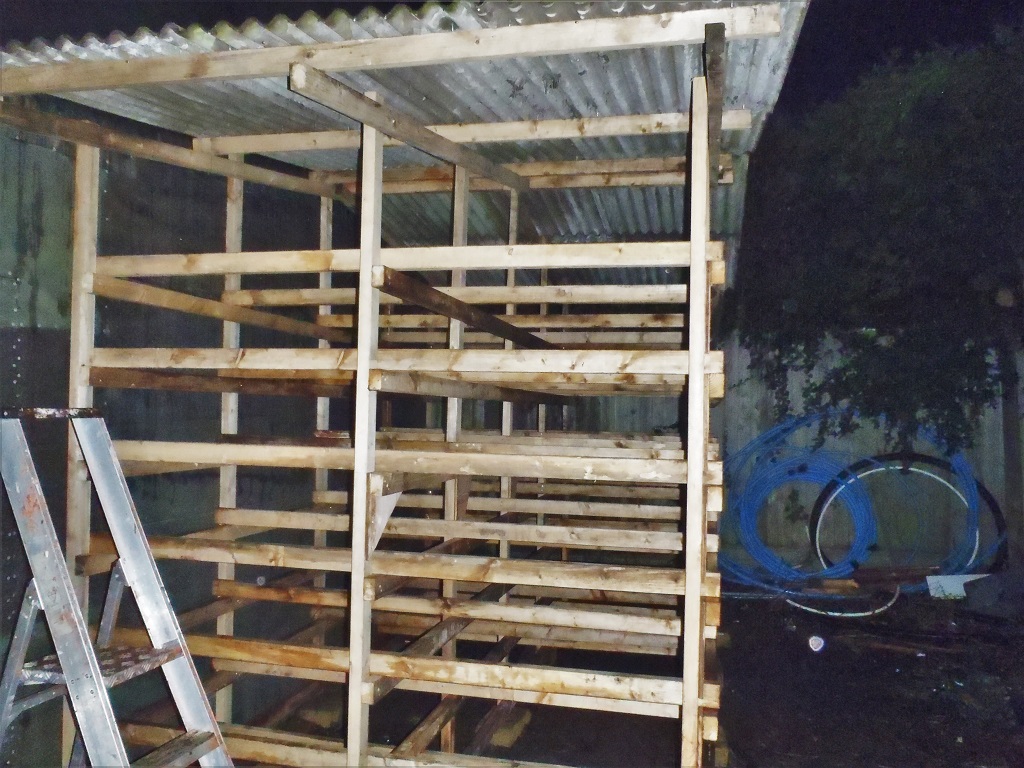
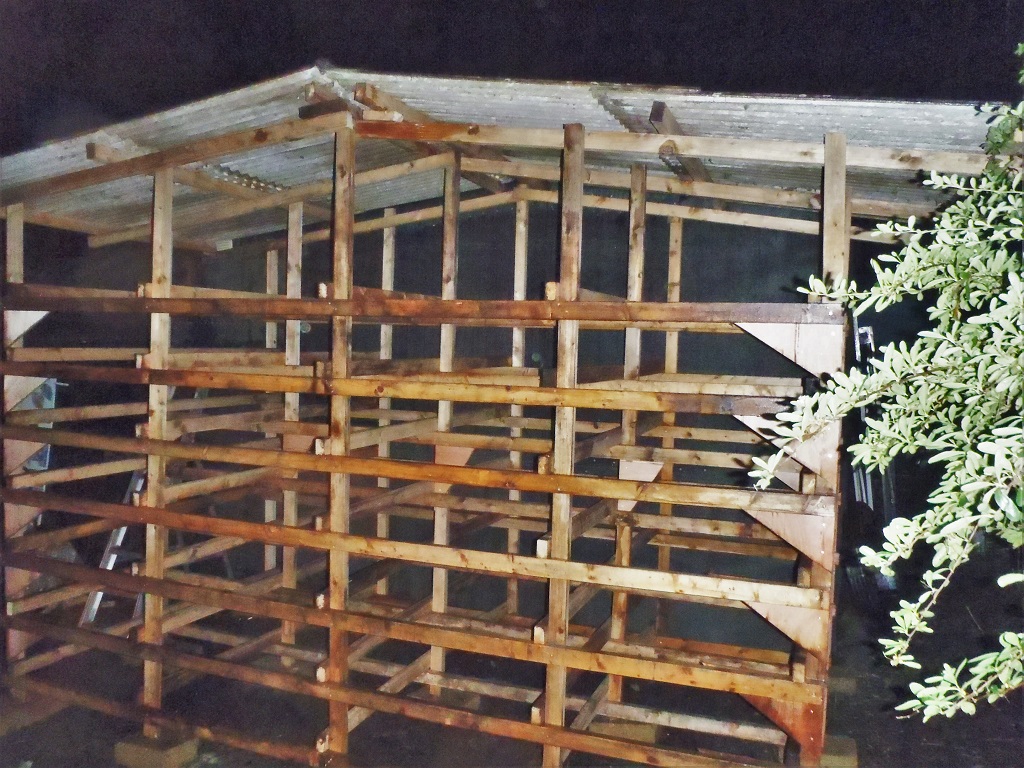
These last few days has been spent working on our Oak Timber requirements and as a result of putting in quotes for more than 6 cubic metres of Oak, we needed to store it on a rack, which is well ventilated and dry.
We made a structure 2 metres wide by 3.5 metres deep and 2.5 metres high , divided into two columns, each a metre wide, and having seven shelves. The weight of the timber will be about 5 tons so all the joints and supports were reinforced with plenty of nails and screws and the legs all sitting on concrete blocks to distribute the load.
Oak-Storage-Front

Oak-Storage-Side
The roof was made using some old corrugated cement panels and a metal ridge cap (they were originally from a garage we inherited when we bought Roselea in the first place), putting up 12 panels to make a good overlap to keep the rain off the Oak.

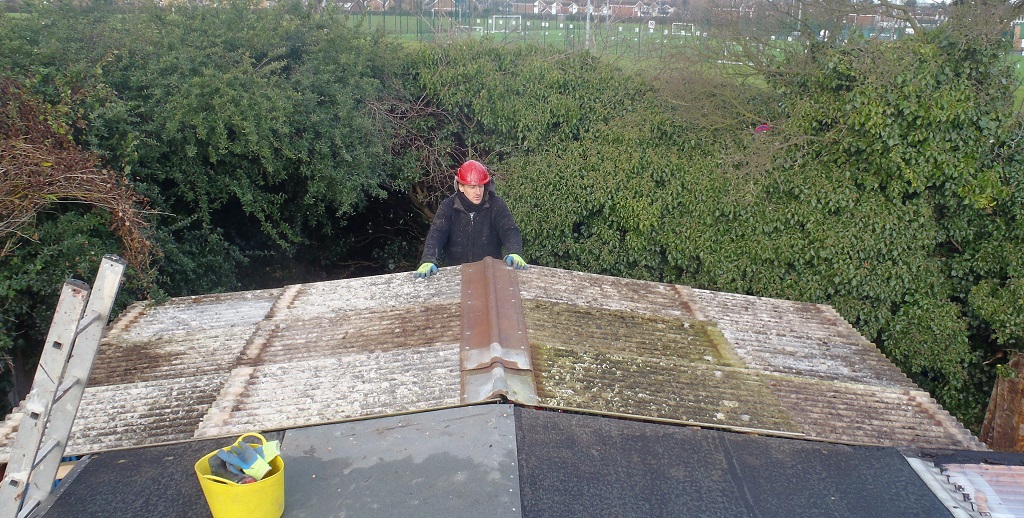
Oak-Storage-Roof
The final job will be to put up some plastic corrugated sheeting vertically on the long side to stop the rain from driving in sideways, we will do that tomorrow. And also put a line of roofing felt with glue to join this shelter to the end of our existing storage building to stop the small amount of rain getting in down the gap. -
External Oak Timber Survey
The last few days, while Shaun recovers from a Back Muscles Twinge injury, we have been surveying for all the Oak timber we would need for the external features of the house (and garage). We do need to do this task anyway soon, as we are nearing the completion of building the roof structure and the next job would be to install the facia and guttering before we can proceed to lay down the roof boards (because the first line of boards overlaps the facia edge).
The main external features we have to survey are gutters, windows, doors, corners, conservatory and garage. Each has a collection of different dimensions (like thickness, width and length) and we needed to do a survey and quantify what we will need and make up an order to a timber merchant who often have “rules” like minimum order pack sizes for any given thickness or length.
The list below is the approximate quantities in cubic metres as follows: (Note: the timber merchants prices this way, so just imagine a solid block of wood 1 metre wide, 1 metre high and 1 metre deep – yes big!)House
- 100 metres of Gutters – 1.0 m³
- 12 Windows – 1.1 m³
- 3 Doors – 0.2 m³
- 16 Corners – 0.3 m³
Conservatory
- 12 Windows – 0.5 m³
- 1 door – 0.1 m³
- 4 corners – 0.25 m³
- Roof’s Hip and Ridge Beams – 0.2 m³
- 14 Rafters – 0.25 m³
Garage
- 11 Windows – 0.5 m³
- 3 door – 0.25 cube
- 4 corners – 0.1 m³
- 38 metres of Facia – 0.2 m³
Summary
All this adds up to a grand total of 5 cubic metres of Oak Timber!
We would split the order into two parts so we don’t have large quantity of oak lying about before they were used. -
“H” Rafters Fully Manufactured and Ready to be Installed
On this very wet and chilly Monday, we resumed work in our nice and warm workshop to finish off the manufacturing processes on our set of rafters to do the “H” section of the roof.
We sliced the bevel ends on all the 13 rafters we had to do, some were the full sized ones (nine of those) using our Bevel Slicing Machine, and the others only had just the 89mm CLS cut (three of them). These last were done using our usual chop saw as you can see below

Doing-compond-bevel-cut-on-H17
This concludes the job of creating these rafters and as soon as the weather clears up later in the week, we will get them installed up into the roof structure. In the meantime, we will continue with preparation and assembly work to do the rafters for the “P” roof section over the Great Room, which is another 15 of them to do! -
Back Muscles Twinge!
During the manufacturing of rafters on Thursday, 3 days ago, Shaun suffered a twinge in his lower back muscles and had to slow down. Fortunately, we had only one session left to do to complete and by careful positioning and movement, he was able to complete the task of squeezing the rafters while being nailed together by Stephen.
But for the rest of the afternoon and for the next 3 days, it was felt that rest was called for and not risk further damage.
So we had a change of plans and switched over to quantifying the total amount of Oak timber we would need for the external features of our house (and Garage too). See separate External Oak Timber Survey report.
Shaun reports that after 2 days of rest, his back muscles are recovering well and hopefully another 24 hours rest (Sunday) will see him doing limited work on Monday. We have to cut the bevel ends on our rafters we have made as the next job before putting them up into the roof and that could be possible for Shaun. -
The “H” Rafters All Manufactured!
Today, we entered into the joyous task of assembling the 13 rafters that will see the completion of the “H” section of the roof (the right hand side of the house over the Utility Room, Back door and Bedroom 3).
The first run was to put together the four smallest rafters and then a further three sessions were completed before we had a problem! Shaun suffered a twinge in his lower back and had to “go slow”, see Back Muscle Twinge but we managed to finish off the final session.These 13 rafters are now done and waiting for the next job of having their bevel ends cut and next week, being installed into the roof.
The rest of the afternoon was spent calculating the quantity of CLS timber we would need to build up a pile of material to do the “P” section, this being 10 and 9 lengths of 89mm and 63mm CLS timber respectively and a further 24 strips of the plywood webbing. Stephen brought these into the workshop to acclimatised, ready for slicing and chopping to required sizes next week. -
“H” Section All Prepared and Ready for Manufacture
These last two days has been the task of making various bits and pieces to continue manufacturing more rafters, the main task being slicing up a further 24 sheets of 8 foot by 4 foot plywood boards into our 400mm wide strips. This was yesterday’s job, having to break into our second pile of plywood sheets, unwrapping several layers of protection: one tarpaulin outer cover, then a plastic “bag” and loads of Clingfilm off the pallet containing 75 sheets and removing 24 of them and, hey hoe, wrapping it all up again!
Today, we proceeded to chop up five lengths of 63mm CLS timber plus 7 lengths of 89mm CLS timber, to produce enough material to create thirteen individual rafters to build the “H” section of the roof, having seven of them cut with the usual bird’s mouth notches, a further three with half bird mouth notches and the other three just being single bottom flanges only. Then, using all the various left-over pieces, we went through them all to make 28 wide 89mm CLS diagonal noggings, a further 61 63mm diagonal noggings and loads of straight one (just over a hundred of them!). We only needed 24 straights, 9 wide 89mm diagonals and 18 narrow 63mm diagonals to do our “H” rafters, all the rest went in the garden shed for the next section “P” and “N” and so on.
We turned to the next task of slicing down a heap of webbing plywood strips to their required sizes, putting in the wall notches in each pair as we went along and also using further left-over pieces to try to recover more of the “waste”.
The day came to the conclusion with us cleaning the workshop of all the saw dust etc. and then filling up the glue dispenser bottle so it is all ready for a fresh and quick start in the morning on assembling and making these “H” nine rafters plus some four “odd” ones. -
Roof on Storage Cover and Garden Shed Repaired
This morning and yesterday, we did some maintenance work on our various structures, to repair leaks in the roof of the garden shed and the temporary plywood storage tent cover.
The plywood storage shed got another layer of tarpaulin put over the roof area yesterday, it might not be a perfect solution but it needs only to survive another month or so while we are building the roof on the house.
The garden shed got some attention this morning, taking advantage of the sunshine and we put on a couple of patches on the shed roofing felt. The roofing felt is getting old and starting to “go” crunchy but it hopefully will last long enough as it only need to survive for another year or so! -
Installed the Last Two Middle “H” Rafters and Measured Up The Next Sections
This morning, in bright sunshine but chilly air, we finished installed the last two middle rafters on the “H” section of the roof.

Rafters-H7-to-H10-Finished
Then we spent the rest of the day measuring up the various sections of the roof on either sides of these middle groups of rafters on both the “H” and “P” sections. The “H” was pretty standard but the “P” had an extra O Ridge to take into account and we measured all of the positions to make sure all the sizes were known and we didn’t give ourselves any surprises. There are a total of 17 rafters on the “H” and 21 rafters on the “P” sections. These are the top few largest sections so is likely to take the whole week to prepare and manufacture for the “H” and another week for the “P” sections. We will see how we go!P.S. Here is the picture of the P rafters we installed on Saturday (It was dark when we finished)

Rafters-P11-to-P15-Finished
-
“L” Now Complete, “P” Middle Section Done and Half of “H” Finished
Today, in a quiet and chilly but with lovely sunshine, we got most of our rafters we had manufactured up and installed into the roof structure.
The “L” section is now complete, all five rafters were done before lunch.

Roof-L-Finished
Then the “P” section was finished as the daylight faded away at 4pm (no picture, too dark!)
And finally, two of the four rafters for the “H” section was installed in total darkness, apart from our powerful floodlight shining down on the scene!

Rafters-H10-and-H11
On Monday, we will finish off the middle portion of the “H” section and then we can measure up the necessary distances to start manufacturing the filling in set of rafters for both the “P” and “H” triangular portions, either side of the middle bit we have done today.