We continued to apply the Resin and Fibreglass layers to the Filter Parts. We completed all of the insides with their two layers as well as the two layers on the insides of the lids and side panel. The outsides of the filter will have a single layer of resin and fibre-glass as they will not be submersed permanently in water so need less protection. The outside of the swimming lane return channel was coated last thing today.
Category: Rainwater
-
Second Final Day of Preparation of Filtration Unit
We started the day off with the task of rubbing all the places where we had put the filler. But we discovered that we needed more wooden triangular battens in various places we missed the first time around.
But we also prepared the side panel “lid” with two more plastic pipes that got glued through the cement panel, one being the 110mm pipe connection from the garage roof and the second one is the 40mm white pipe that will connect to the underground rainwater storage tank underneath the garage.
We wanted to get on with doing the fibre-glass coatings but we kept finding other jobs to do like making the real “lids” to the top of the cabinet when it is fully installed in the ground and attached to the end of the swimming lane.
So by the time we got that done, sanded more edges and then did a major clean up operation to remove all the dust and dirt, it was already near the end of the day again!!
But we decided to overrun because we needed to make a slim wide slot, using a chunk of polystyrene foam block, to act as a mould to wrap glass-fibre around it and then put the first coat of polyester resin on it and allow to set properly overnight.
Tomorrow, we WILL get on with the marathon task of putting two layers glass-fibre all over the whole filtration unit, both inside and out, all the lids and other parts .. at long last!! -
Last of the Preparation Tasks On Rain Filtration Module
Today, we finished off putting wooden battens, some of them triangular shapes around in various locations, for example, the dirty water filter support rim and the support bar across the top of the module to hold the lid on.
Then after that lot, we went around with several tubs of plaster filler to fill in gaps, holes and round off corners and edges to aid the laying down of the glass fibre matting, which cannot turn sharp corners very well.
Finally, we inserted three plastic 110mm drain pipe small segments (two next to each other for the rain water coming off the main house’s roof and the third one being a connection to the soak-away downpipe.
Tomorrow, we will rub down all the surfaces and clean everything and start the process of coating everything with the polyester resin and glass fibre layers, both inside and out. -
Many Days of Creating and Building Various Parts of the Filtration Module
This is a report to summarise the work we have been doing for the last twelve days, in creating a filtration system for all the rain water collected off the roof, including water falling into the swimming lane and the pond too. The total amount of rain water being processed by this half buried module is going to be in the excess of 500 litres for every millimetre of fallen rain.
This large box, measuring 1800mm (6feet) high, 1200mm (4feet) deep and 400mm (16inches) wide, with most of it buried (only 800mm (just over 2½ feet)) is above ground. It has three main pipelines (110mm diameter pipes) connected to the module, 2 running from the main house roof and 1 from the garage roof. There is also a fourth connection, directly to and from the swimming lane with the wide but narrow slot that is positioned 150mm below the top of the swimming lane. This slot acts as a overflow point for the swimming lane when it collects rain water and combines with the roof water and is filtered and stored away for later use, but also the swimming lane and pond can act as a buffer to store temporary surge water during freak thunderstorm weather conditions that would normally over whelm the underground soak-away module and give it time to handle that kind of volume of rain water.
We are making two modules, one is the main filter unit and other is a separate channel which is used to recirculate water in the swimming lane, drawing it from the bottom of the swimming lane and pumped up to the return channel which runs down the back of the swimming lane and empties into the pond at the other end of the plot.The filtration module comes in three sections, the first being the ‘dirty’ water collection chamber, the second section is the filter to provide the ‘clean’ water and finally the third part is a set of external vertical channels to provide paths for processing different types of water.
One channel runs from the bottom to the top and is where the dirty water is extracted from the bottom of the filter module and pumped up to either the same return channel stream or distributed on the flower bed running along the fence behind the return channel, we haven’t decided which yet. The second channel of water, is the emergency ‘highest’ overflow point (sandwiched between the other two channels) for the whole system. This channel is connected to the main module by a slot positioned at 50mm from the top and all this water will flow down through more 110mm drain pipes, going into the soak-away module (buried under the driveway 10m away). We had to extend the existing underground pipeline to bring it into the correct position, when we install the whole module.
The filter is constructed from fibre-glass and resin coated on 10mm thick cement boards, with wooden battens cut at 45degrees angles to help reinforce the corners and various internal shelves and baffles.
We have so far created over a dozen pieces of various shapes, with the battens glued and screwed along various edges.
We have started assembling it all together, only stopping at the point of putting on the ‘lid’ which actually is a side wall of the cabinet. We need to have access to all the internal surfaces to paint on the layers of fibre-glass and polyester resin.
We had quite a few interruptions to our work plus being a complicated piece of work, has accumulated to the twelve days so far spent on this task, but we should see it finish by another week. We are still waiting for our slates to arrive so we are not losing time on that job, and had to have this filtration module built and installed, so we can connect each section of the roof guttering system to the downpipe channels and all rain water would be immediately handled and taken away. -
Tested Rainwater Pipes, Finalising Design of Rain Filtration Module and Sliced Sheet of Plywood for Roof
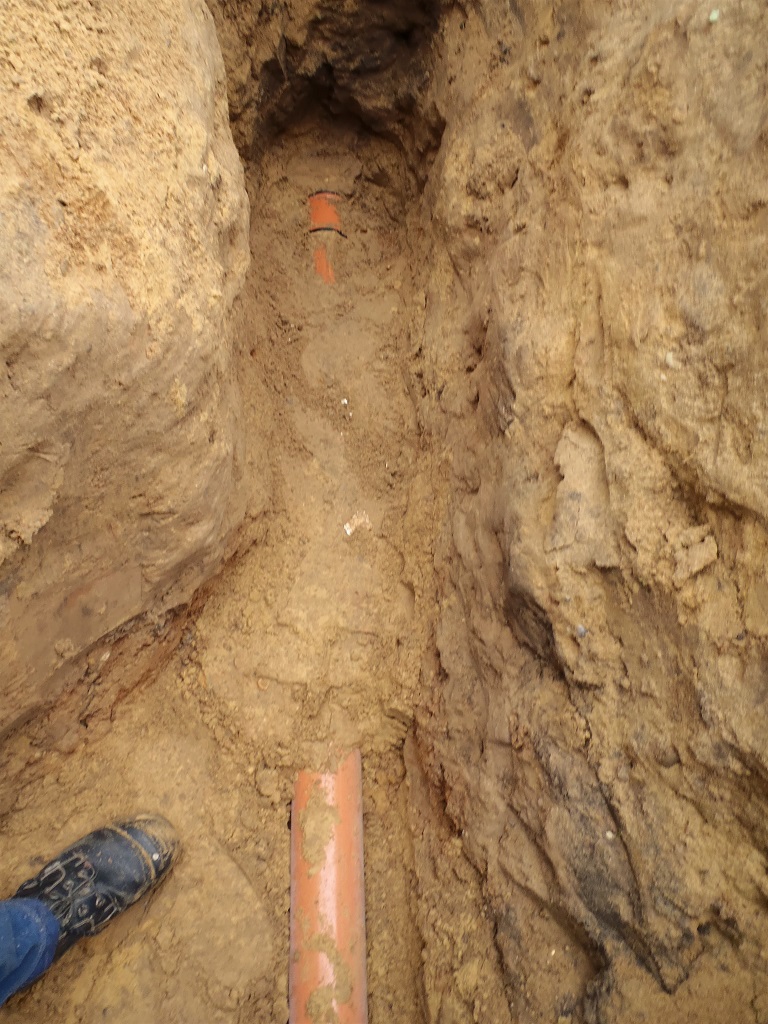
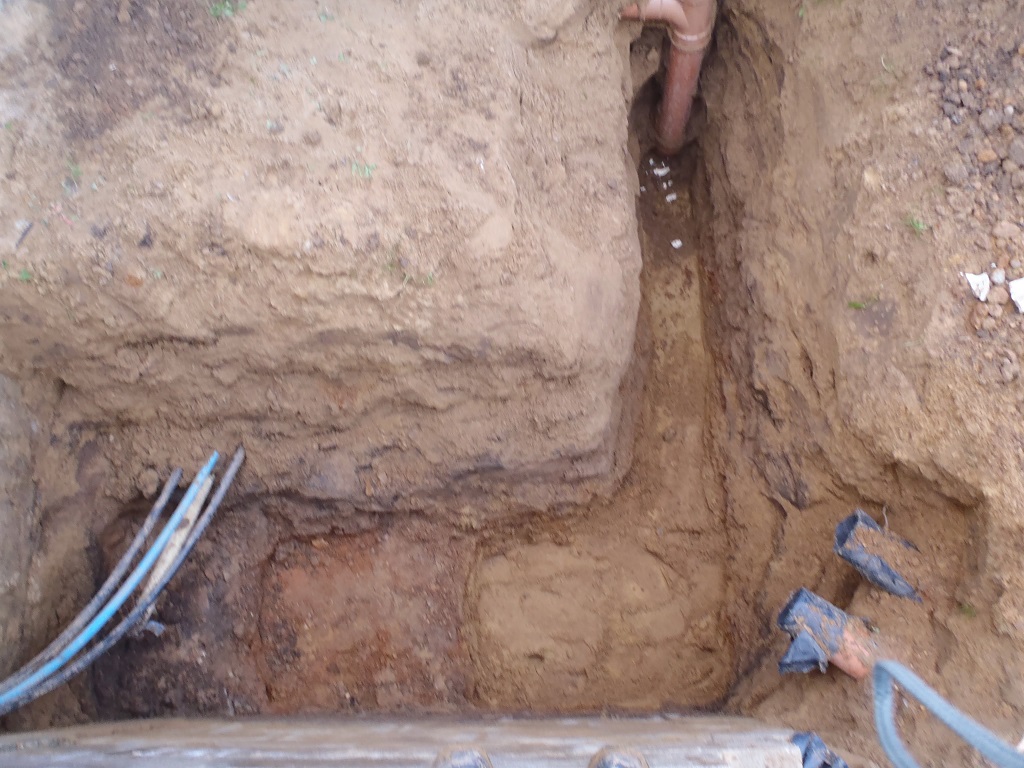
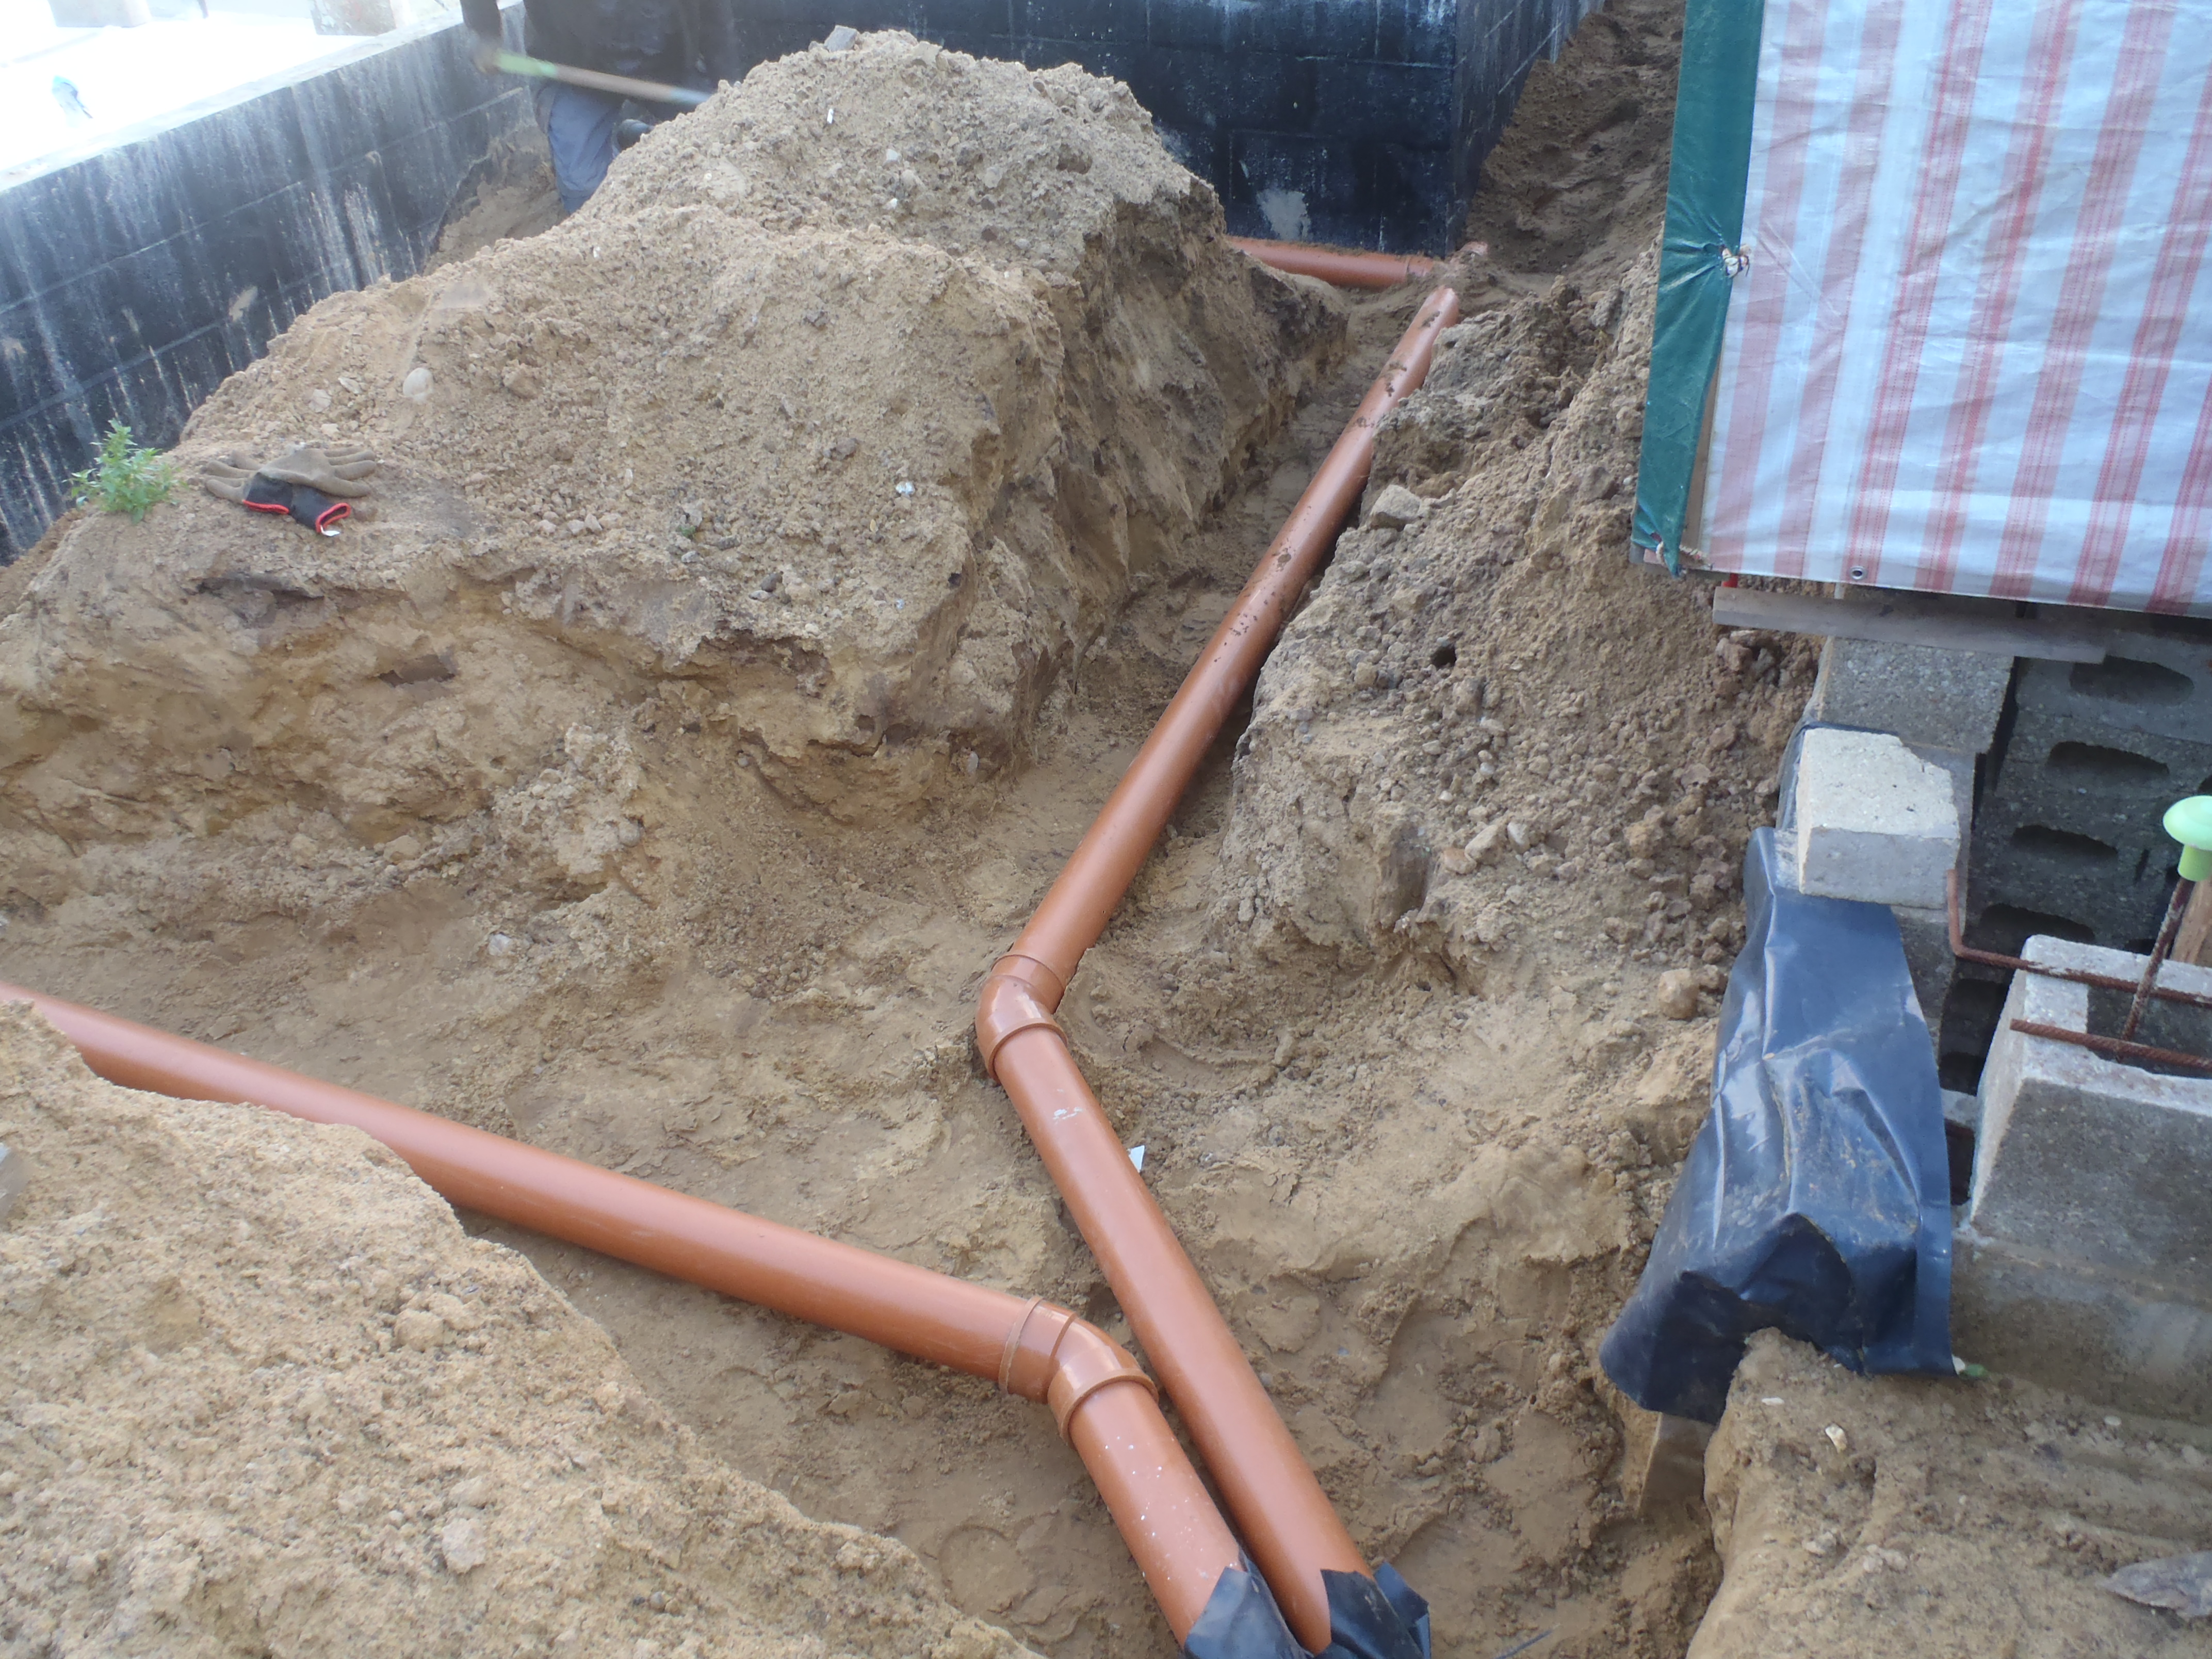
Yesterday, we wanted to test the pipework that we installed (for the rainwater collection off the roof) two years ago and make sure that the position of the ends of the pipe lines (two of them, one coming from the front of the building and the second one running along the back) which terminate just beyond the end of the swimming lane. It was a matter of levels and whether the rain water would flow reasonably easily down these pipe lines and confirm whether we need to readjust anything. We poured in about 120 litres of water (10 buckets) in a downpipe point furthest away and waited to see what happens. We had two right angled bends plugged into the two ends and pointed them down into a large 75litre trug. It took about 5 minutes before any sign of water arrived and only on the front pipeline. Nothing arrived on the back one. we left that to dribble over lunch as it was quite slow.
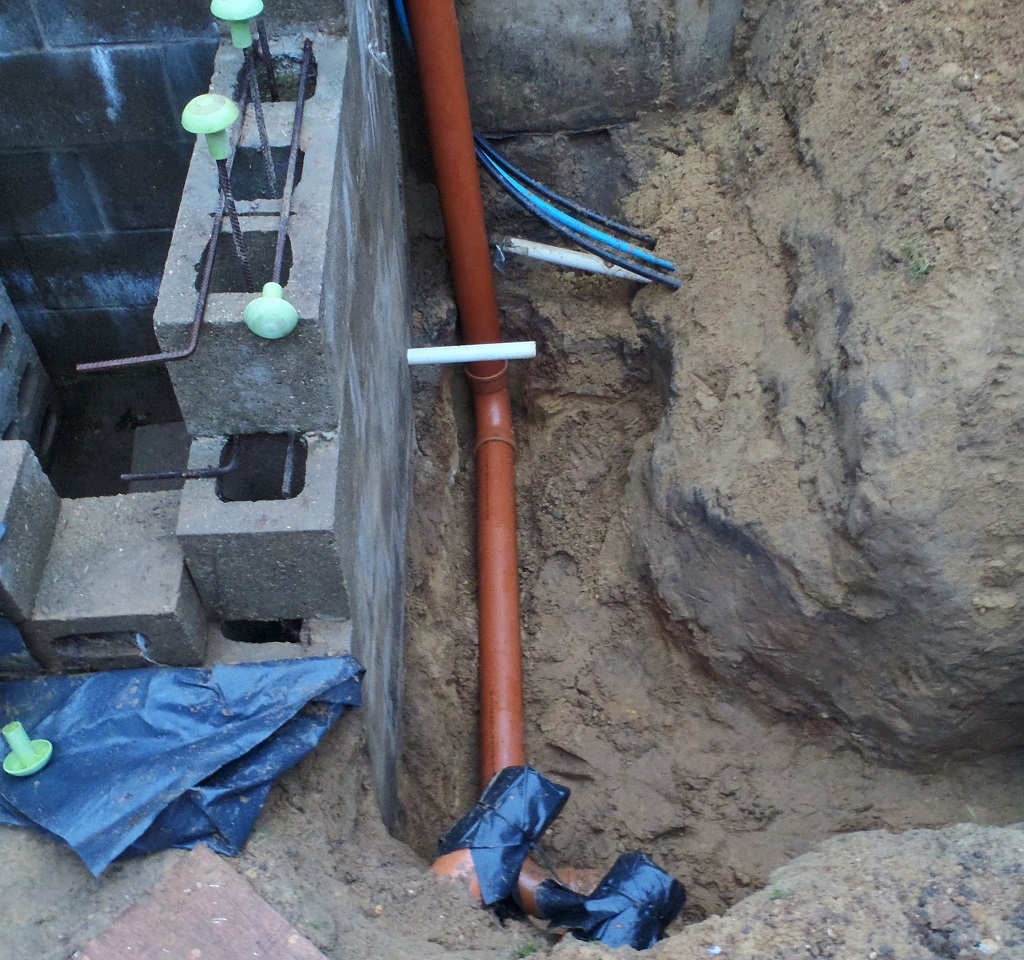
After lunch, the large trug was full but not overflowing so we only got back about 75 litres of the 120 litres we put in, which means the pipework has very small dips in various sections which needed to be filled up before allowing excess water to flow pass. This will be trapped water for all time, but it is not bad at all, for this amount of water, considering our roof will be collecting 360litres of rainwater for a single millimetre of rain fall!! The only concern is for the pipeline running along the back of the building so we did some more tests by pouring in five more buckets of water in two more downpipe points behind the house, in between the Great Room and Bedroom 2. We did get some water to finally appear at the second pipeline but not much at all, most of the five buckets load went around the long way around the front of the building. This means that we have a small hump (a rise in the level of the pipes) somewhere between this point and the short run to the rain filtration module. The last thing we did yesterday in testing this out, was to carefully pour one bucket into the downpipe point (we label this one “LM” which is next to Bedroom 2 and Bedroom 1 – see map below) and we put two separate empty buckets under each of the two pipelines to find out what apportion of water went which circuit of the pipelines.In the morning, we discovered that a small amount arrived via the back pipeline but most of it went around the front pipeline circuit and filled up our bucket. The final test was to pour another single bucket in the final downpipe point we got along the back of the house, this time being the “IJ” corner (between Bedroom 1 and Bedroom 2) and see where it went. The result was that all of it arrived in the second bucket under the back pipeline route. We concluded that the hump is most likely in the 7.5metres section that runs along Bedroom 2, the “K” wall. We have earmarked a job request for later on, to dig up the sandy soil and see if we can level out the hump in the pipework, but only if it is possible. It is not the end of the world as the rain water will still be delivered to the rain filtration unit but sometimes more slowly than it ought to be.
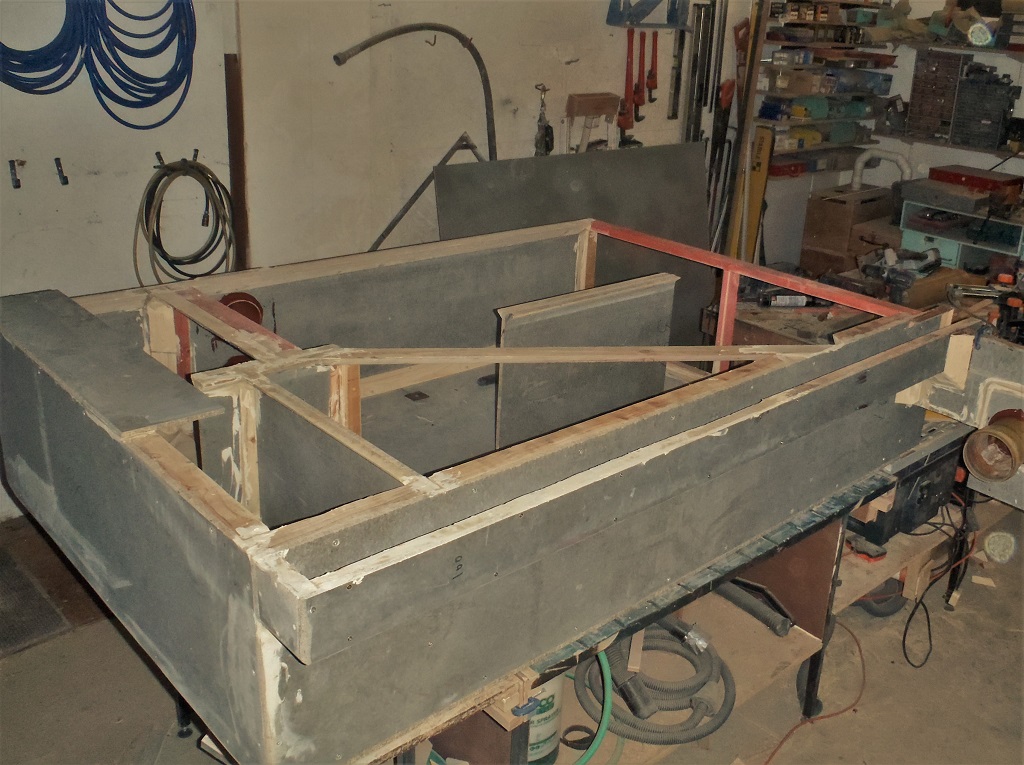
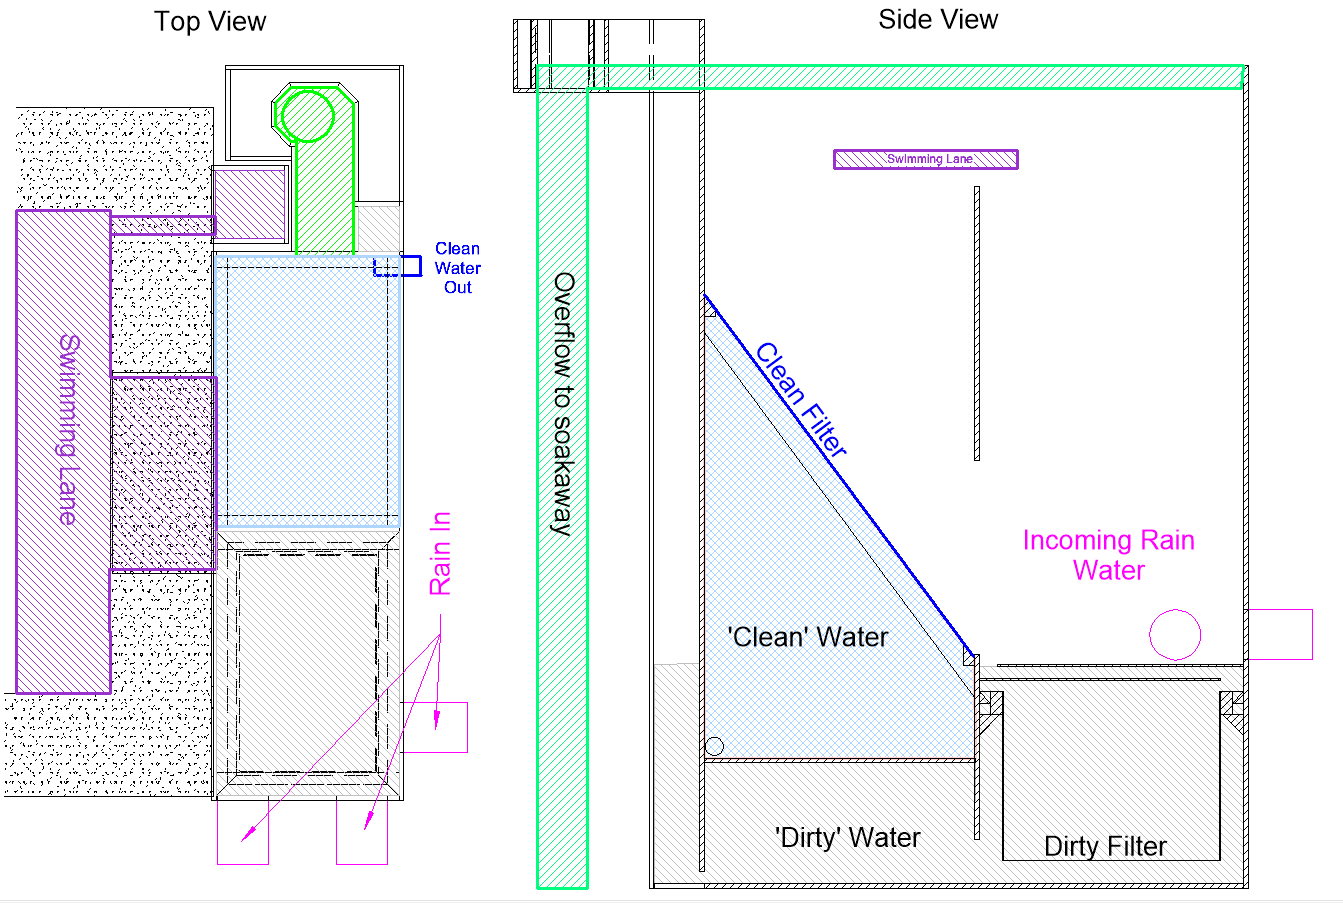
Anyway, while those tests were being done, we also got on with the designing of the rain filtration module and one aspect of the system, was the slow draining of the “dirty” water, or the first flush of rainwater off the roof, which we don’t want to keep as it could very well contain chemicals like herbicides and fertilisers, blown on the wind from our local farmlands. But the trick is to make this dirty water drain away so slowly that it would take a week or two to go and it hadn’t been topped up with more rainwater. This suggests that we are getting a dryer spell, like 2 or 3 weeks, especially during the summer and there would be more chance of a higher concentration of chemicals landing on our roof. We don’t want this stuff in our storage tank and being used in our house like flushing the toilets or providing recycled water for showers and washing machines. Hence why we want to “throw-away” this dirty water into our soak-away module instead.
One method is to have a plug of fine sand to control the flow rate and we did some further tests yesterday evening, using a 100mm diameter pipe and putting a 100mm depth of sand in the bottom (the end covered in a geotextile material to hold in the sand) and then pouring a quantity of water and timing how much water drained through in a given amount of time. our first test showed that the water was flowing through at about a rate of 6litres per hour which is rather too fast for our purposes. We would like to slow this down to about 1litre per hour so that our “tank of dirty water (which is currently designed to hold about 240litres) would take about 10 days to drain away completely. Our second test in another drain pipe with a different plug of sand but with a taller column of water to emulate more closely the reality of our filtration module but when we put in the water this time, it didn’t flow hardly at all! Very strange and we wondered if we managed to get silt on the top surface of the sand and effectively blocked it, or perhaps the different sand had much finer grain sizes which also served to block the flow of water too.We walked away from that, discussed the problem and considering alternatives.
Today, we concluded that it would be far more reliable if we used a small water pump instead and have it controlled by the computer in the house, and pump the water up and into leaky hose pipes running along the back of the swimming lane where there will be a small strip of soil for growing various shrubs and climbers.
This does mean that our design for our filtration module is now much simpler and we can narrow down the width from our original 600mm width to a more practical 400mm wide and extend the whole unit backwards towards the mass wall and the fence line. All the electrical apparatus, sensors and control gear can be held in one place near the back of the module and the water can flow backwards toward the location of the pump.Tomorrow morning, will see the design fleshed out and finalised, but for the remainder of today, we got on with slicing up the plywood sheets we bought last week into narrow strips, ready to build up edges of the Hip portions of the roof plus also the ridge lines too. This build up is necessary to help support the tile battens when we are doing the fiddly angled edges along the hips (which has an extra “flashing” layer added on top of them) and something similar for the ridge lines (but a little simpler).
So we bought six sheets of 15mm thick plywood which got sliced up into 100mm wide strips (actually, we only needed five of the sheets) to produce 60 strips in total. Then we got out most of the left-over strips of 12mm thick plywood out of the garden shed (these came from the rafter building stage) and sliced them up into 175mm wide strips. These left-over pieces gave us the equivalent of 39 and a bit full length strips (2.44metres long) so we only need a further 53 strips to satisfy our requirement of making 92 strips. We will conclude that task tomorrow, along with making 30 strips of 150mm wide (12mm thick) ones too. All these pieces are being stored in the middle of our house under our gleaming new Skylight!! -
Dug Hole for Filtration Module
This afternoon (after being diverted in the morning to other commitments) we started the next stage of dealing with the rain water coming off the roofs (main house and garage), by digging a hole at the end of the Swimming Lane and next to the garage.
We will be building a water Filtration Module to receive the input from the roofs (in three 100mm pipes), entering a settling tank section first and then being filtered so the fairly clean water is collected and stored in our underground rainwater tank under the garage.
This module will be attached to the end of the swimming lane, with additional connections for surge water to flow into the swimming lane and pond but also a connection for drawing the water from the depth of the swimming lane and feeding it up to the return channel via some form of a “water feature”.
We had to dig down to the lowest pipework which feeds to the rain soak-away module, the depth being 1.2metres (4feet) down. The other pipe (the white one) is the feed to the rainwater tank which is at a depth of 700mm below ground level and the bottom of the swimming lane is 800mm down to the foundation level.
Tomorrow, we will measure everything to confirm these numbers and then finalise the design of the module which will be made of cement boards and fibre-glass resin layers with internal removable units so we can clean them. -
Automatic Pump to Extract Rainwater from House
This morning, whilst it rained, we made an automatic pump to extract and remove the rainwater from inside our house footprint. The concrete is open to the sky so we are collecting all the rainwater that falls down upon us!
The pump is located in the sump up next to the Great Room as it is better situated for reaching more puddles of rain water than the other sump.
We had a false start with the first try of running the pump, we were not getting any flow of water out of the end of the hose pipe. We had to take apart the pump completely to get to the centrifugal disc unit and discovered a mass of fibre material blocking the middle portion of the disc, where the water should have been allowed to enter but couldn’t!! We cleaned it up and reassembled the pump back together and reinstalled it back into the sump and now it is working.
The flow rate coming out of the hose pipe is about 10litres per minute or 600 litres per hour so it shouldn’t take too long to remove much of the water whenever it rains, as every 1mm of rain that falls, we would be collecting about 260litres of water.
-
Last Stretch of Pipework Completed
We finished off the installation of the pipes (running around the whole perimeter of the house) that [will] collect the rain water off the roof.
The last stretch is along behind Bedroom 2 and in the corner with Bedroom 3 and towards the end of the Swimming Lane. We put in the 8th and final down pipe spur in that corner of the building and it is now all finished, ready for the Filtration Module which will sit at the end of the swimming lane, we will assemble it later on when we have the roof constructed.
-
Day 2 of Installing the Pipework for Rainwater off Roof
This afternoon, we continued with installing of the pipework running around the perimeter of the house, connecting to the downpipes from the roof and the guttering.
We went along the front, past the Great Room, the Kitchen, The Hall and Entertainment Room, and around the Utility Room, past the back door and alongside Bedroom 3. That is 3 more downpipes connected up to the “ring” circuit, so only 1 more to do tomorrow, the one next to the back of Bedroom 2, giving a total of 8 downpipes. The two “ends” of the ring circuit will finally be meeting together again and joining to the Filtration Module at the end of the Swimming Lane.
-
Installing Pipework for Rainwater off the Roof and Guttering
Today, while we are waiting for the arrival of the ready mixed concrete on Monday, we carried on with the preparation and installation of the pipework running around the perimeter of the building, with 8 separate connections to the roof and the guttering (when that is built!).
The pipework is standard 110 mm diameter sewage underground pipes, with down-pipes from the guttering in all the internal corners of the building (except the one beside the back door near the garage, which is along a straight section)
We managed to do behind bedroom 2, bedroom 1, and around the Great Room (including the conservatory) doing 4 down-pipe sections. The depth of the main “ring” around the house is set to 350 mm below ground level, running 50 mm above the foundation strips, tight next to the Perimeter Wall.
On Saturday, we will hopefully finish off the front of the house and down the side back toward the Swimming Lane and the Filtration Module where the rainwater pipes will terminate.


