Category: Repair

  • Wall and Sign Repaired

    This morning and yesterday were spent on repairing the broken wall and repainting the street sign for our Loke after the delivery lorry with our I-Beams had misjudged things and knocked into the curved brick wall at the entrance of our Loke on the main road.
    Yesterday, we managed to pick up the pieces and glue them back together again using our adhesive PU foam that was specialised to glue building materials. Many bricks were still mortared together in large sections and we carefully put the jigsaw puzzle back in the correct order without having to remove any of the old mortar. The bricks were the ones where it had two large round holes instead of a frog and we slid and wiggled each layer back and stick on the top row back down.
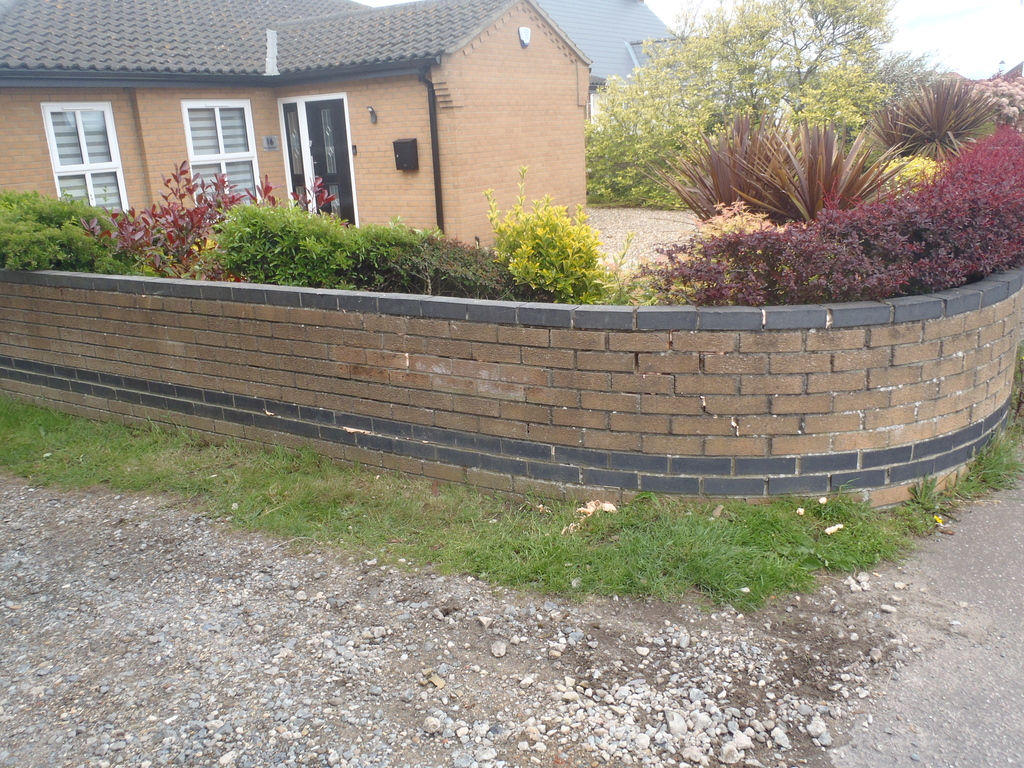
    Wall and Sign Repaired

    Rebuilt-wall


    The old metal street sign had also got disturbed and was in terrible state so we decided to bring that home to give it a complete revamp with fresh metal paint.

    Wall and Sign Repaired

    Old-loke-sign

    We removed the old green vinyl coating, scrubbed and got the aluminium clean and shiny again. This then had a half a dozen thin coats of a green hammer effect metal spray paint and left to dry and cure overnight.
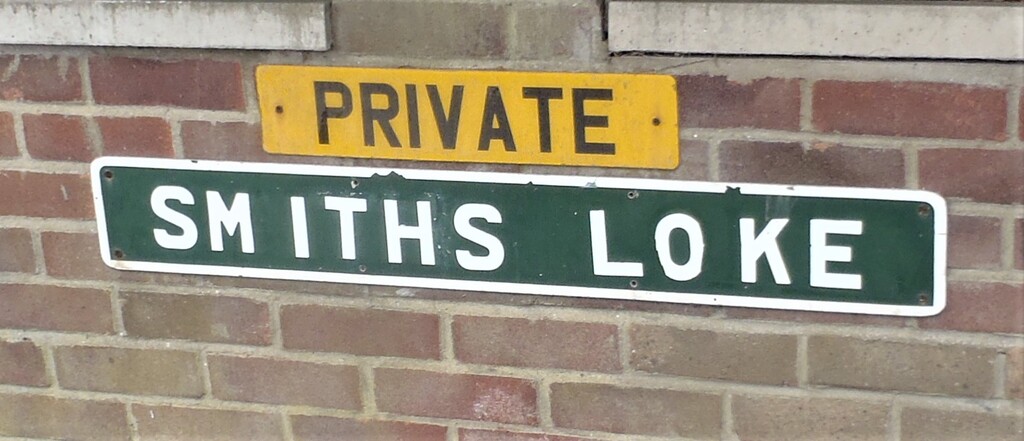
    The new letters, “Smiths Loke” was re-created on the computer, using the British Highways standard font face and adjusted to fit along a metre length of the sign and 150mm high with a white border. The paper print out was stuck to the freshly painted metal with that special spray glue that allows the removal and refixing. Then the border and each letter was very carefully cut by following the lines using a sharp scalpel to leave “holes” where the letters were, ready for several coats of a white metal spray paint.

    Wall and Sign Repaired

    Repainted-sign


    Once this was dry, after lunch today, we took up the new sign and positioning it very slightly higher because the old holes had many missing mortar where the plugs were. Drilling new holes and using mushroom headed stainless steel screws, the new sign was affixed back on the repaired wall.
    Wall and Sign Repaired

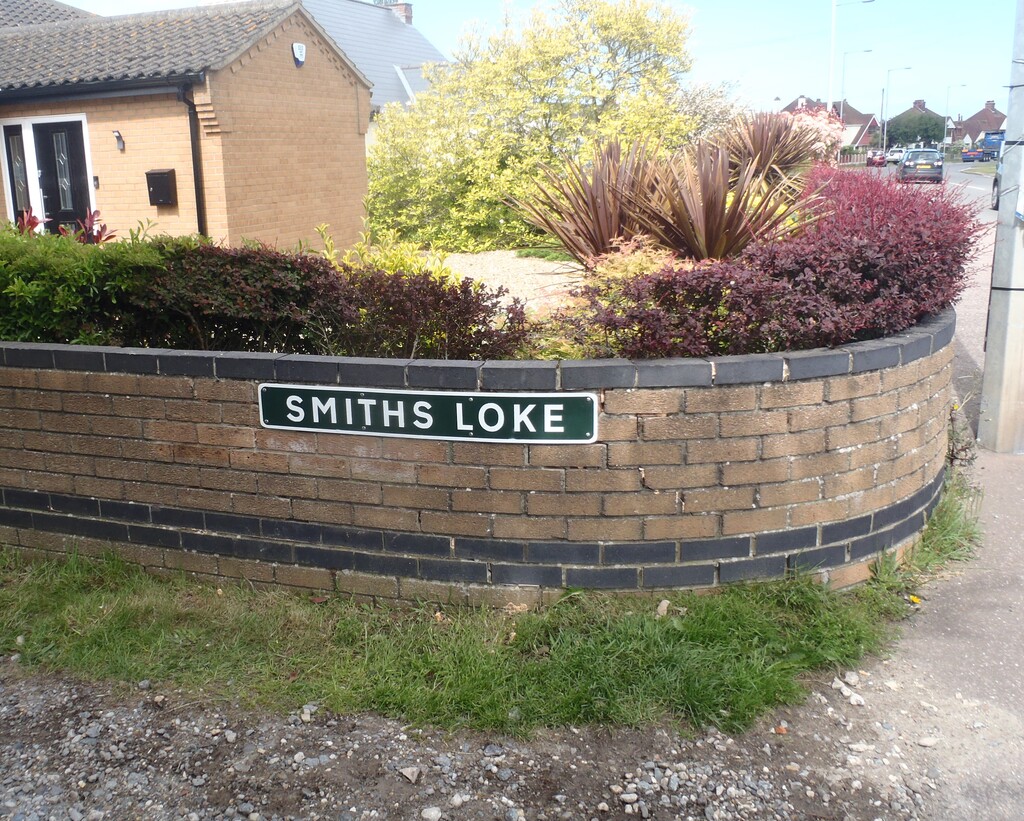
    Wall-all-refurbished


    We probably will take down the twin street sign on the opposite side of the Loke and do the same thing again. This sign is starting to peel and it is done at a different time and by a different hand with poor quality letter placement so it would be good to get this sign repaired too and both become a matched pair.

    Wall and Sign Repaired

    Old-loke-sign-Left

  • Rain Water Filter Module Upgraded With Stainless Steel Mesh

    We postponed the insertion of the PU foam board into the Great Room walls, because the freezing temperatures that has just arrived with the icy northerly weather, would not allow the gun foam to properly expand and cure in the correct way. So, Tuesday, we switched over to doing another task that has been waiting for months for us to complete. This is the upgrade and repair of our rain water filtration module, specifically, the main large mesh filter that provide the final sieving and removal of larger bits from off the rooves, like moss and leaves. Originally, we used a geotextile cloth like material to provide this filter barrier but we found, unfortunately, the fluffy texture of the cloth made it a good environment for bacteria and fungi to grow, which in turn blocked the last six inches of the filter and we had virtually a permanent pool of water sitting in our filtration module and in turn, in our 100mm pipes that runs right around the whole house.
    Last year, we bought some fine mesh stainless steel woven mesh which a 2mm size holes so it will still do the job of stopping the moss and leaves from getting into our underground rain water tanks but the larger and much simpler mesh design would stop any bacteria and fungi from growing.

    Rain Water Filter Module Upgraded With Stainless Steel Mesh

    New-mesh-for-rainwater-filter


    (here is our roll of the mesh)
    But first, we had to drain the filtration module using our built-in little pump which took well over an hour to pull out nearly seven hundred litres of water, pull out the old filter, cut off the old cloth and then give it a thorough scrub in strong detergent to remove the slimy yukky mess.
    We discovered that the resin we had coated the mild steel bars with, is showing signs of being chipped and this could be letting in water to oxidise the metal, i.e. rust. We may have to go all stainless steel in a future replacement but for now, we dried it all off and smeared copious amount of grey PU sealant when we put on the stainless steel mesh.
    The mesh was cut down to size, 380mm wide by 1100mm long, trimmed around the handle and the extra sticking out tongue piece at the bottom. We then cut several lengths of wooden 2by1 battens, put on parcel sticky tape, wound around a thick wire and cover that up as well with Sellotape (so the PU sealant doesn’t stick to the wood nor wire) and clamped around the edges of the framework to press the engulfed mesh into the PU sealant. The wire is there to try to ensure that we had a little extra amount of sealant above the mesh to provide extra bulk to encapsulate the mesh for long-term strength and stability.
    Rain Water Filter Module Upgraded With Stainless Steel Mesh

    Clamping-batten


    On the following day, we discovered that the grey PU sealant was taking a long time to set, we surmise that this was being caused by the lack of water vapour reaching the sealant to aid in the chemical reactions to set it. So we rigged up a “tent” over the filter and directed our fan heater to blow in warmer air to raise the temperature to speed up that chemical reaction. We had to wait another day and then carefully peal of our battens off. The sealant was just about set but still sticky to the touch so yet another day was required. This is ok as we got on with doing the insulation filling task in the house (the outdoor temperature has warmed up enough to allow us to carry on using the foam gun) and also we performed a test of several different kinds of glues to examine which will work best on naked rubber. We used Stixall, neutral silicone and PU sealant by smearing it hard into the rubber surface.
    Rain Water Filter Module Upgraded With Stainless Steel Mesh

    Rubber-gluing-test


    The conclusions were that the stixall and neutral cure silicone worked very well but the PU one literally rolled off with no difficulties at all.
    After several more days of neglecting this task, we finally got bac to finishing off by sticking down a line of glazing rubber strips on the underside of the metal bar. These original rubber strips were left-overs from doing the Skylight and they are 50mm wide but we only wanted half that width so we sliced them down the middle. We then used a Stixall glue (we had several tubes of that left) to glue down the rubber strips onto the metal bar and waited another day again.

    We finally installed the repaired and upgraded filter back into the rain water filtration module and we will wait and see how well it performs over the next year or so.

    Rain Water Filter Module Upgraded With Stainless Steel Mesh

    Mesh-glued-to-filter-frame

    Rain Water Filter Module Upgraded With Stainless Steel Mesh

    Rubber-seal-on-filter

    Rain Water Filter Module Upgraded With Stainless Steel Mesh

    Filter-installed


  • Patched Hole in Corridor’s Roof, Caused by a Firework!

    Today, we discovered a leak in our corridor in our temporary living quarters while it was raining outside! Upon closer inspection, there was a hole right through the outer layer of the clear corrugated plastic sheet, and we found a little spent firework payload, only measuring about 12mm by 18mm!
    Our neighbour, yesterday, decided to celebrate Guy Fawkes Night really early this year and was letting off some fireworks which included these mortar shells that pumped sparkling displays up into the air. One of those empty payload capsules must have went straight up and came down hard on our roof.

    Patched Hole in Corridor's Roof, Caused by a Firework!

    Hole-in-the-roof


    But to be fair, our corrugated plastic roof is getting rather old and it is becoming more and more brittle as the years roll by. But, it was still amazing that such a little thing could punch clean through the first layer of our roof, and bounced off the second layer inside, we now have a permanent souvenir visible until such a time in the future when we dismantle our temporary living quarters!
    So the solution was to thoroughly clean the surface, with sand paper and chemicals, and lay down aluminium tapes to try and make a waterproof patch. We will see !

    We will have to keep an eye on this roof and hopefully, it will survive for another couple of years.

  • Sun Shield Over Corridor Removed and Two Fence Panels repaired After Storm

    Today, Sunday, under a very grey sky, we got up on to the roof of our temporary living quarters and rolled up our Sun Shield tarpaulin covering over our long corridor and put it away for this year.
    We did a quick inspection of the rest of the roof, including the garage roof, to make sure that it is looking good and solid.
    Plus also, we put in fresh batteries into our weather station transmitter as it was reporting a low battery indication.
    After that, we went over to our temporary wooden fence along the Loke to repair two panels that had been blown down by the storm we had a couple of days ago. The rain gauge reported a total of 50mm of water fallen out of the sky! Fortunately, it was not all concentrated in one sharp downpour but spread right across the whole day. Phew!
    Anyway, we screwed some pieces of 2 by 1 battens (recycling so old pieces used for the dunking tank) to reinforce the broken vertical edges of the panels and slid them back in between their posts. This time, we also screwed the panels to the posts to stop them falling out of their brackets.

    Sun Shield Over Corridor Removed and Two Fence Panels repaired After Storm

    Repaired-Loke-fence


    That concludes the 2 hours of Sunday chores!

  • Replaced Caterpillar Tracks on mini Digger

    We discovered a couple of days ago, at the weekend, that one of the caterpillar tracks had split and ripped half way across. We can see rusty steel wires sticking out of the rubber material.

    Replaced Caterpillar Tracks on mini Digger

    The-tear-in-the-old-track


    The mini digger has been idle for several years and we think the whole machine has been slowly sinking into the sandy dirty soil every time we had heavy rain showers. This probably meant that the tracks had been “under water” for longer periods of time and there must have been a initial split in the rubber material to allow the water access to the tensile steel wires that runs around the circumference of the track and converted the high carbon steel into iron oxide!
    So we ordered a pair of new rubber belts online and they came yesterday (Tuesday), amazing considering that we only placed the order at the beginning of the week!! Wow!
    All very clean, very black and smelling of strong rubber.
    Replaced Caterpillar Tracks on mini Digger

    The-new-tracks


    After we had completed putting up the Larch cladding on the “I” section of the house, in the late afternoon of Tuesday, we came over with our pressure washer and jet blasted all the lower portion of the digger to remove as much as possible the sand and dirt in and around the caterpillar tracks and cog wheels. We also gave the cabin a quick blast to see if the dirt and green algae would come off and it does seem so. We were wondering whether to give it a fresh coat of paint!
    Replaced Caterpillar Tracks on mini Digger

    A-very-dirty-digger-1

    Replaced Caterpillar Tracks on mini Digger

    A-very-dirty-digger-2


    So on Wednesday, the big day, of taking off the old tracks and sliding on the new ones! These belts are very very heavy! There are 76 rubber coated heavy steel metal bars (one inch diameter with heavy flanges sticking up to ensure positive engagement with the drive cog wheel), spaced apart by 52.5mm, the track being 300mm wide and the tread depth of 20mm deep. We estimated that the weight of one of these track is about 100kg each!!

    The first job was to push the whole digger over to lift one track entirely off the ground and then open up the cover to access the static hydraulic ram that lies inside the structure that holds the caterpillar track. There is one screwed in plug that has a grease nipple point in the middle. We undid the plug to allow the grease to escape when we thump the end of the track in. we used a sledge hammer to knock the ram backwards, this in turn ejects a small blob of grease.

    Replaced Caterpillar Tracks on mini Digger

    Grease-comes-out-like-a-pile-of-


    The distance between the two internal “cog” wheels at each end, is shortened by about 25mm and that is enough for the rubber track to slip off (with a bit of an assistance by lowering the digger down to flatten the track and extend its length), to disengage off the front wheel (the non-drive non-sprocket wheel) and we could then drag the old track away.
    After inspecting the various parts, most especially the main front wheel and three smaller solid metal wheels, to make sure that they weren’t loose and still easy to move, which they were very nicely smooth and tight.

    Next, is to drag into place the new tracks and sort of hook it on the back cog wheel and lay the rubber track out alongside the digger and lowering down the digger again, to extend the length just enough to squeeze it over the front wheel using a crow bar. Then the hard work starts .. by pumping grease back into the static hydraulic ram to push the front wheel back out to its fully extended position to tighten the track up. The instructions says that the droop in the track underneath the middle small cog wheel should be about 2cm so it is not too tight and not too loose.
    Our grease gun is a manually operated device, using a pumping handle and it was awkward in trying to get the gun’s outlet to engage to the nipple on the digger and put  thousands of PSI pressure to force the ram outwards and tighten the track.

    Replaced Caterpillar Tracks on mini Digger

    All-new-and-shiny-1

    Replaced Caterpillar Tracks on mini Digger

    All-new-and-shiny-2


    We repeated the whole exercise for the other track and just before lunch time, we got both changed over and we now have a fully working mini-digger again.

    The final job after lunch was to make sure that all the joints all over the digger was fully charged with grease. The log book was updated with today’s work and the last entry was back in 2016!! The old tracks were folded in half and carted around to the back behind the temporary living quarters for storage and we will decide to what to do with them later on. We even may use them as a raised flower beds!!

  • Garden Shed Finally Gets its Roof Repaired!

    On Thursday, we had noticed that the old roofing felt on the Garden Shed was loose and flapping about and this prompted us to decide that we ought to finish the job we started 6 months ago when we recovered all our temporary building roofs with brand new felt last year (the original felt was installed in 2012!).
    So we spend the morning and a couple of hours after lunch in laying on five new full sized strips and two narrow strips, all glued with bitumen horrible sticky stuff!!
    We also straightened up the guttering by jamming in a couple pieces of wood so the rain water will flow along the gutters instead of tipping out the side.

    Garden Shed Finally Gets its Roof Repaired!

    Refelted-shed-roof


    This will probably be the last time we deal with the roof as the life time of the felt is five years and we hope to have the house all finished by then!! Cross Fingers!!

  • New Roof Covering on Store Room and Living Quarters!

    The start of the week saw the roofs of both our Store Room and our Living Quarters get new coverings. The picture below is the image of it all before hand ..

    Store-room-old-felt

    Store-room-old-felt

    Temporary-Living-old-felt

    Temporary-Living-old-felt

    Garden-shed-old-felt

    Garden-shed-old-felt


    On Monday, we got on with the Store Room, putting on five new strips of the standard cheap roofing felt, using the black bitumen glue and some nails around the edges. We released the transparent corrugated plastic sheets so we could slide in a new strip of the felt and then refitted the foam and screws.
    Store-room-new-felt

    Store-room-new-felt


    Then on Wednesday, on the next dry day, we then put on four and half strips of the roofing felt on the Living Quarters, making sure we overlapped the old original joints of the old felt with plenty of bitumen glue plus plenty of nails too around the edges and along one of the joints near the ridge line that does feel the force of the prevailing wind coming from the south west.
    Temporary-Living-new-felt

    Temporary-Living-new-felt


    We ran out of the bitumen glue so we are awaiting for more to come before we can finish this task of protecting our temporary structures, the last one being our garden shed, sometime next week.

  • The Roof Felt Getting Old and Brittle plus Rolled up the Sun Shield

    On Wednesday, we performed a quick and dirty fix to our roof over our temporary living quarters and rolled up our Sun shield tarpaulin covering over our corridor.
    We suddenly sprang lots of leaks on Tuesday morning during some heavy weather and discovered on the following day that the strips of the roofing felt had shrunk enough to pull apart at the overlapping joints. So we applied a quick fix by inserting a long narrow strip of rubber in between the two layers of the felt and that would hopefully stops most of the water from entering our home.

    We then rolled up the Sun Shield tarpaulin off the corrugated plastic roof and put that away, plus also completely removed the mid-section support arm and their concrete blocks (all stored on our main garage roof for the time being), so it is ready for the whole roof to be recovered in a brand new layer of roofing felt when the weather is dryer and less windy. We also inspected the roof over our store room and the garden shed and decided that both needed recovering too.
    Therefore we ordered 13 more rolls of felt plus a tin of glue and roofing nails and we will grab any portion of any day that is dry, to put on as many strips of new felt each time. we are unlikely to get a whole day or so of dry warm and calm weather so we have to take this approach to grab each moment as it present itself.

  • Sun Shield Installed and very Minor roof repairs done on Living Quarters

    Today, in the afternoon, we installed the Sun Shield tarpaulin up over the long corridor in our temporary living quarters . It seems to be very early this year, but we were suffering in the collected heat of the sun pouring into our corridor!

    But the first job was to repair the Sun Shield tarpaulin because the stitching we did last year had torn apart. Well actually, the thread had frayed and came apart due to excess loading when we had high winds.

    So this time, we decided to try to glue the two pieces of the tarpaulin (2.5 metres wide by 5 metres long) using contact glue. We first tested this method on an spare bit of the similar tarpaulin and it seemed to be just fine, in fact, very strong indeed! Of course, we don’t know whether the glue joint will survive in the sunshine but we will give it a try.

    So we proceeded to glue the two sections together (with a 150mm – 6inch – overlap) on top of our garage, on its flat roof where we had plenty of room, plus also we didn’t have to disconnect the tarpaulin from the first anchorage point.

    But we discovered that when we pulled out the new combined piece, it wouldn’t reach the far end! Of course not, we nicked 6inches didn’t we! But fortunately, we had wrapped some excess amount of the material around the fixing batten so we undid the first anchorage point after all, unwrapped it one half turn to give us the extra back again and redid everything back.

    We now have a Sun Shield and aaah h.. it is nice and cool! Sigh!

    To finish off being on the roof of our temporary living quarters, we inspected the surface and did some very minor repairs in the felt and also took notice that we will have to do a major roof job soon, perhaps later on in the Summer, and lay some new strips of roofing felt as the current layer is definitely shrinking and pulling itself away from the glue line. It is after all 8 years, or even 10 years since we put on the felt so it has done very well!!

  • Fixed Small Patches of Damage on Store Room Roof

    This morning, under the bright hot sun, we went on the roof of our Store Room to locate the leaks we had yesterday during a day of heavy rain. We found them and applied pieces of flashing tape, by using a hot air gun to dry the roofing felt and also warmed up the flashing tape too and rolled it hard into the surface.

    Fixed Small Patches of Damage on Store Room Roof

    Store-room-roof-patching-Oct-2018-1

    Fixed Small Patches of Damage on Store Room Roof

    Store-room-roof-patching-Oct-2018-2


    We did several more patches on other parts of the roof, one definite hole but several were potentials so they got patched too.
    Now we wait until the next rain storm and see if we have found all the sources of our leaks!