Blog

  • Second Half of Fascia Boards All Glued and Double Screwed

    Today under a very strong Sun, we continued our way around the house, taking down each section of the Fascia, gluing the ends of the rafters and the joints and putting it back up again but this time with both stainless steel screws, wound in and tightened right down.

    We completed the F, G, H, I, J, K, L, M, N, O and the last part of P sections! Hurray! Now we can get on with the next task of mapping out the angles of all the gutter runs, taking into account the prevailing direction of the rain and the collection area on each section of the roof.

  • “P” Section is Completed Together With their Two Downpipe Channels and Began Permanently Gluing All Fascia Boards

    We finished off the “P” section of the Fascia boards where they connected to the temporary Downpipe Channels (which are alongside what will be the conservatory).

    Last-of-the-Fascias-with-downpipe


    After that bit was done, which saw the final conclusion of getting our Fascia Board up, all 77 metres of it on 15 sections of roof, all aligned up and no extra bits needed doing or repairing, we were ready to begin the task, the long task, of permanently fixing and gluing all the Fascia Board into place.
    We started at the conservatory end (on the front part of the “P” section) and began taking down each section of the Fascia, after pre-screwing the second screw first (provide a pilot hole to help us align the boards), gluing all the ends of the rafters and the butt joints with their biscuits and mounting everything back up again! We got as far as and completed section “E” so we managed to get all the front of the house done.

  • Last Three Fascia Sections Done and Three Downpipe Channels Installed

    We carried on with the “N”, “O” and “P” sections of the Fascia boards, getting the last two outside corners up and fitted (on the NO and OP corners) and screwed the Oak pieces into place.

    Last Three Fascia Sections Done and Three Downpipe Channels Installed

    N-Fascia-Installed

    Last Three Fascia Sections Done and Three Downpipe Channels Installed

    OP-Fascias-Installed


    After lunch, we tackled the three Downpipe Channels, for IJ, LM and MN inner corners, each taking an hour or so to complete. It was very hot work under the blazing sun, and the wind wasn’t really cooling at all, even though it was strong!
    Last Three Fascia Sections Done and Three Downpipe Channels Installed

    IJ-Downpipe-installed

    Last Three Fascia Sections Done and Three Downpipe Channels Installed

    LM-Downpipe-installed

    Last Three Fascia Sections Done and Three Downpipe Channels Installed

    MN-Downpipe-installed


    Tomorrow, we will do the last two Downpipe Channels (the temporary ones) for the conservatory where it would join to the “P” section (in the middle of it) and conclude all the Fascia right around the whole house.

    Finally here’s a Time Lapse of yesterdays work.

  • Six and Half Section of Fascia Boards Completed

    Under some glorious sun, we continued with the mounting up of the Fascia Boards. We resumed on the “H” section, then around an outside corner which had it 45° bit put on, done the “I” towards a downpipe inner corner, together with the neighbouring “J” section. This joined up to the “K” long section (on the back of the building) via another 45° corner. Then a duplicated corner, again an outside 45° angled piece, to connect to the “L” section heading back into an inner downpipe corner. And the “M” Fascia was mounted up which has a double ended internal downpipe at both ends. Finally, the “N” Fascia board is loosely held up and we will finish that tomorrow, along with the “O” and “P” and that’s it!

    Six and Half Section of Fascia Boards Completed

    Facia-H-Installed

    Six and Half Section of Fascia Boards Completed

    Facia-I-Installed

    Six and Half Section of Fascia Boards Completed

    Facias-JK-Installed


    Six and Half Section of Fascia Boards Completed

    Facia-L-Installed

    Six and Half Section of Fascia Boards Completed

    Facia-M-Installed


    We didn’t stop this time to do the Downpipe Channels as we wanted to concentrate on getting as many of the Fascia boards fitted up as possible. We will have five of them to do so probably will take the whole day.

  • Downpipe Channels Installed and Side Porch Fascia Mounted

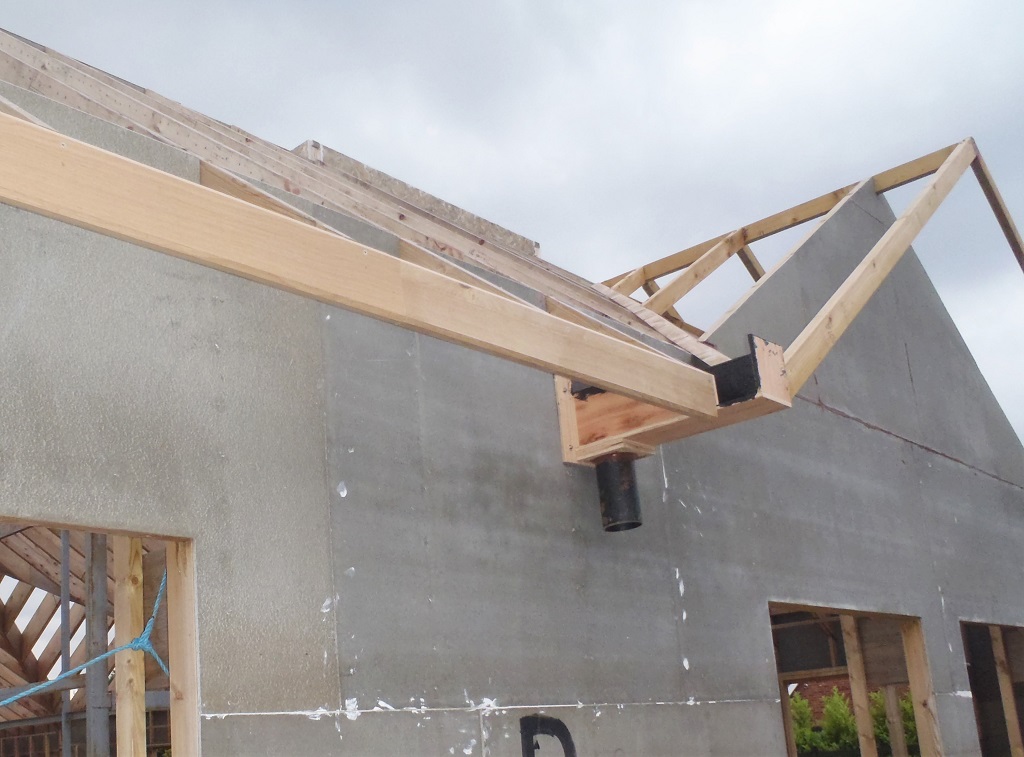
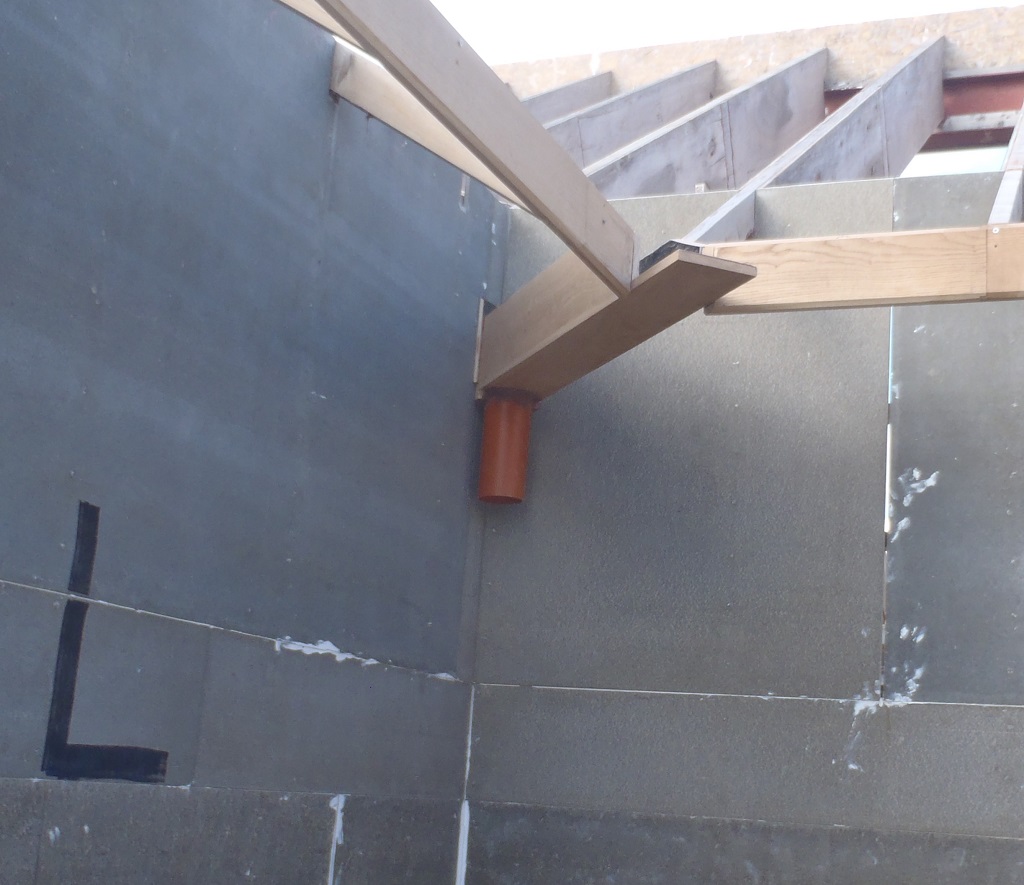
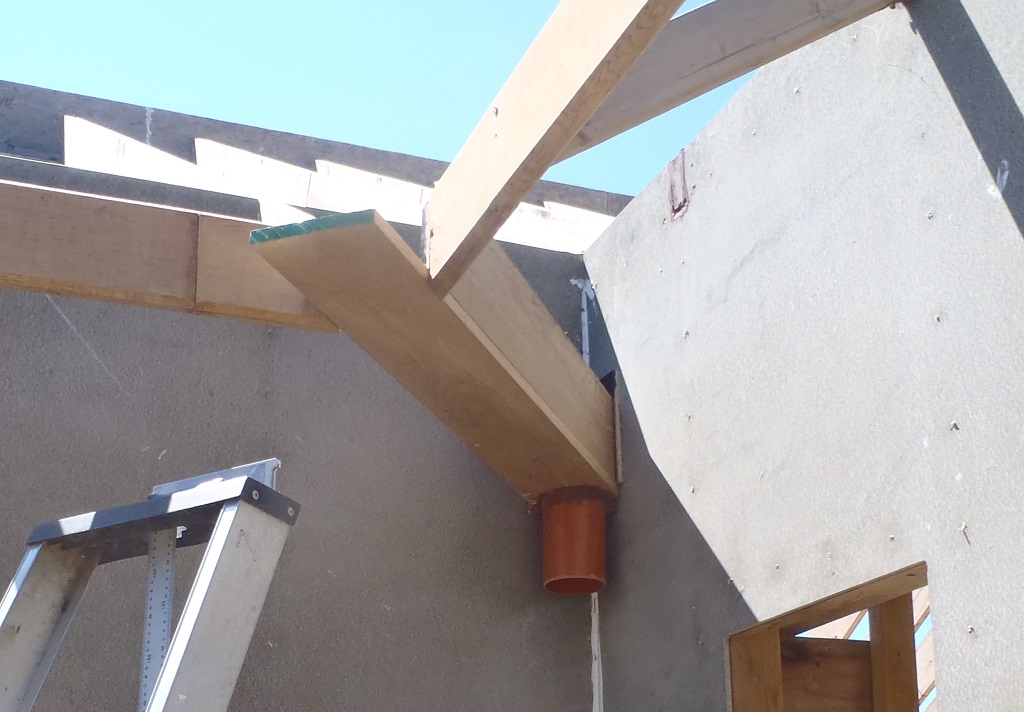
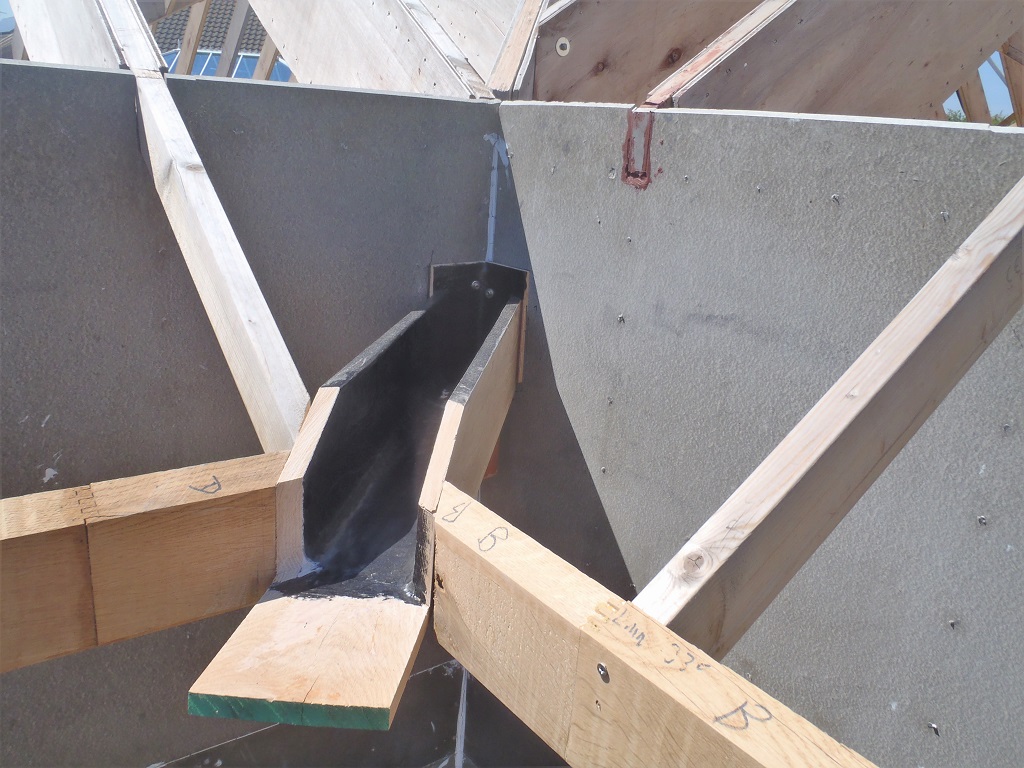
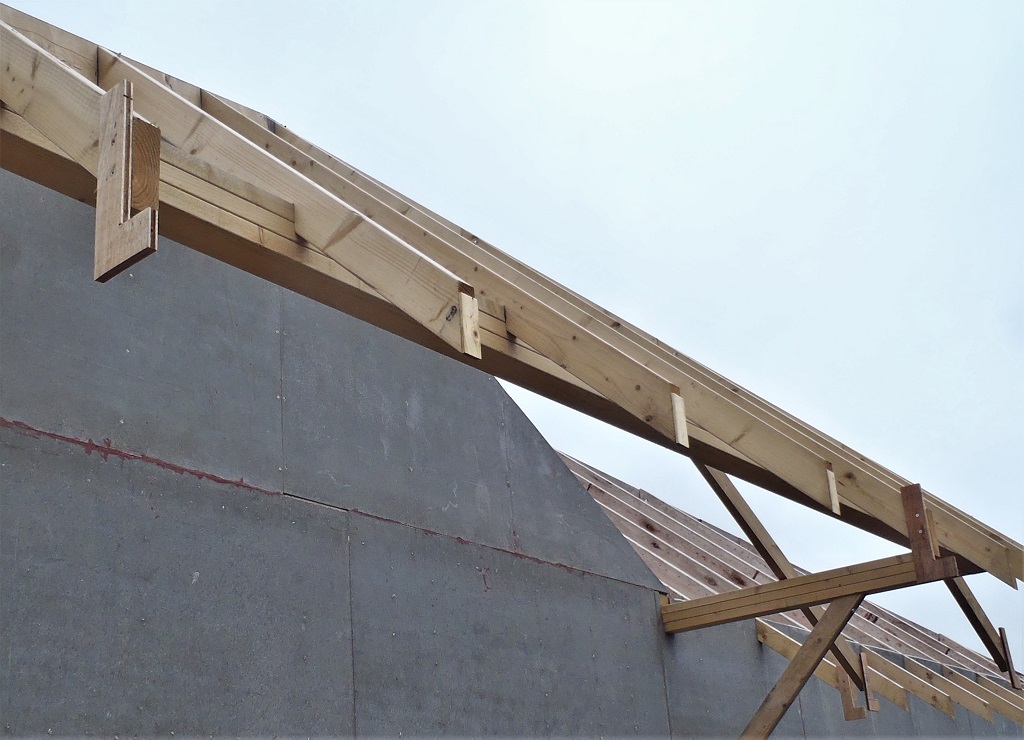
    Yesterday we tackled the job of installing one of our Downpipe Channels for the first time, now that we have up enough Fascia board. The “AB” corner was our designated target. After careful positioning of the channel module, from below and then from above, and double checking gaps between pencil marks etc., we then proceeded to hand saw the end of the rafter and the Fascia timber itself, at the required 45degree angle and ended up with a gap of 160mm wide. The Down Downpipe Channel fitted nice and neat – thank goodness!

    Downpipe Channels Installed and Side Porch Fascia Mounted

    AB-Downpipe-in-place-1

    Downpipe Channels Installed and Side Porch Fascia Mounted

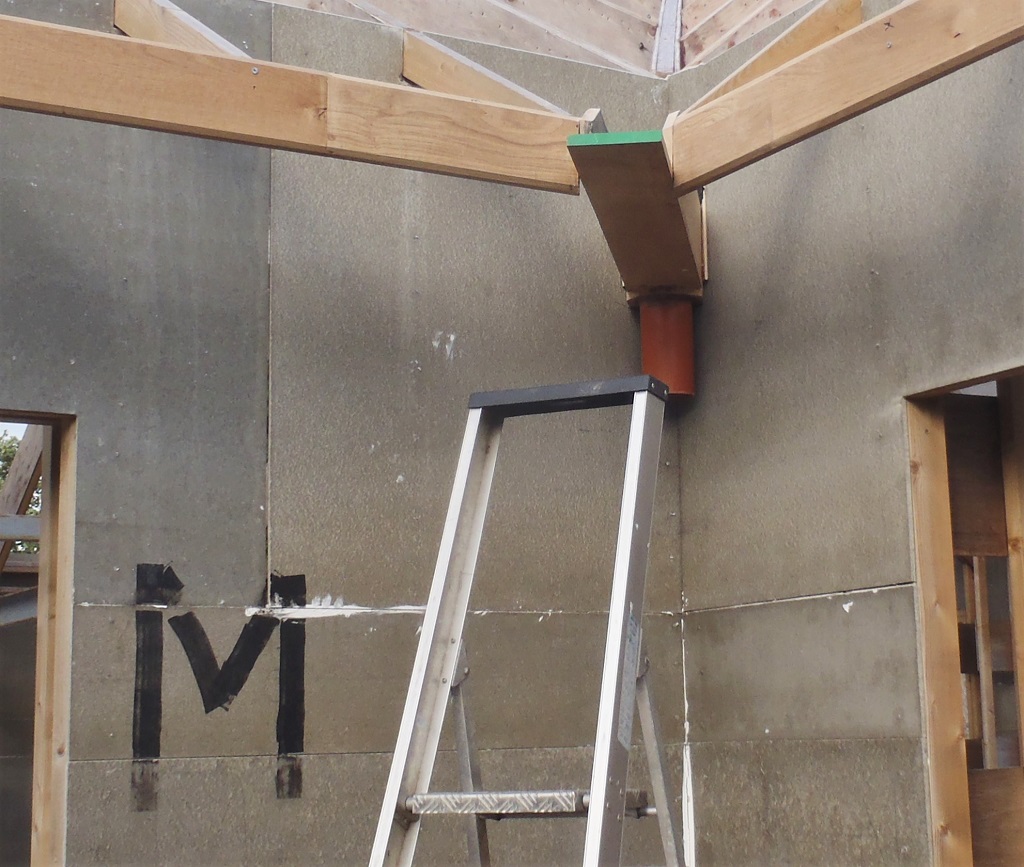
    AB-Downpipe-in-place-2


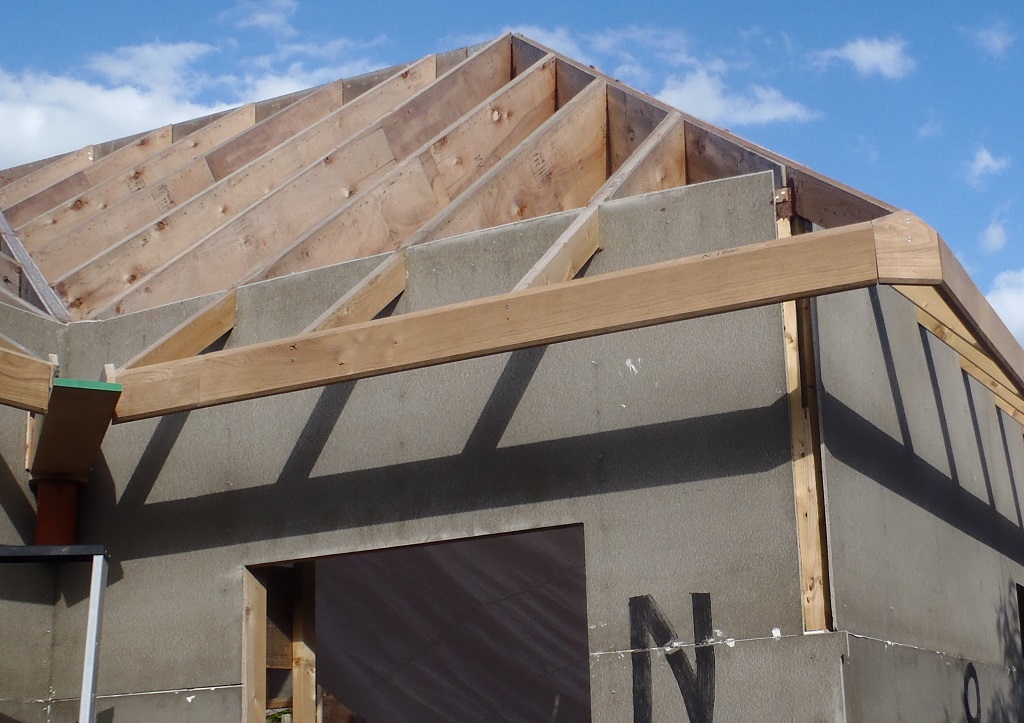
    We then screwed the back of it, to secure it onto the wall and with that extra support, we could then sawed the excess material off the vertical walls of the channel as they were protruding above the slope of the roof.

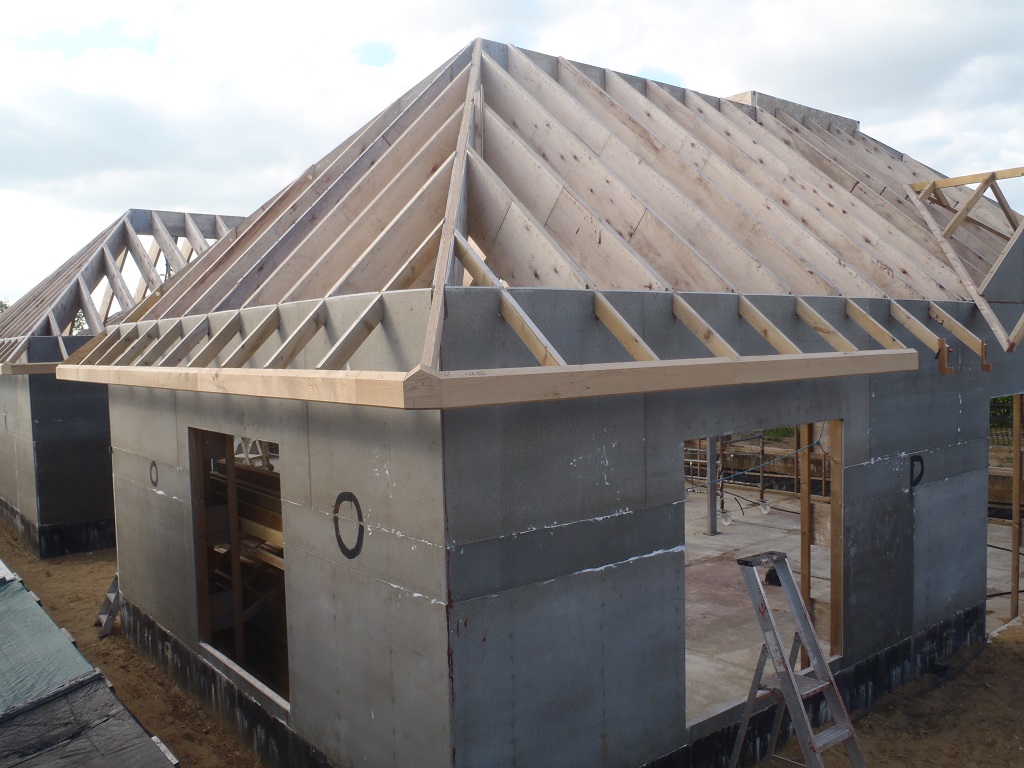
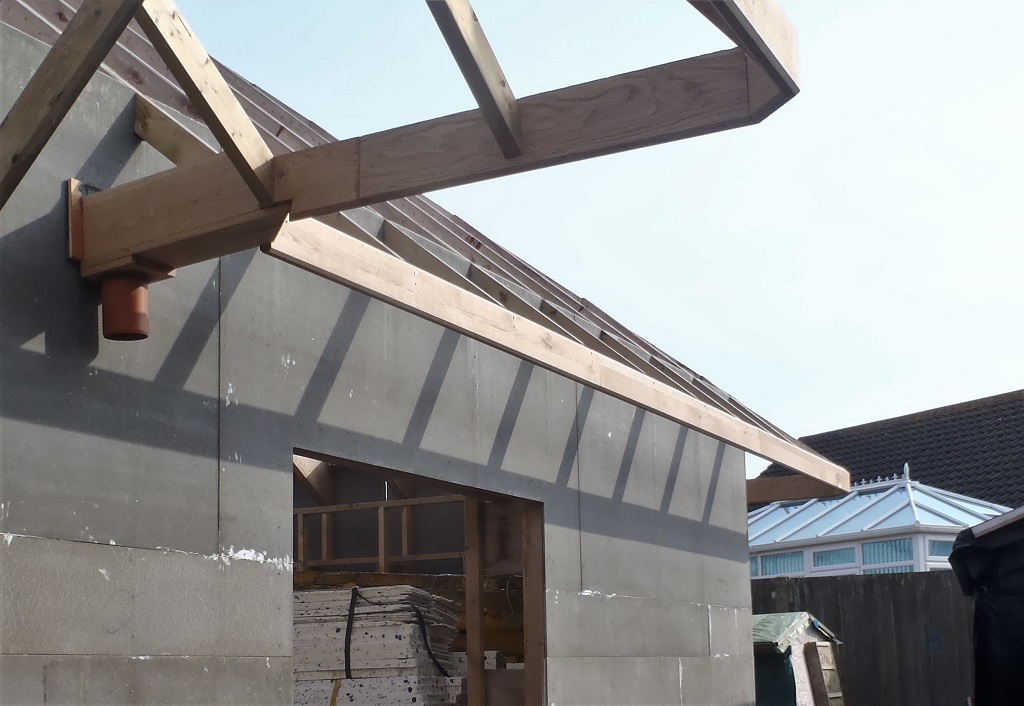
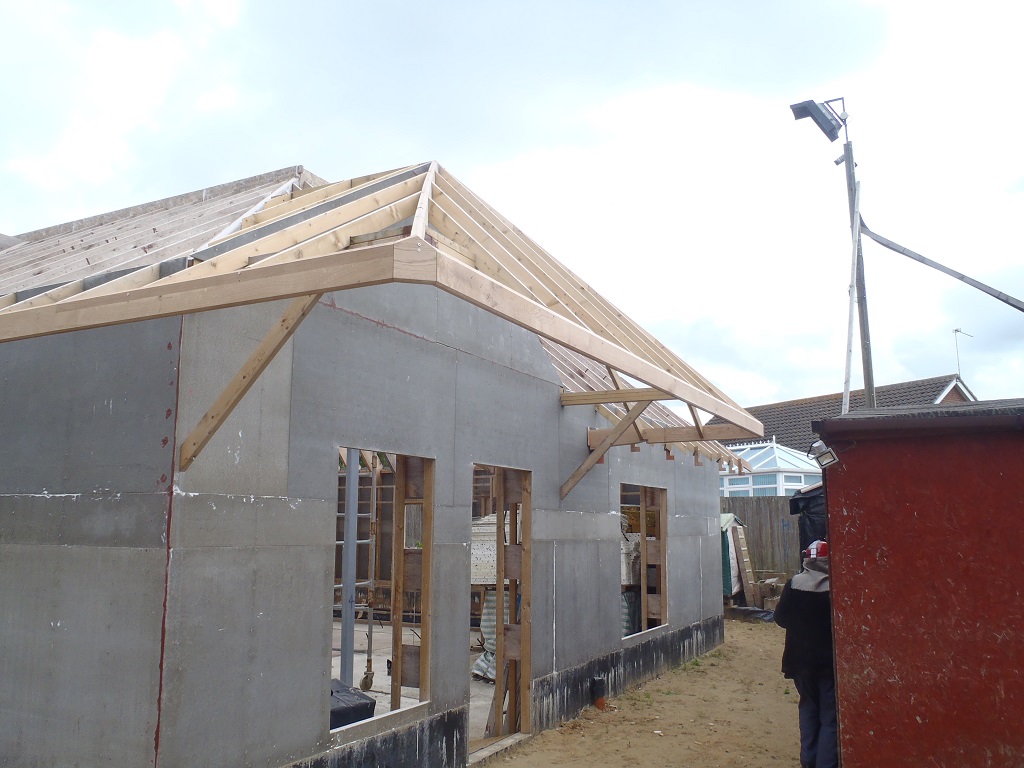
    Then we mounted up the “E” section of the Fascia boards, as usual, starting at the outside corner (part of the Side Door Porch) and positioning and screwing up the two and half pieces to form the “E” section.
    Today, first of all, we cut joined several pieces together in the “F” section by the usual tongue and groove joint, all glued up and drying, while we went outside to do the next Downpipe Channel module, this time for the “DE” corner (the other side of the Front Door Porch) and got that fitted in with a similar method as for the previous module.

    Then we carried on with the “F” portion of the roof (the Side Door Porch), now that the glue was set and cleaned up, and around the right end, this being the “G” bit of the Fascia. These two sections were drilled and screwed into place, including the two outside 45degree corners too.
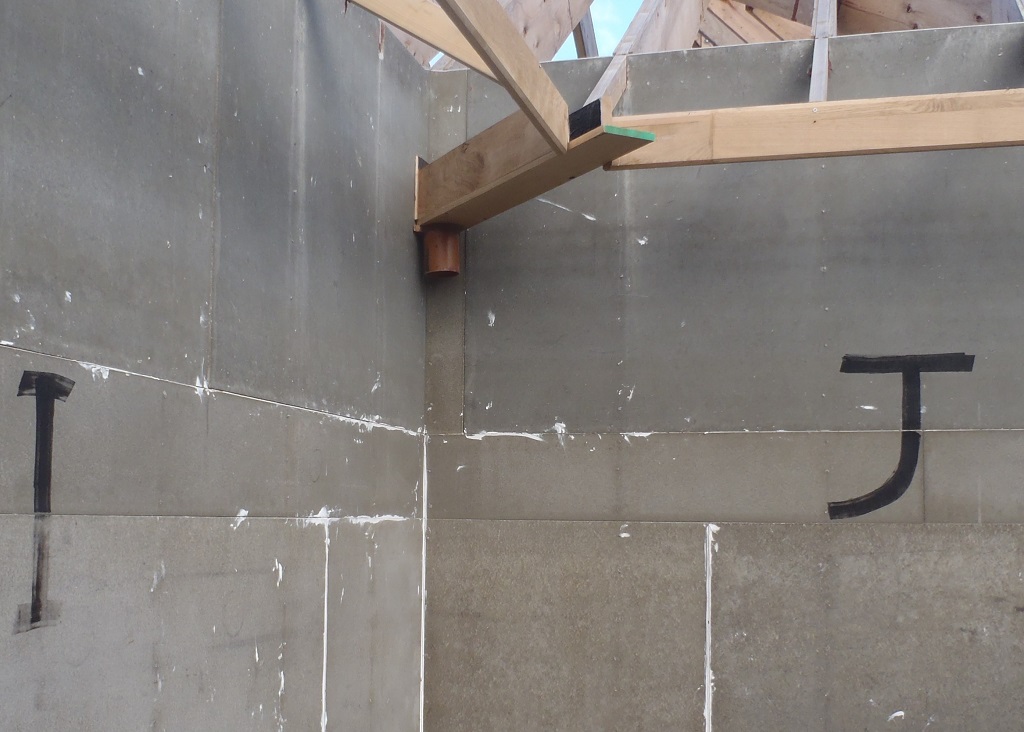
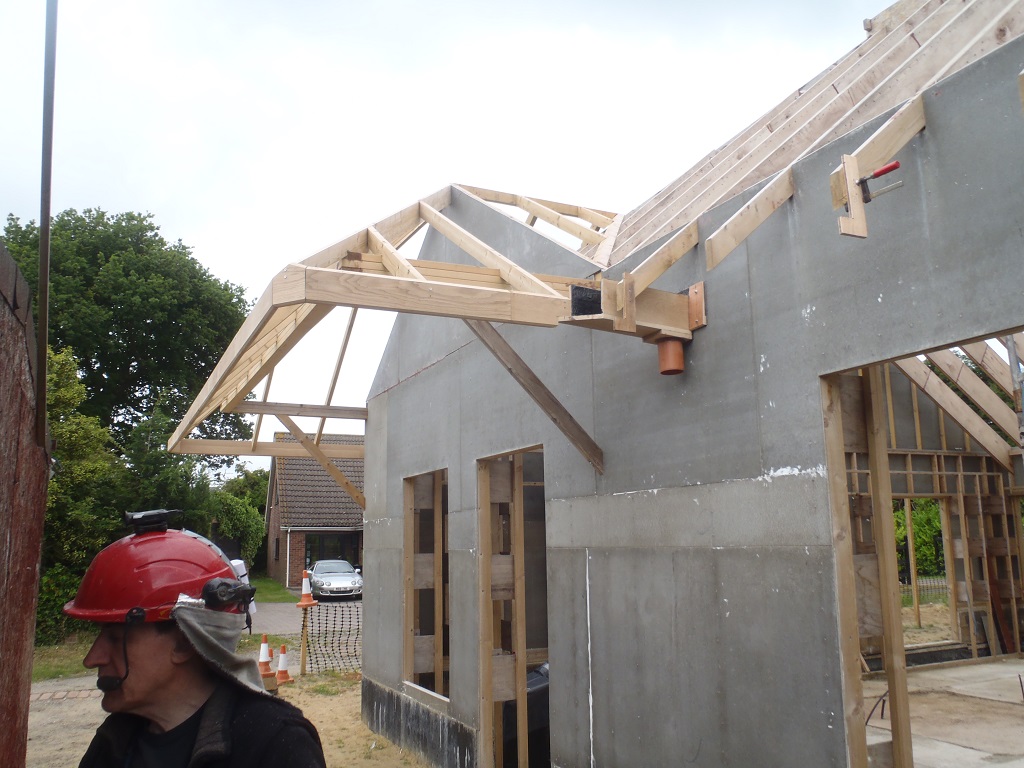
    The last job of the day was to fit the next Downpipe Channel, which is a straight one coming along from the “G” section. It was a complicated joint to fit the module again against the Fascia board but also making sure it had the required slope and clearance for the downpipe connections as well.

    Downpipe Channels Installed and Side Porch Fascia Mounted

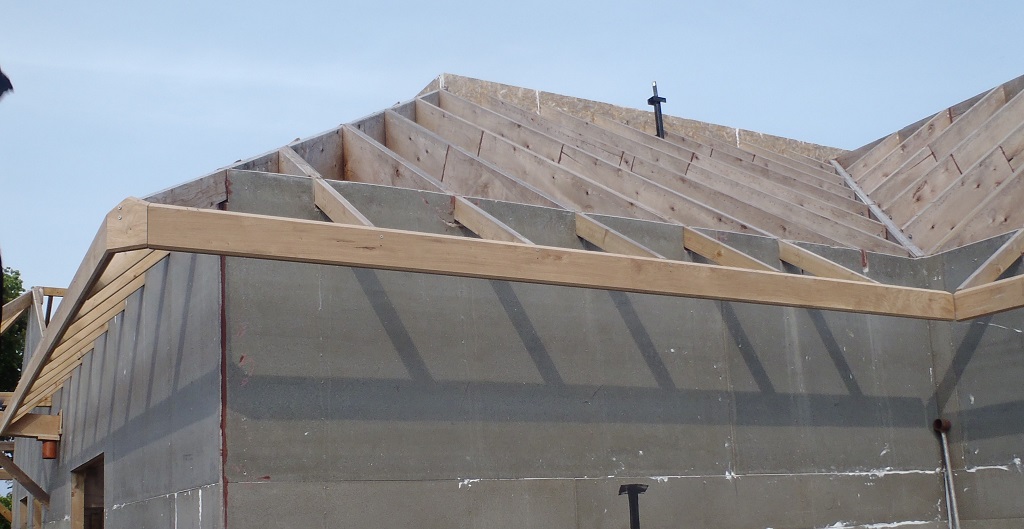
    Side-porch-facias-and-downpipe-installed-1

    Downpipe Channels Installed and Side Porch Fascia Mounted

    Side-porch-facias-and-downpipe-installed-2


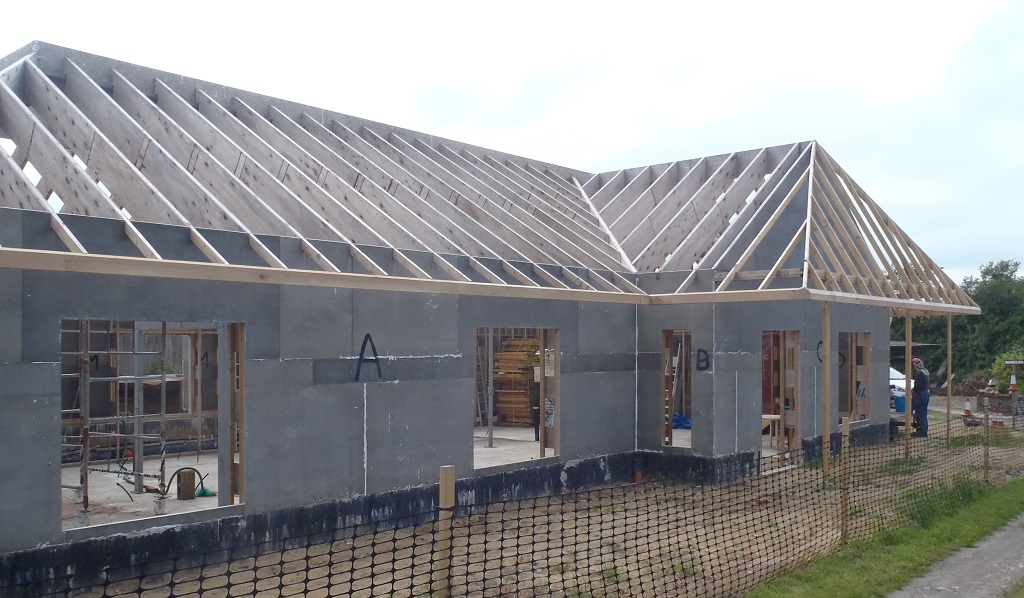
    Tomorrow, we will continue the circuit of the house with the “H” section to do next and then “I” and so on.

  • Fascia Boards Progresses Around the House

    Yesterday and today, we carried on processing the Fascia boards, sorting out the pile of Oak pieces, taking off the bad ends, adjusting lengths for outside corners, slicing bevel ends, cutting biscuits joints and sanding down rough patches. We got sorted enough pieces so we could tongue and groove several lengths ready for the “C” section of the roof as well for the “N” section too.
    So after lunch today, we took out the pieces for us to mount up the Fascia board for “B”, “C” (along the Front Porch) and “D” (the two sides of the porch). We started on the two outside corners first, getting the little 45degree angled block positioned into place connected up to the two long sides, which allowed us to chop off the complicated angled slopes coming off the Fascia boards. Then eventually getting the whole “C” section up and screwed into place.

    Fascia Boards Progresses Around the House

    Facia-for-BCD-fitted-1

    Fascia Boards Progresses Around the House

    Facia-for-BCD-fitted-2


    We are making quite good progress and we have almost finished sorting and processing the Oak Fascia pieces and the remaining job of mounting the Fascia will go quicker. On Monday, we will try and put up one of our Downpipe Channels to see how that will go in and what adjustments to our technique we may have to do. We Will See!!

  • Fascia Boards For 32degree Roof Sections Processed

    Yesterday and today, we continued with the processing of the set of Fascia Boards that has the 32degree slope on them, and sorted them out to form sets for the five sections of roof that are the same angle. These are the “A”, “E” (along the front of the building), “G” (the short sticking out bit on the right hand side of the Side door porch) and finally the “I” and “M” (along the back). The outside corners all have the 22.5degree mitre cuts (all of them except “M” as it is completely an inside job!). and all the intermediate planks have a biscuit joint to help align the faces together. We also had to join pieces together using a multi-finger tongue and groove joint to extend the last board arriving into the inner corners (where the downpipe channels are situated).
    We had the “A” and “P” section of the rafters all ready for mounting up the Fascia boards so we took these two sets out and gave it a test run.

    Fascia Boards For 32degree Roof Sections Processed

    Facia-for-A-initial-install-1

    Fascia Boards For 32degree Roof Sections Processed

    Facia-for-A-initial-install-2


    We started at the outside corner and positioned the first planks from both “A” and “P” plus the 150mm wide 45degree angled piece and joined them together so all was aligned. We then continued along the “A” putting up pieces and all is fine. Because it was looking good, we decided that we could do the next step of using our drilling template and make the clearance holes in these Fascia boards and screw down the top hole only to keep it all secured.
    Tomorrow, we will finish off the last plank on the “A” section and then start work on sorting out the “C” section (Front Porch) and have that ready so we can do these outside corners for both BC and CD, which in turn, will allow us to put up “B” and “D” Fascia plus also the “E” section too! It is coming along! Hurrah!!

  • Widened Area Alongside Outside the Great Room

    For a couple of hours in the morning and late afternoon, using some spare time, we tackled the task of making the area outside the Great Room larger so we can position our scaffolding tower beyond the edge of the roof. The sandy soil was banked up so we just shovelled the lower portion of the slope and spread it out.

    Widened Area Alongside Outside the Great Room

    Outside-Great-room-area-widened


    This will allow us to have our building materials and tools closer to hand when we start building up the roof itself, and by extension, gain access to the Skylight too.
    The final job left to do another day, is to use an 8 foot timber to scrape and make sure this area is levelled and wide enough.

  • Finished Straightening Ends of Rafters and Started Extending Fascia Boards

    This morning, we completed the task of straightening the ends of the rafters on the last sections of roof, namely “E”, “D”, “C” and “B”. that didn’t take too long and now we have all sections having a nice straight runs around the whole roof of the house – lovely stuff!
    Then we got on with the task of extending some of the Fascia boards, ready for the shorter sections, these being two set of “B”, and “D” plus “J” and “L” which are only 2.1metres long approximately. Wes used our router to cut a multiple tongue and groove joint in the ends of the Fascia boards and attached small lengths, about 390mm long pieces. They were glued and now setting overnight.
    Finally, we went outside to move the scaffolding tower from where it has been sitting for a couple of months now and moved it away to sit alongside the large stack of plywood near the Loke. Tomorrow, we will spread more sand from the bank and widen the levelled area going down the side of the Great Room which will allow us to mount the scaffolding further away from the building beyond the eves of the roof and gain better access to the whole roof when we are doing the boards and the slate tiles too. and then in the afternoon, carry on preparing more Fascia boards with biscuit joints for more outside corners.

  • Rafter Ends All Aligned Up

    We used our new piece of equipment today, a niffy little band saw machine we bought yesterday, to make a collection of wooden spacers of variable thickness. We sliced a 100mm long piece of our CLS timber into lots of spacers, some thin (about 1mm thick), some at 3mm thick, some at 6mm thick and a few at 10mm thick.
    Armed with our collection of spacers, battery circular saw, glue and a staple gun, we started working on checking the alignment of the ends of our rafters in each section of the roof. Using a 100mm by 50mm regularised long plank (4.8metres long), that was very straight (we had to reject half a dozen before we found one that was nice and straight within 1mm or so), we placed it up on our wooden fascia support brackets and examined if any rafter was sticking out more than its neighbours. After careful analysis, some of these had a small sliver taken off their ends and some had extra spacers added (using our new collection of course!), stuck down with glue and a couple of staples to hold while the glue set. We also sprayed more timber preservative on these modified ends to reduce problems in the future.

    Rafter Ends All Aligned Up

    Rafter-ends-packed-out-straight


    We proceeded clockwise around the house, starting from the “A” section of the roof, and did “P” (two halves), “O”, “N”, “M”, “L”, “K”, “J”, “I” “H” and “F”. We have only four more sections to go to complete the circuit. It was quite rewarding to have made these adjustments and now we can look forward to putting up our Fascia boards and have them aligned up, be flat and all at the same level too! Lovely!