Blog

  • Sliding Door Frames Installed and Started on Insulation In Roof Rafters

    Among several interruptions during this week’s work, we got on with installing new framework for two sliding doors for our stand-alone Bathroom as well as for Ensuite Two. Both of these rooms are going to have two half sliding doors, built into the body of the walls themselves (pocket), not exposed, mounted on the surface. It will be so much nicer to have our doors disappearing into the fabric of the walls, to keep them clean and much neater too. Our room doorways right across the whole house are going to be a standard 800mm wide, some 32inches wide which is wider than most normal doorways. The Side and Front doors will be 1000m or 39inches wide. Of course, some of this space will be required to hold the finishing oak pretty framing itself plus also some doorways are the more traditional rotating door type designs and this will reduce the gap a little bit. To enable the frame to be installed we had to glue a piece of 18mm OSB to the underside of the steel lintel over the doorways and then install the CLS posts in the right direction and position to hold the doors.

    Sliding Door Frames Installed and Started on Insulation In Roof Rafters

    OSB-glued-to-lintel

    Sliding Door Frames Installed and Started on Insulation In Roof Rafters

    Door-framing-for-bathroom


    Also during the week, we took each opportunity of dry sunny weather to bring in all our remaining random heap of PU foam boards and dumped the whole lot upstairs, so we can get on with installing at least one layer of foam board up into the roof rafters as the weather is getting cooler. We calculated that we have an estimated 170 sheets of various thicknesses from 50mm to 150mm, which each measuring a rough 1.2metres by 1.1metres, will give us a coverage somewhere in the range of 180 square metres. We would be able to cover about two thirds of our roof space with “some” insulating foam board at various thicknesses. Better than nothing at all. But it does mean that we will need to order another duplicate load of seconded PU boards again in the new year to get the required level of insulation in our roof we want, to achieve our super insulated goals.
    Sliding Door Frames Installed and Started on Insulation In Roof Rafters

    The-Remaining-Piles-of-Insulation-1

    Sliding Door Frames Installed and Started on Insulation In Roof Rafters

    The-Remaining-Piles-of-Insulation-2

    Sliding Door Frames Installed and Started on Insulation In Roof Rafters

    All-remaining-insulation-moved-upstairs-1

    Sliding Door Frames Installed and Started on Insulation In Roof Rafters

    All-remaining-insulation-moved-upstairs-2


    So we started on doing the two gable ends of the roof, the one over the Side door and the other over the Front door. We needed to use our 25mm thick boards to build up past the various battens we have on the walls holding the cement panels and the external larch cladding. It was a bit fiddly but it has to be done one day or another.
    Sliding Door Frames Installed and Started on Insulation In Roof Rafters

    First-layer-of-insulation-in-Front-door-gable

    Sliding Door Frames Installed and Started on Insulation In Roof Rafters

    Two-layers-in-the-side-door-gable


    Another job we tackled was to move the entire heap of wooden sheet material off our stack which is living in Bedroom Two, sitting on the concrete floor. It has been there for several years being very useful and accessible for our sheet material but now we need to get on with building Bedroom Two and hence why we did this heavy task! The stacking shelves have been unscrewed and is now in a collapsed heap waiting to be moved out next week!
    Sliding Door Frames Installed and Started on Insulation In Roof Rafters

    Sheet-goods-stored-in-Bedroom-2

    Sliding Door Frames Installed and Started on Insulation In Roof Rafters

    Colapsed-storage-rack


    Next week, we will continue installing more PU insulation boards upstairs in among the rafters but also start looking at building the flooring for Bedroom Two and getting the permanent pipes and conduits installed before laying down the floorboards.

  • Hallway Cavities Insulated and Mains Electric Installed

    The week was spent installing a layer of insulation inside the cavity under the hall’s flooring. We wanted to make sure that we don’t have too much leakage of valuable house energy, especially we will have our main air duct running in this cavity to supply fresh and warm air to all our rooms. So we took all the thin insulation boards that measured 50mm or 60mm thick and sliced them up into various widths to fit between the leg supports. This took a few days as you had to cut each piece to fit around the legs.
    We completed all the four hallway sections and glued them into place with spray PU foam.

    Hallway Cavities Insulated and Mains Electric Installed

    Jigsaw-of-Insulation-laid-in-halls-1

    Hallway Cavities Insulated and Mains Electric Installed

    Jigsaw-of-Insulation-laid-in-halls-2


    The next little job was to install mains electric cables, using twin and earth 2.5mm solid copper wires and ran them from the Tech Cupboard and its new consumer switch unit. We screwed little cable tie saddles on each of the legs and grouped together a bunch that are going off in various directions. We laid in cables to go to the Great Room, the Kitchen, then to Bedroom One, around the corner to Bedroom Two and finally to Bedroom Three. At the end of each cable  we installed a double switched socket (the Great room has already several sockets so we carried the cabling across the room to those, plus also Bedroom Three also had its collection of sockets already installed too) so we could plug in local piece of equipment without having to run our extension reel everywhere. We also sent one cable upstairs through the ceiling of the Tech Cupboard and mounted another double socket on the metal leg to serve the First Floor. The cables were then neatly connected to the appropriate switches in the switch panel.

    Hallway Cavities Insulated and Mains Electric Installed

    Cables-running-off-to-rooms

    Hallway Cavities Insulated and Mains Electric Installed

    Cables-enter-cupboard-and-are-routed-up-the-wall

    Hallway Cavities Insulated and Mains Electric Installed

    Power-to-each-room-neatly-terminated-in-the-switch-panel


    It doesn’t seems that we have done a lot this week, which is true because Shaun is still recovering from his eye operation but hopefully, things will get back to normal soon.

  • Started on Technology cupboard and Electrical panel.

    Stephen wanted a solo project whilst Shaun in resting, so he started on the Tech cupboard.
    First the two walls next to the bathroom and Storage cupboard where boarded with OSB (using up a lot of small pieces to make solo handling easier and using up the accumulated offcuts). Then Fermacell was stapled and glued up on the wall next the storage cupboard. This was enough to start working on the main Electricity switch panel (consumer unit).
    The panel was mounted about 1.2m above the floor and two cable trunks were constructed to manage the cables going down under the floors and up to the first floor. Then the 16mm² supply wires were pushed though the duct to the utility room, they were then connected to the main switch on the panel and the distribution block in the utility.

    All the switches were installed in the panel and all the fixed internal wiring was installed. Labels have been added to RCBO neutrals to help with testing.

    Started on Technology cupboard and Electrical panel.

    Tech-Cupboard-Switch-Panel-closed

    Started on Technology cupboard and Electrical panel.

    Tech-Cupboard-Switch-Panel-open

    Front-panel-circuit-labels

    Front-panel-circuit-labels

    Started on Technology cupboard and Electrical panel.

    RCBO-Neutrals-labeled


    Tech Cupboard Panel circuits

    Kitchen sockets RCD ring Shared RCD
    Hob RCD radial Shared RCD
    Ovens RCD radial Shared RCD
    Great room Sockets RCBO radial
    Conservatory Sockets RCBO radial
    Bed 1 Sockets RCBO radial
    Bed 2 Sockets RCBO radial
    Bed 3 Sockets RCBO radial
    Entertainment Sockets RCBO radial
    Tech cupboard 1 Non RCD radial Computers & backup DC
    Tech cupboard 2 Non RCD radial Primary DC PSUs
    Work 1 Sockets RCBO radial
    Work 2 Sockets RCBO radial
    Work 3 Sockets RCBO radial General use
    Work 3 Special Sockets Non RCD radial For Experimental use

    Tech Panel also has a Surge Protection Device fitted.


  • Hall floor hatches completed

    This week we finished cutting hatches into the hall floors on Monday and Tuesday.

    Hall floor hatches completed

    Hall-1-Hatches

    Hall floor hatches completed

    Front-door-hall-hatches

    Hall floor hatches completed

    Hall-3-Hatches-cut


    Then we needed a way of lifting the panels easily. So we drilled a hole 100mm diagonally in from each corner and inserted a ‘Pronged T Nut’ into each hole from below, then we could use a bolt with a T piece as a lifting handle.
    Hall floor hatches completed

    T-Nut-inserted-from-below

    Hall floor hatches completed

    Hatch-lifting-Handles


    This completes the hall flooring.

  • Floorboards Laid for all Hallways

    For this rather truncated week of work, we resumed the task of laying down the floorboards after a week of building the framework. One of the first things we did was to put in a load of insulation bits and pieces from our giant bag of “rubbish” we got outside into the area under the stairs. We also screwed a left-over piece of floorboard and put it vertically on the back of the 2nd step of our staircase and this will become the base of our control board for the stair-lift mechanism.

    Floorboards Laid for all Hallways

    Under-stairs-with-insulation-strips

    Floorboards Laid for all Hallways

    Under-stairs-filled-with-foam-scraps

    Floorboards Laid for all Hallways

    Panel-for-stairlift-controls


    We then installed more vacuum cleaner piping across the central cross hall with connections for a cleaning point and the Hall 2 side of the Tech cupboard and a T connection going upstairs.
    Floorboards Laid for all Hallways

    Vacuum-ducting-hall-crossways

    Floorboards Laid for all Hallways

    Vacuum-duct-for-hall-crsossway-point

    Floorboards Laid for all Hallways

    Vacuum-duct-going-upstairs


    The other thing we did was to sort out the front door. It was built way back before we had the new flooring so it is too low. We simply just sliced off a chunk of material using our wiggle saw after noticing where the new floorboards will be etc. Then we had to fix down a fresh new door sill (there wasn’t one there before) using another left-over piece of 2by4 pine timber and along with a sheet of 10mm cement board, we screwed and sealed both items down into the concrete blocks underneath. This is only temporary until we are ready to build and install the proper door structure later on, using proper Oak timber.
    Floorboards Laid for all Hallways

    Temporary-front-door-sill


    Then we carried on putting down lots of floorboards, starting where we left off, in both Hall Two and Hall Three (going off to Bedroom Two and Three respectively) and we were very lucky to discover that these two “arms” were right angles to each other so the tongue and groove slotted together very nicely. Going down the side of the Entertainment Room only needed to slice off a very small narrow strip which was also lucky and arrived at the front door. We soon got the crossroad all covered up and then cut around the staircase too. finally, we went down Hall One towards the Great Room, going past Bedroom 1 and the Kitchen. It all went very nicely in the end and to finish off, we made a wide step at the entrance to the Great room to make it easier for anyone stepping off the new hall floor surface (being 400mm- 16inches high) especially if we are carrying large or heavy material in and out of the Great room.
    Floorboards Laid for all Hallways

    Hall-cross-way

    Floorboards Laid for all Hallways

    Front-door-hall-1

    Floorboards Laid for all Hallways

    Front-door-hall-2

    Hall 1 from Great room

    Hall 1 from Great room

    Floorboards Laid for all Hallways

    Step-down-to-Great-room


    We had finished at end of Thursday. Friday was lost to Shaun having a minor eye operation and Stephen resuming doing the Grapevine Talking newspaper after 18 months.
    On Saturday Stephen started slicing the nice solid floor boards up into Ribbons! Well the ribbons are about 1m wide and are cut into rectangles as well. These are the liftable hatches to give access to the utility’s under the hall floors. All the ribbons have been cut and cutting of the hatches has started with Hall 2 and Cross hall hatches being cut.
    Floorboards Laid for all Hallways

    Hall-2-lifting-panels-cut

    Floorboards Laid for all Hallways

    Cross-Hall-lifting-panels-cut


    There will couple of slower days next week because Shaun needs to keep quiet and recover from his Op.

  • Finished Framework for Hallway Flooring

    This week (apart from one day on Friday lost due to other commitments) was spent constructing the complicated framework for supporting the remaining Hallways, going up to the Great room, the crossroads and the bigger section under the stairs and up to the Front door.
    One of the tasks we had to do first before all that was done was to dismantle our large 8foot ramp that have been serving a very useful unction when we needed to bring in a trolley load of 8foot by 4foot sheet material or a pile of floorboards. It has been there for a few years and now it is gone, the pieces recycled for other jobs around the house.
    The assembly of the framework was a slow process of setting the main outer rails down a section, supporting it with clamps while then progressing bit by bit using our green laser line generator to mark where each leg needed to be sliced so it can fit under the rail just about right, to avoid lifting it up or being too short and missing the concrete floor entirely, which meant repeatedly going back to our chop saw and nipping off very thin slices. We even took to grinding the concrete floor itself to help settle these legs in place. There are dozens and dozens of these blessed .. I mean lovely legs, doing a vital job of holding up the flooring for all our hallways.
    One of the section that we thought didn’t need liftable panels was the route up to the Front door area but we realised that we couldn’t achieve that goal because we don’t have any pipes or air ducts ready to be permanently installed so we had to create a narrower lifting up section to allow us to install the necessary utility pipes etc, up to the front door, to serve the Entertainment room, the Front door itself and the stair lift mechanism too.
    We completed the framework under the stairs which will holds various storage segments, some will pull out on wheels and a larger section for walking in. We had to put down temporary framework around the bottom of the staircase where the stair-lift mechanism will reside but again, we didn’t have any of the pieces that will make up the platform module or the pulling chain and cog wheels. We will have to come back to this area and unscrew the floorboards later on.
    There was one sticking up conduit, coming out of the concrete, it is one of our temperature probes for monitoring the soil temperature between our energy modules buried underground, so we connected additional 20mm plastic conduit and routed it around to where the main gathering of the access point to this large Energy module situated under the Kitchen and Bedroom One.

    Finished Framework for Hallway Flooring

    Hall-floor-framing-1

    Finished Framework for Hallway Flooring

    Hall-floor-framing-2

    Finished Framework for Hallway Flooring

    Hall-floor-framing-3

    Finished Framework for Hallway Flooring

    Hall-floor-framing-4

    Finished Framework for Hallway Flooring

    Hall-floor-framing-5


    One of the consequences of putting down the framework, right up to the Front door area, is that we cannot open the temporary front door! It is too tall, or rather too deep. We will have to slice off a small piece off the bottom of the door before we can open it again!
    That will be one of next week’s tasks, as well as filling in some of the area with insulation and then proceed to cover all this lovely framework with floorboards. Hurray!

  • Worktop Plus Sink Installed and Started on Flooring for Hallways

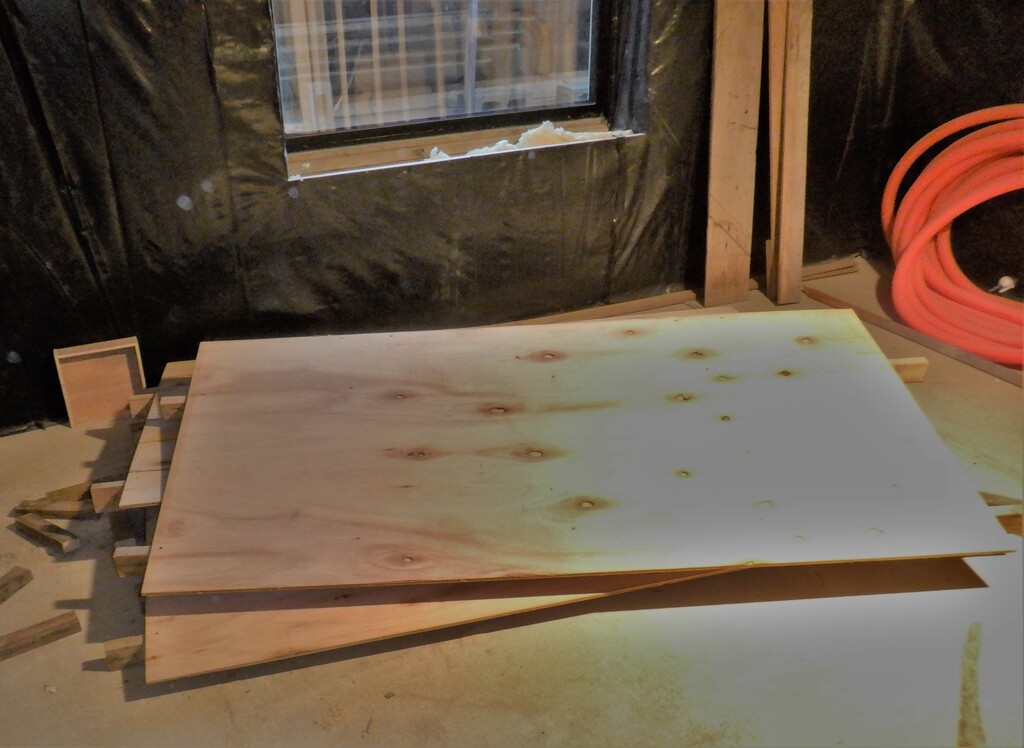
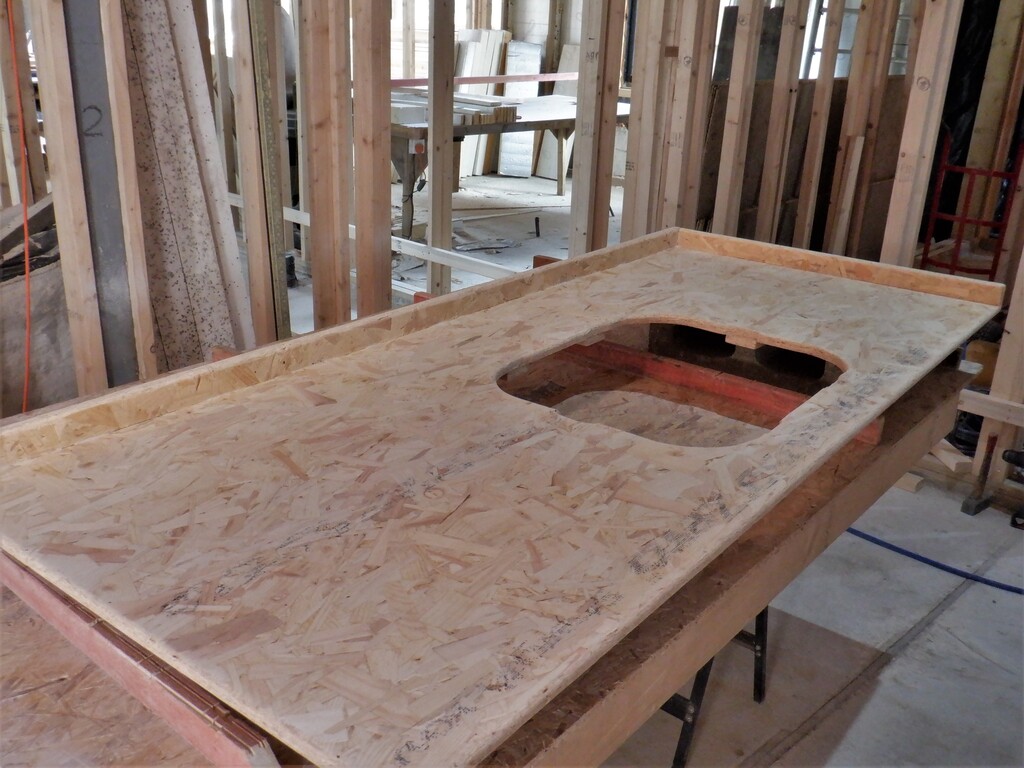
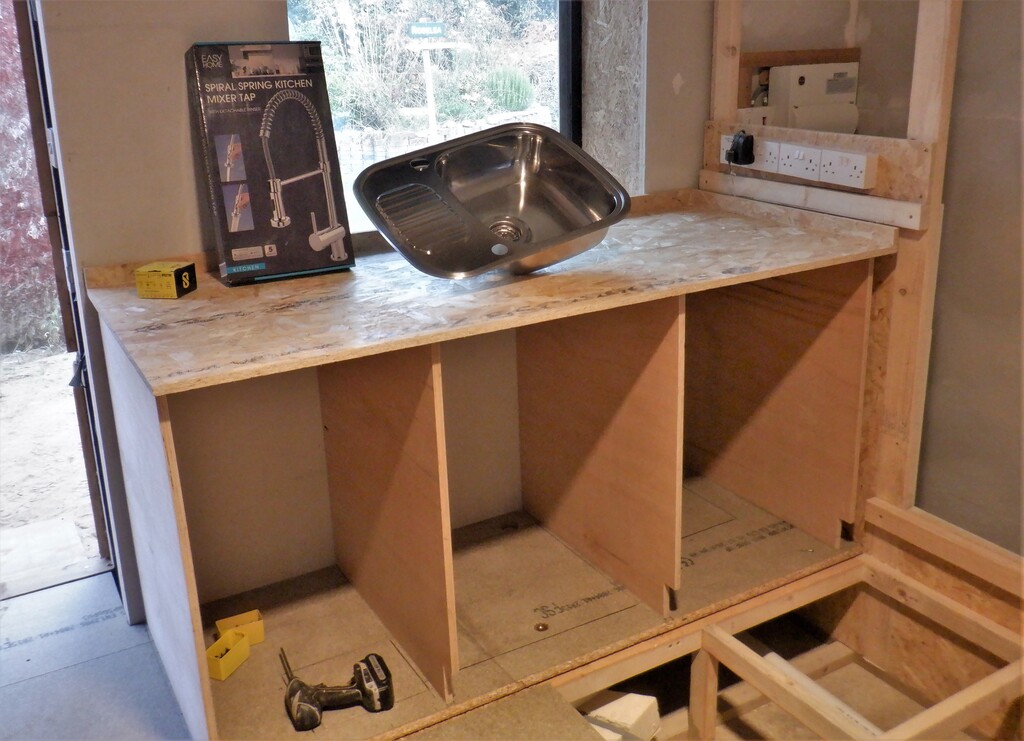
    We got the week going by taking our slab of OSB board we cut last week for the worktop in the Utility Room and cutting a large hole in the middle of it for the stainless steel sink to be placed. We wanted it fairly near the front and have more room around the back for pots and bottles to live and be ready to serve anyone using the sink. Then all the edges were rounded using a quarter turn cutter bit to take off the sharpness, rubbed down all over with the sanding machine.

    Worktop Plus Sink Installed and Started on Flooring for Hallways

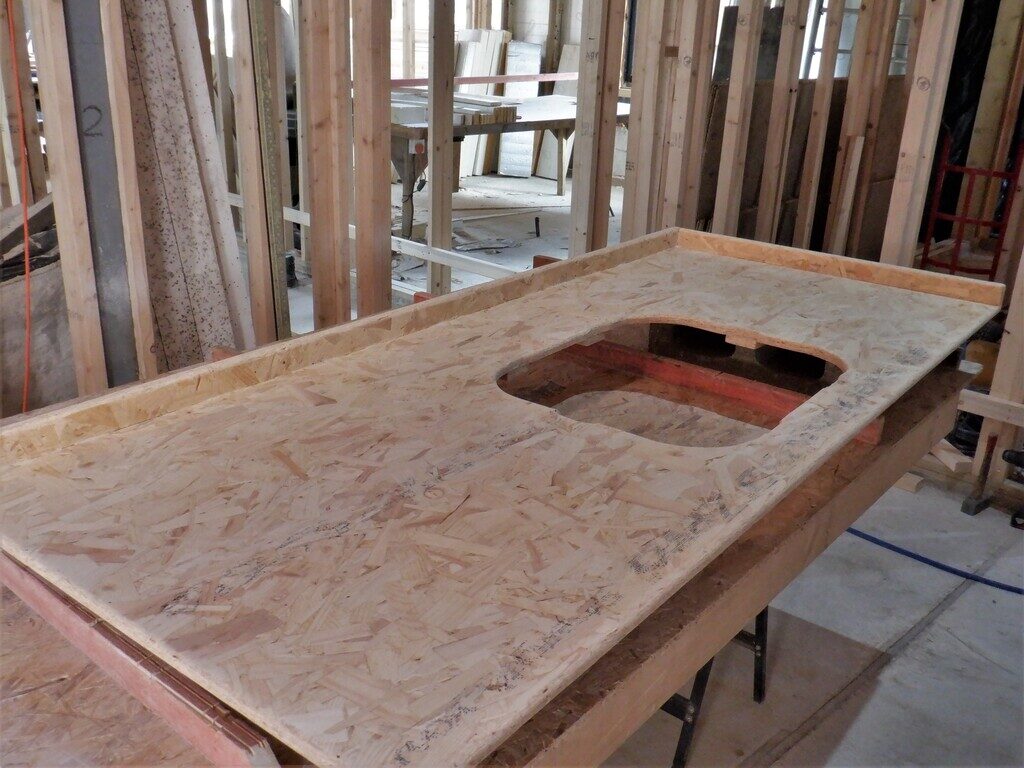
    Temporary-worktop-ready-for-paint


    Then  a coat of black two-part resin scraped and brushed all over the surface to provide a waterproof barrier. We put the drying worktop upstairs into the warmer sunshine to help cure and harden the resin for a day and then brought it to its final resting place in the Utility room, sitting on top of the four plywood sides supporting the worktop. The stainless steel sink was installed and tied down using the supplied clamps and putting in a line of sealant to stop liquids creeping under the edge and dripping into our drawers and cupboards under the worktop.
    Worktop Plus Sink Installed and Started on Flooring for Hallways

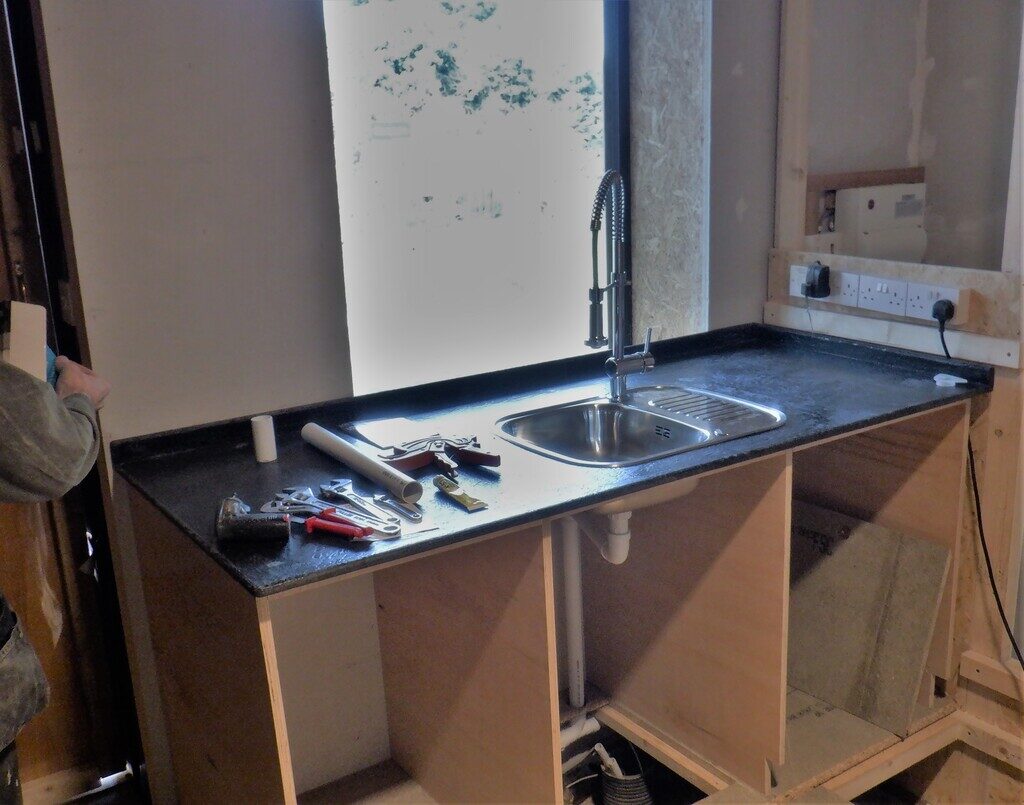
    Temporary-worktop-painted-and-sink-installed


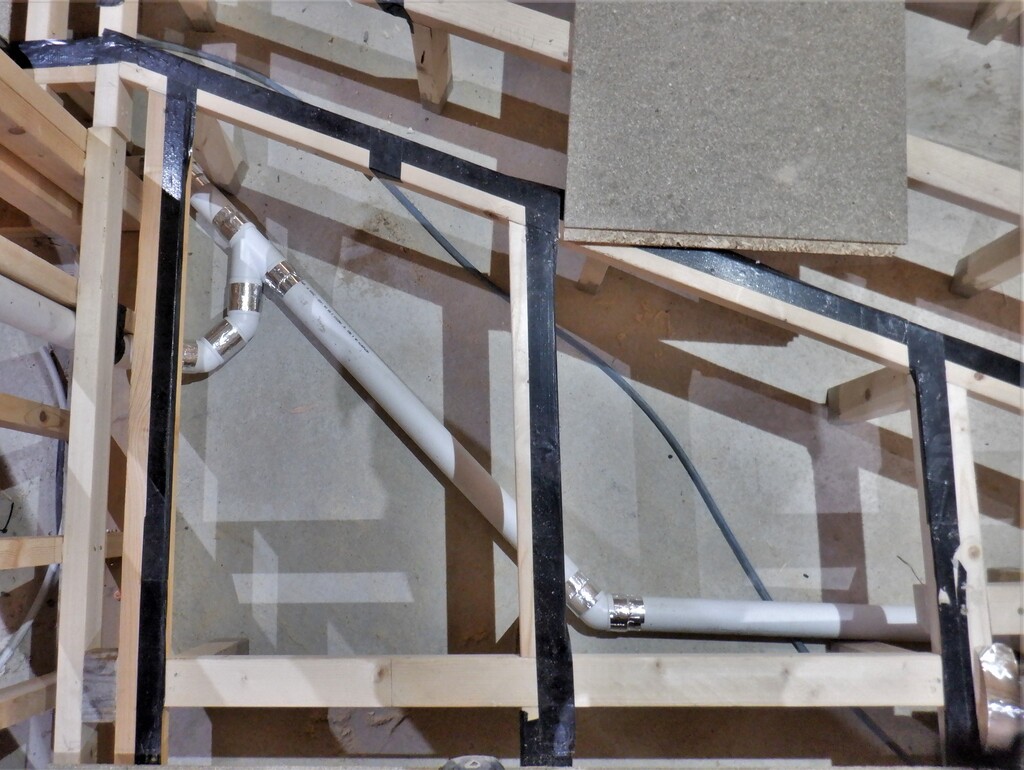
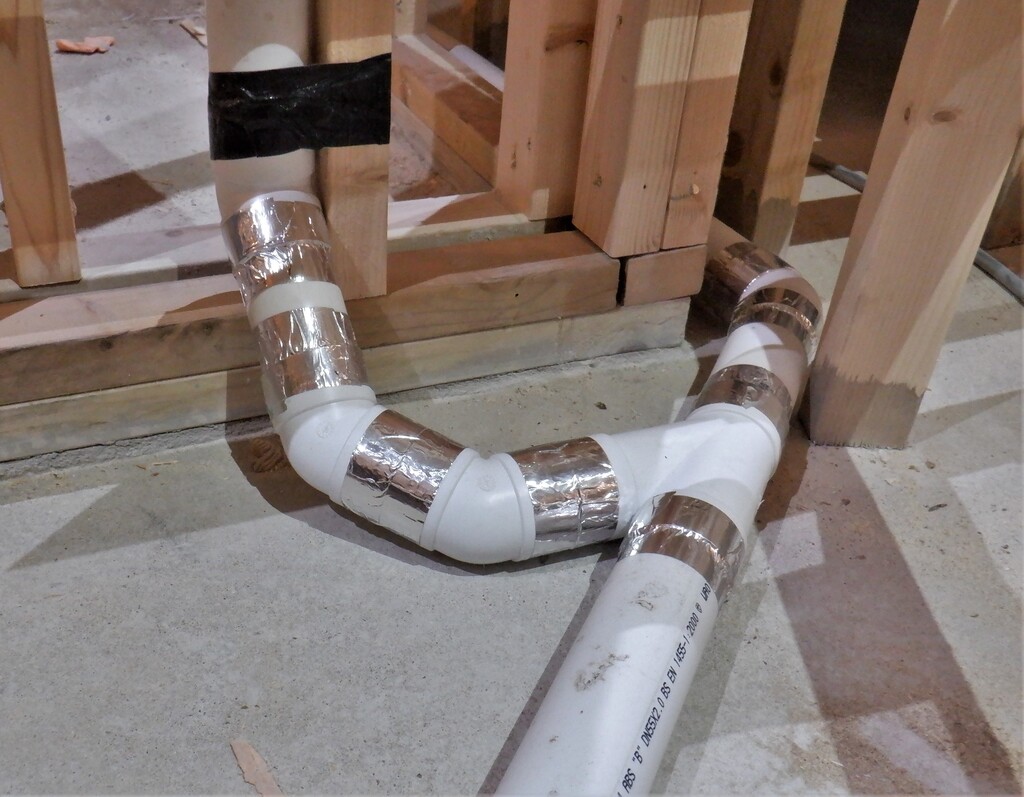
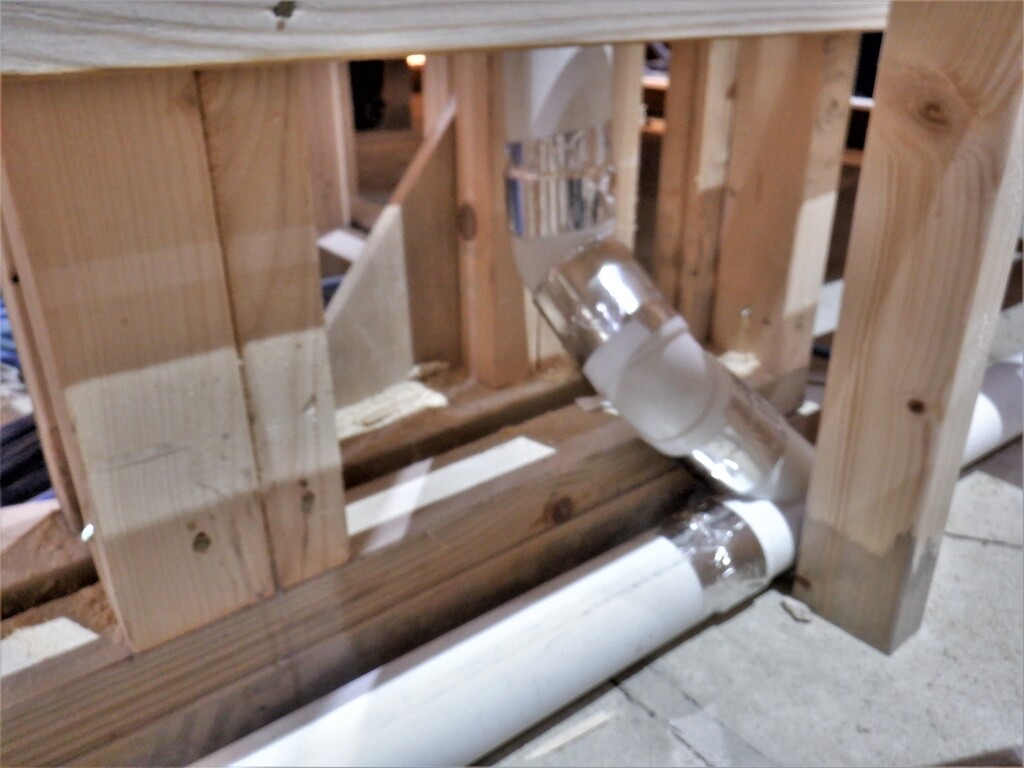
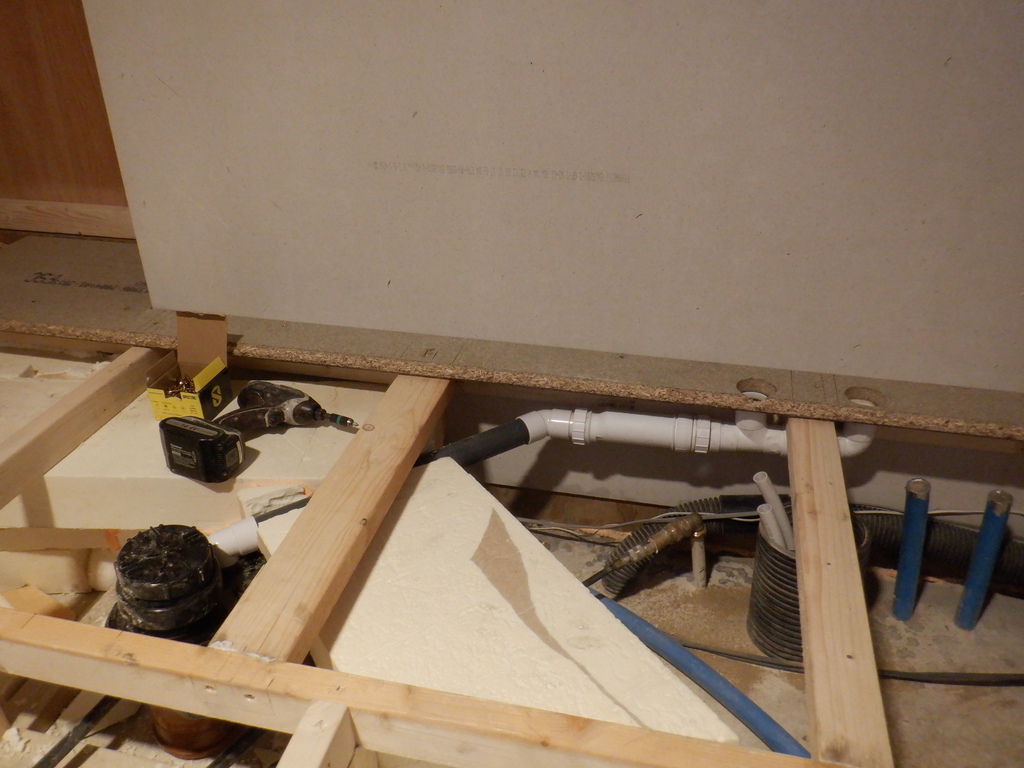
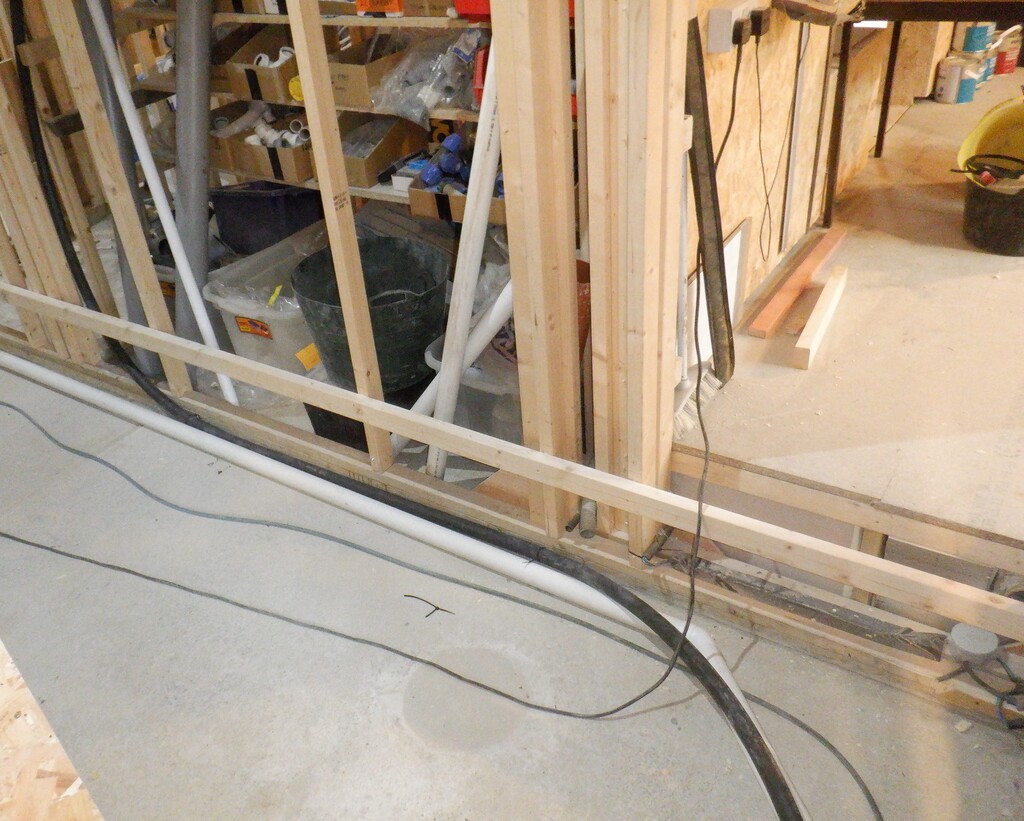
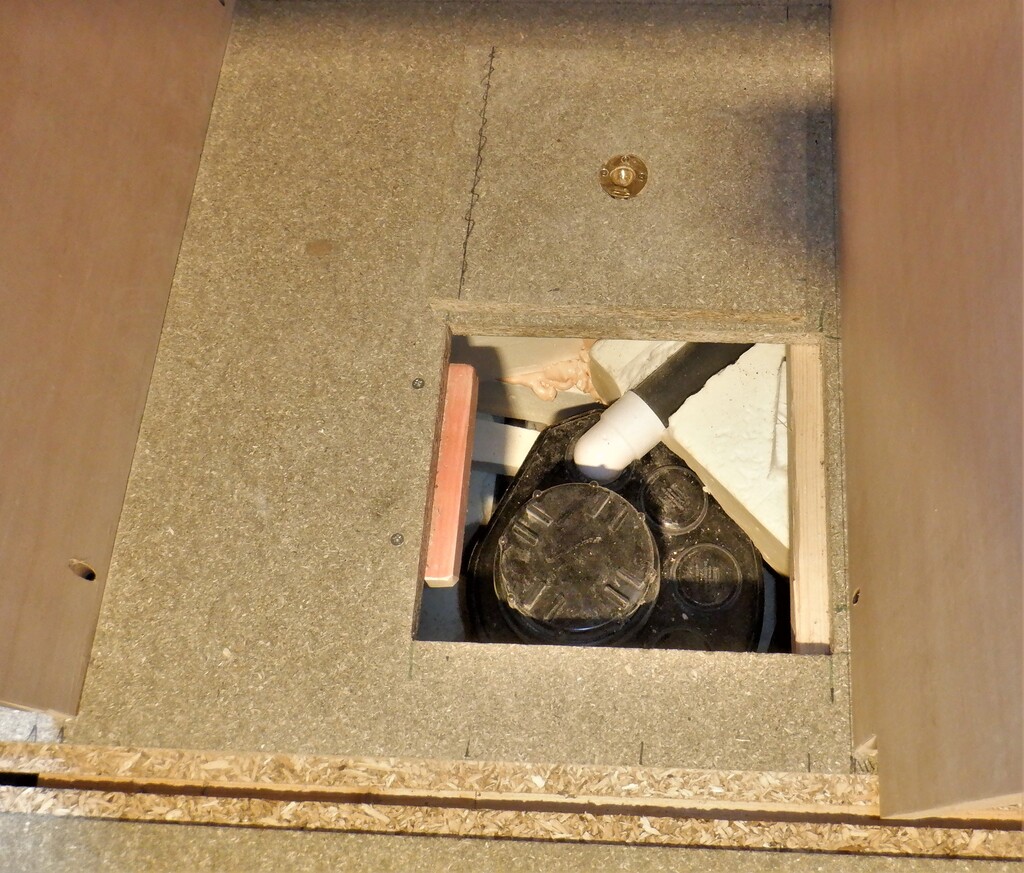
    Next, we plumbed in the waste pipe from the sink to the waiting socket we did last week and also inserted a long vertical waste pipe in the other waiting socket just positioned under the floorboard, this second one is for the washing machine in the future setup of the house when we finally move in properly.
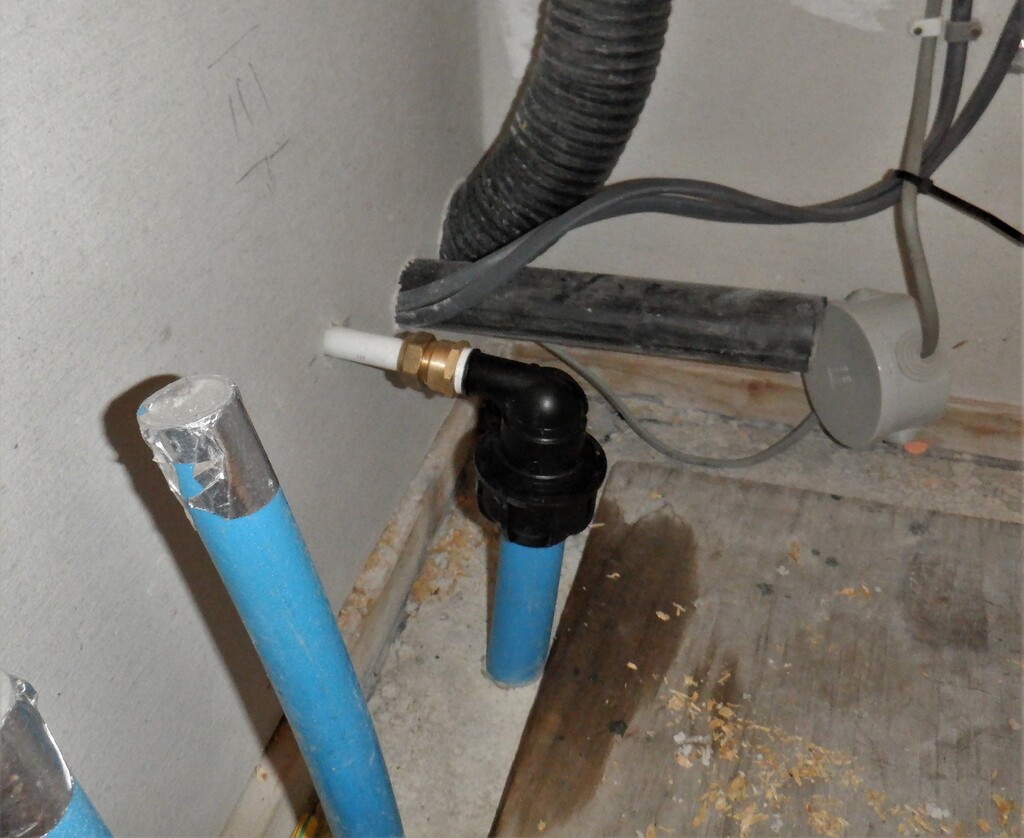
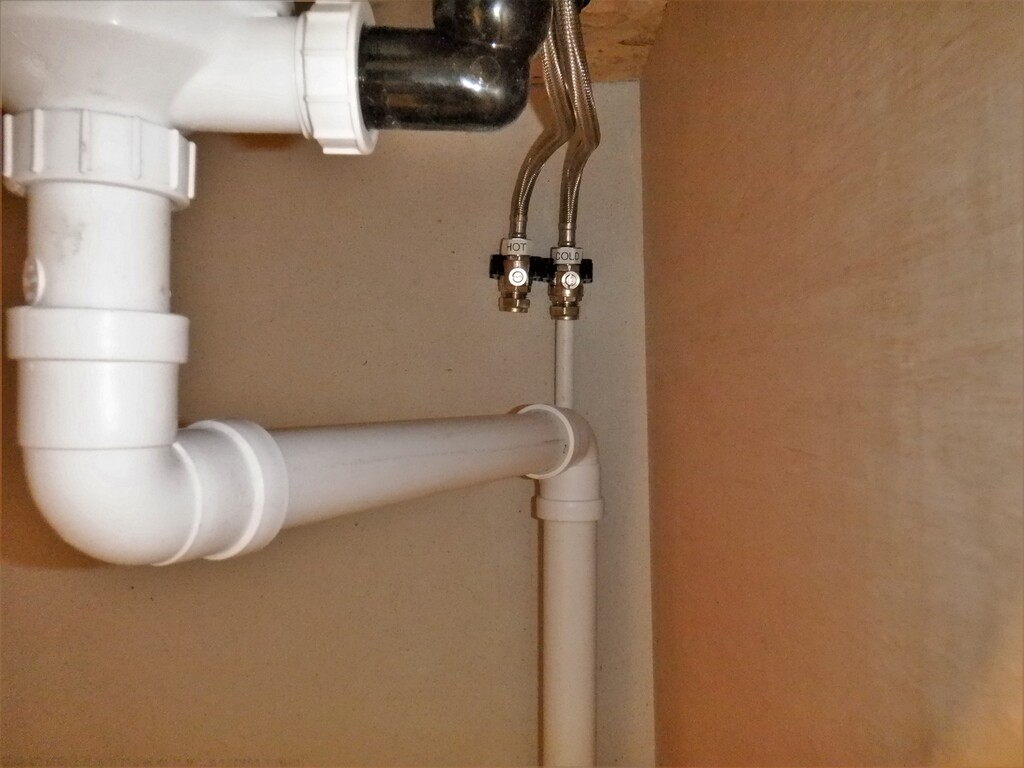
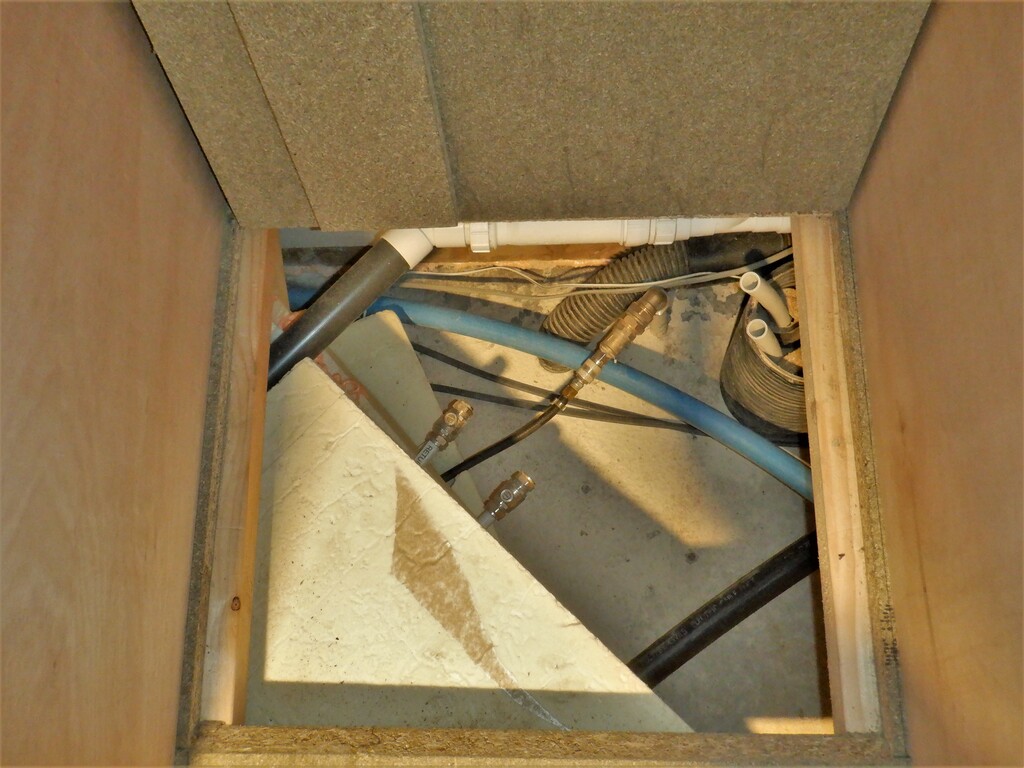
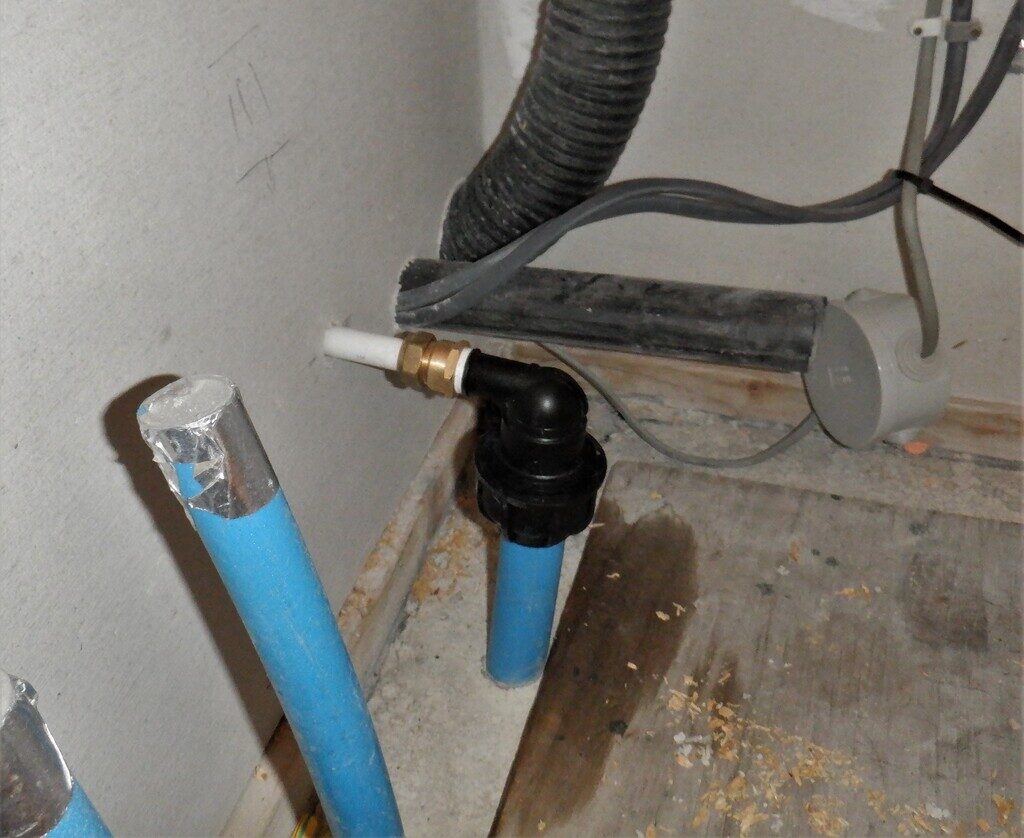
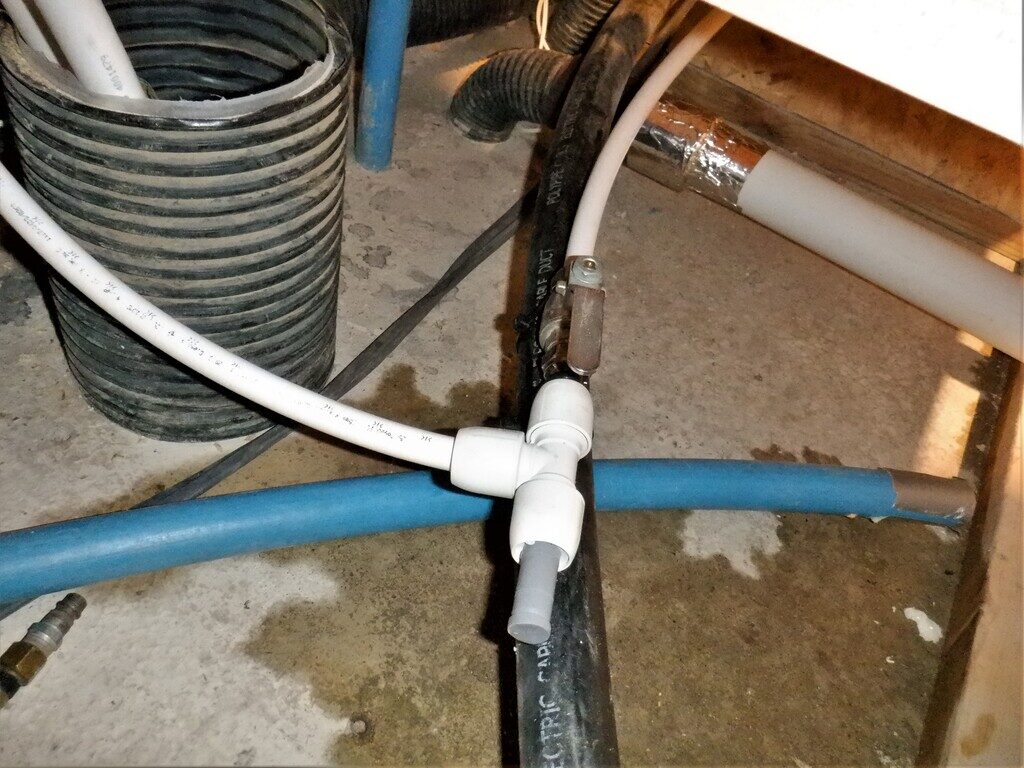
    Then, we turned off the mains water supply at our water meter so we can break into the capped off pipe that is coming up through the concrete floor, we put an right angle adaptor to convert from the 32mm diameter polyethene pipe to a standard 15mm internal plumbing pipework. This 15mm feed went through the side of the Equipment cupboard and had a cut-off valve inserted in just at the start of the middle cupboard (still under the floor) so it is relatively nearby and only requires lifting up a trap door to gain access. We will have clear labels to remind people to where it is but also we are planning to employ a motorised valve in series so we can tell the computer to turn off the mains water if we need to do any servicing. The other thing we added after this cut-off valve is a T-junction so we can feed a supply of cold water to our new mixer tap. The continuing 15mm pipe is terminated at this point but it will go all the way to the main kitchen and also upstairs to the header tank to feed those end points too.
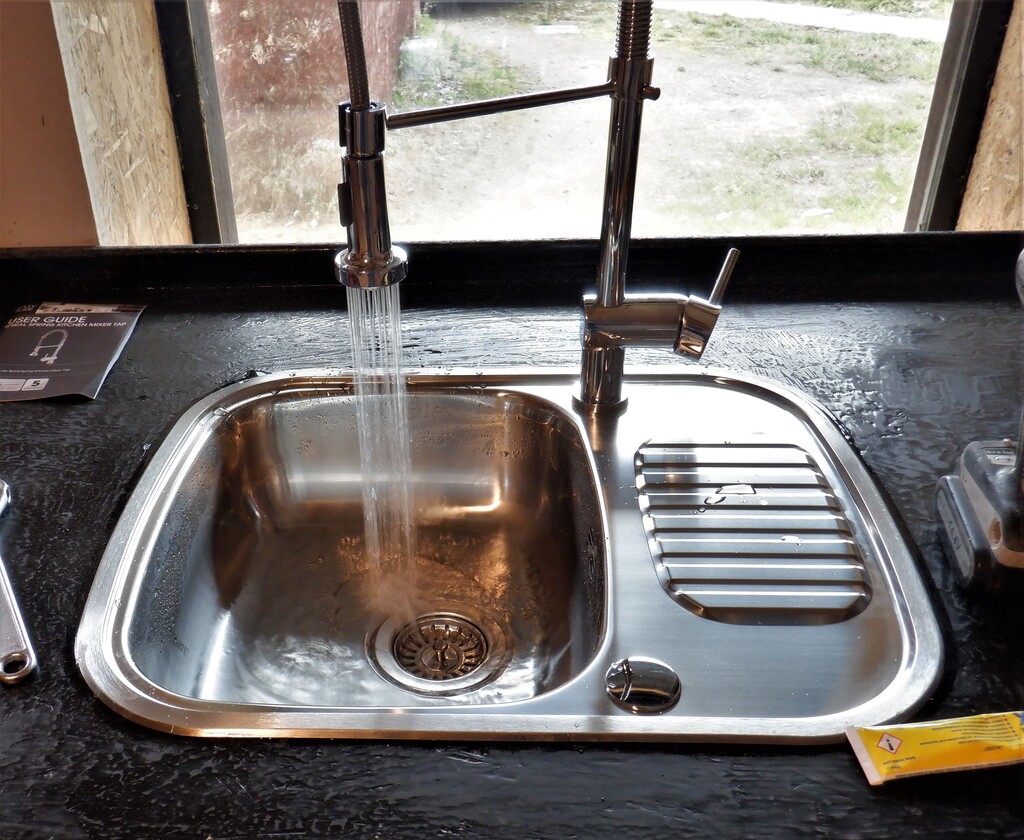
    The new mixer tap is a large flexible design with a mini shower head on the end pointing down into the sink bowl, being held up on an arm projecting from the body of the mixer tap. It has just cold water coming out for now but we will plumb in the hot water later on when we get that far with the pumps and tanks etc.
    Worktop Plus Sink Installed and Started on Flooring for Hallways

    Incoming-mains-water-turning-under-the-sink

    Worktop Plus Sink Installed and Started on Flooring for Hallways

    Mians-water-stop-cock-with-T-to-sink

    Worktop Plus Sink Installed and Started on Flooring for Hallways

    Mains-water-to-the-sink

    Worktop Plus Sink Installed and Started on Flooring for Hallways

    The-sink-is-working


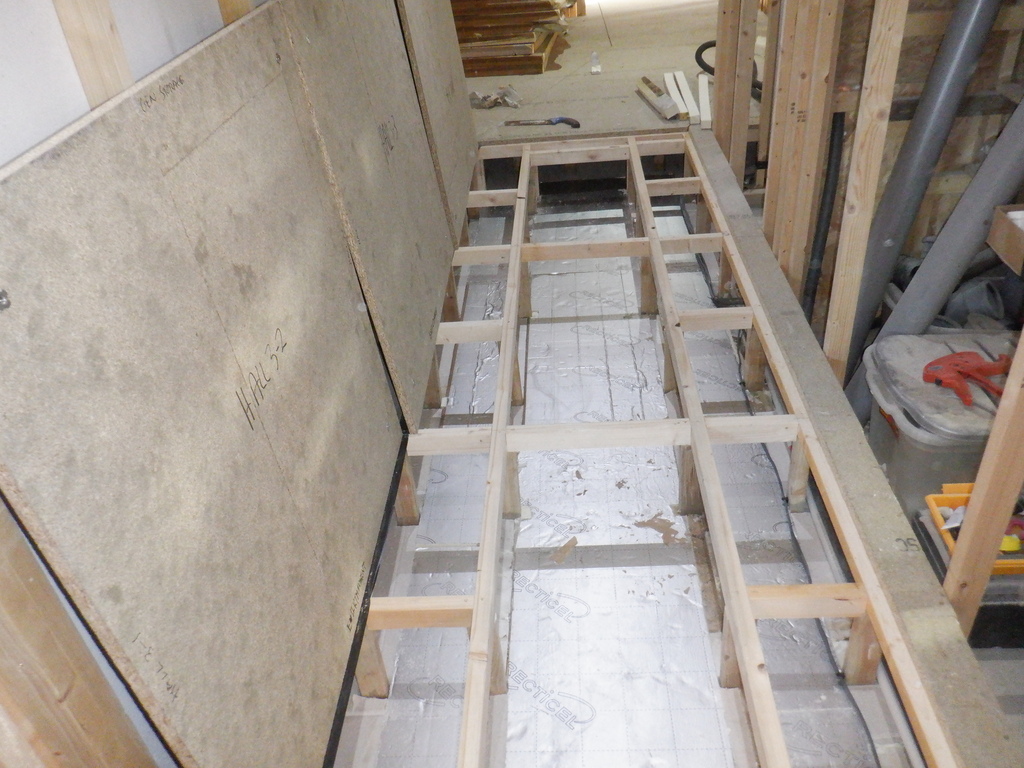
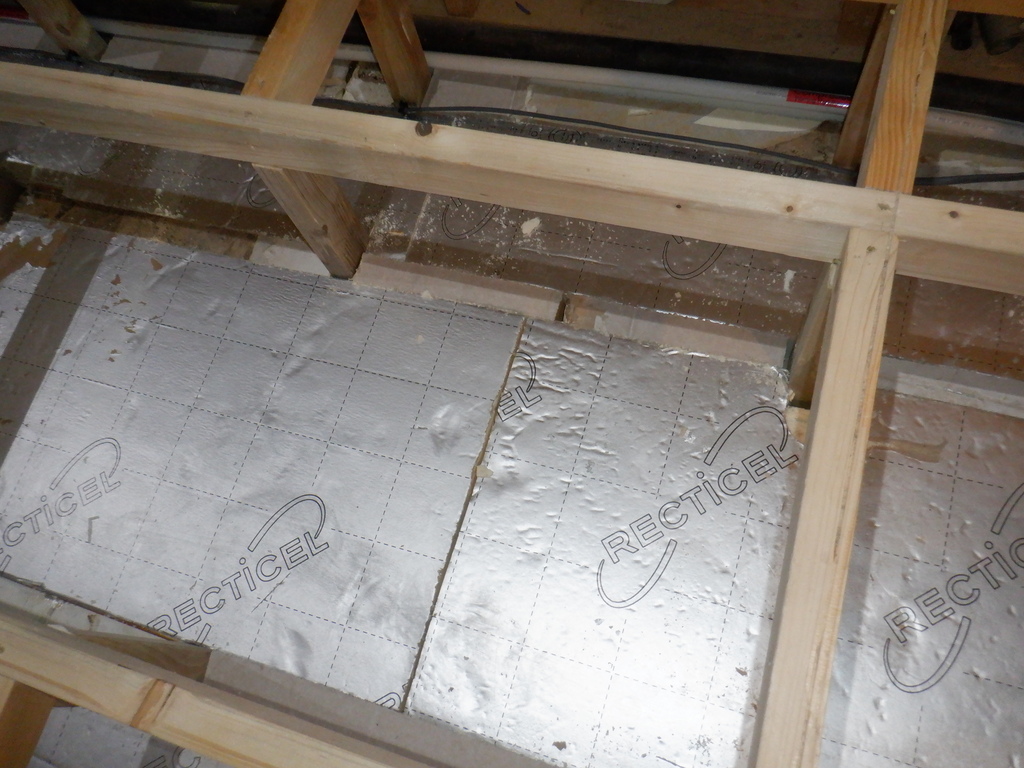
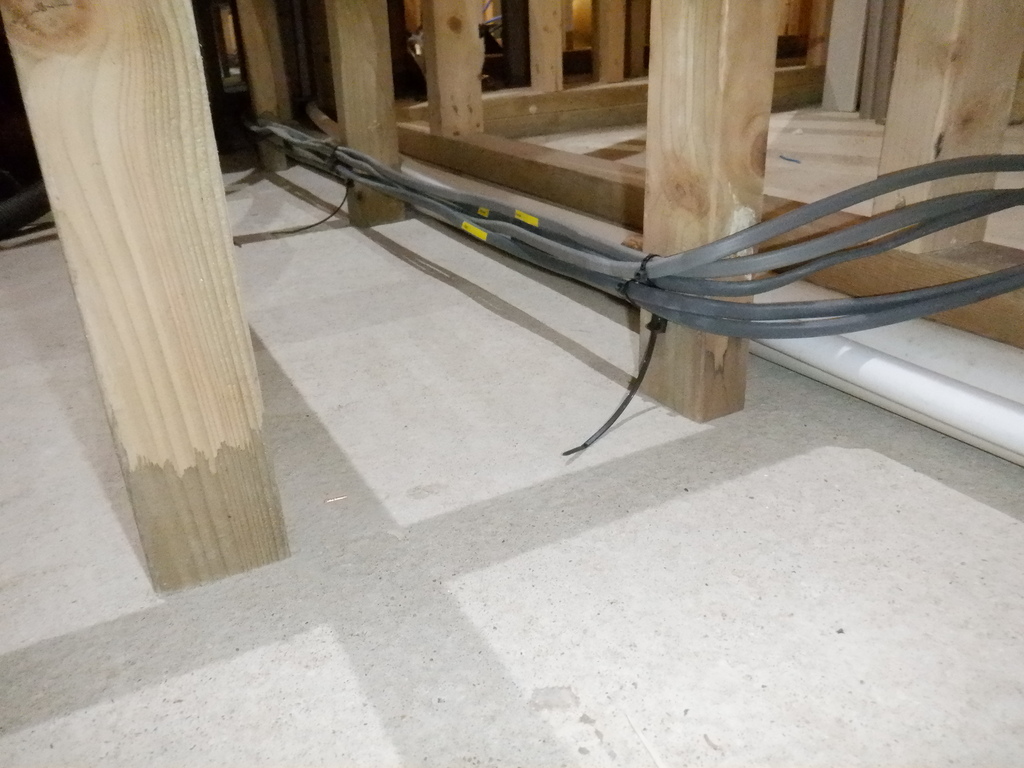
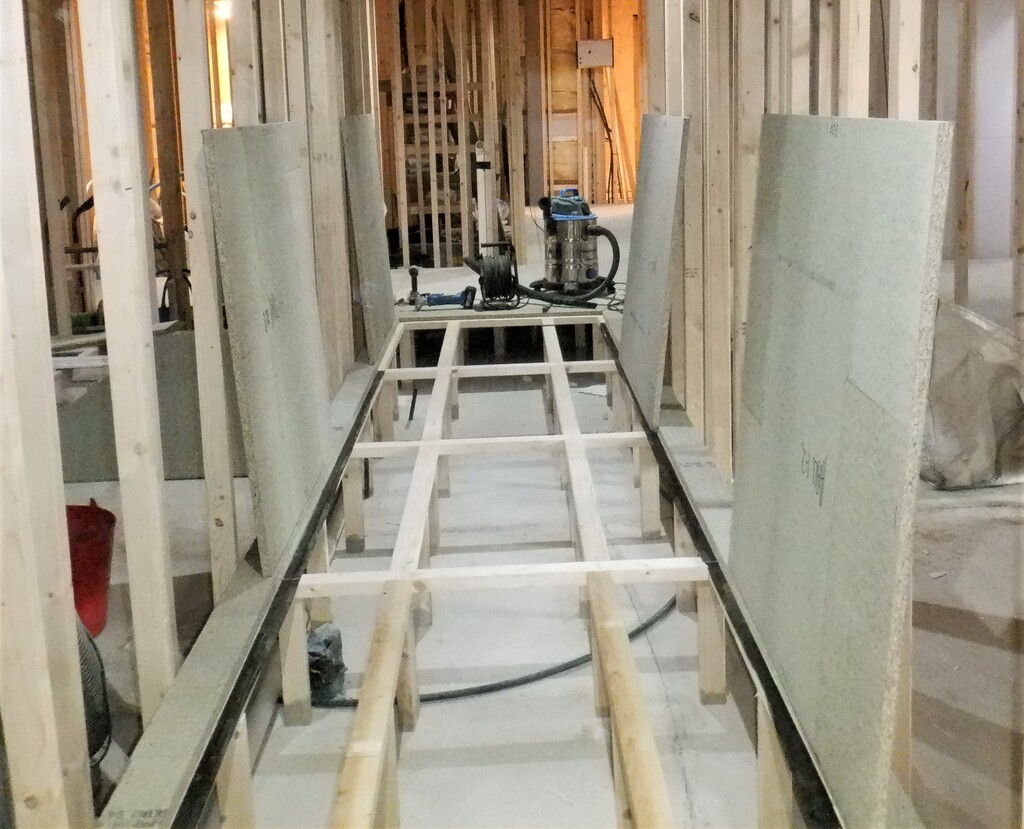
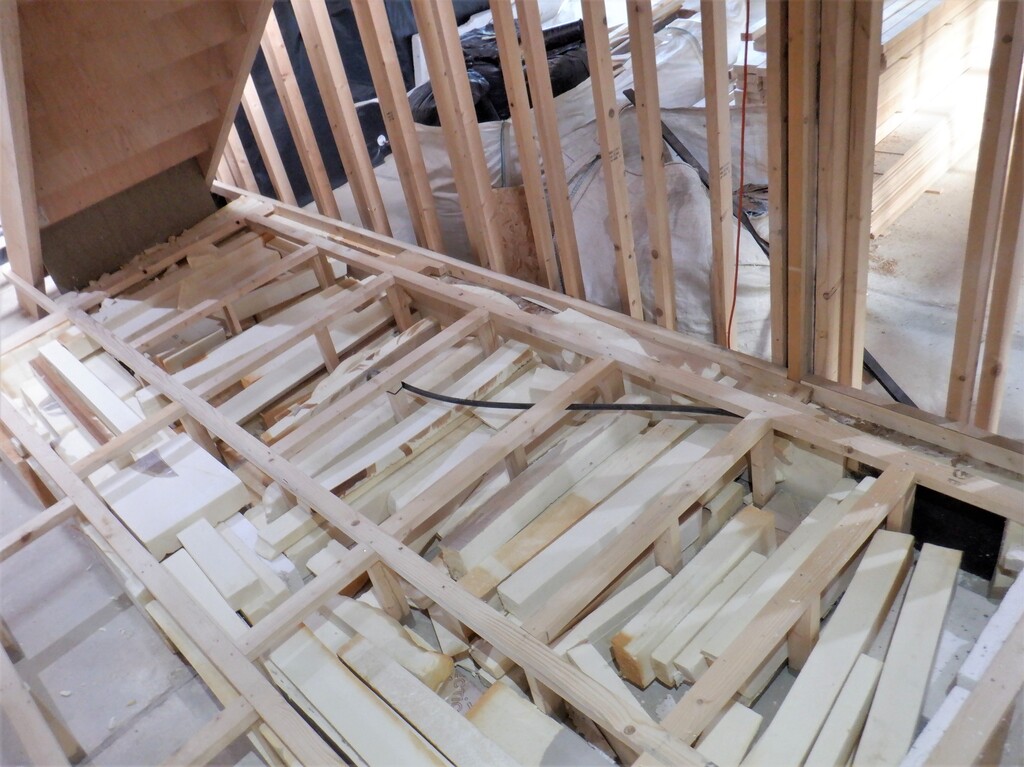
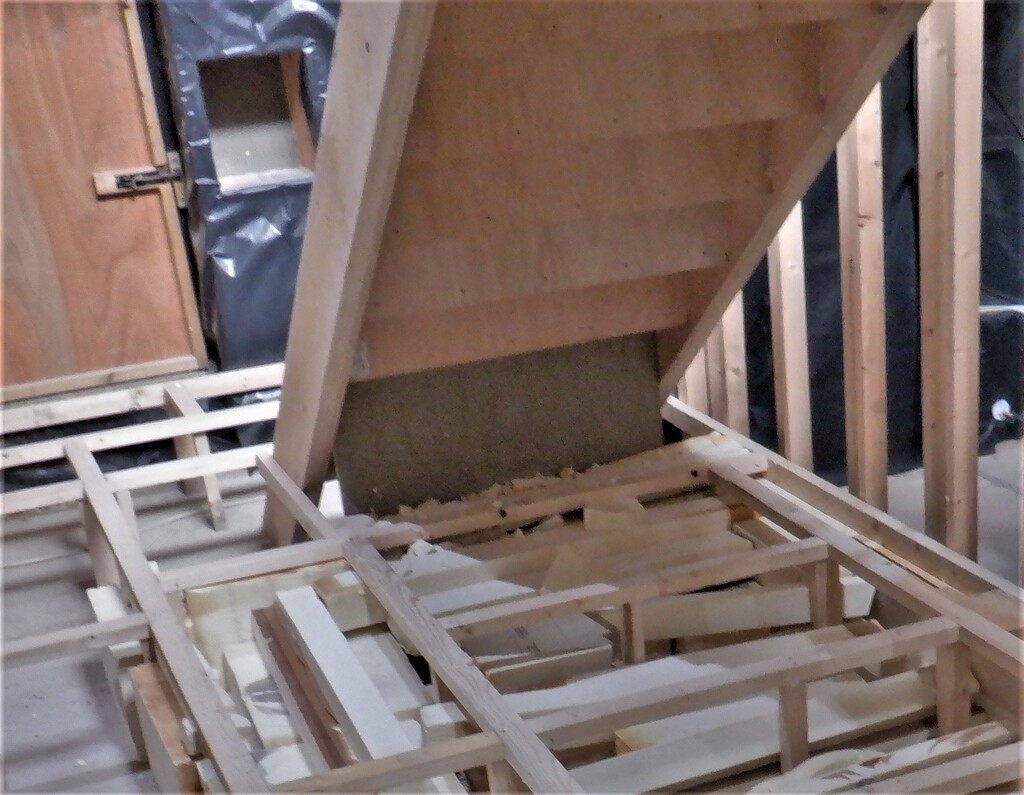
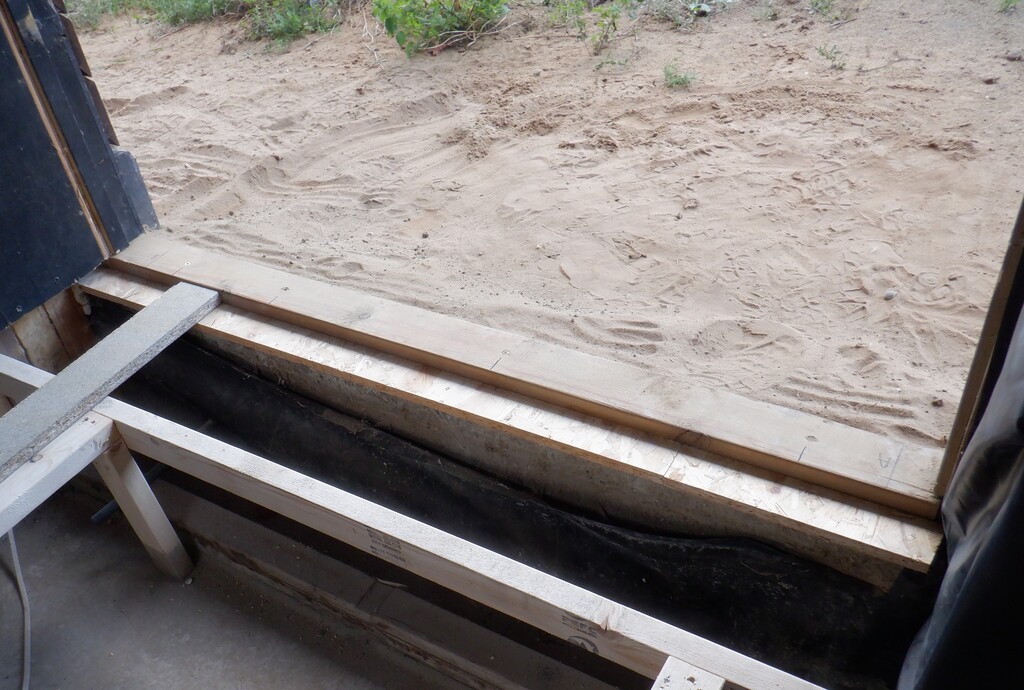
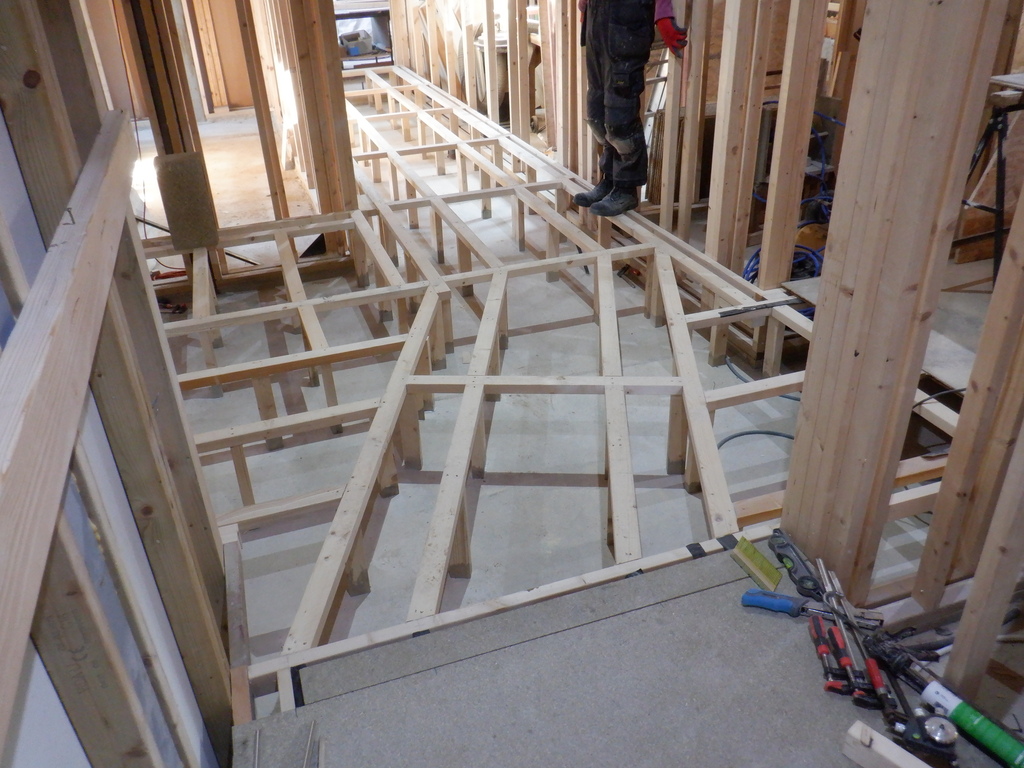
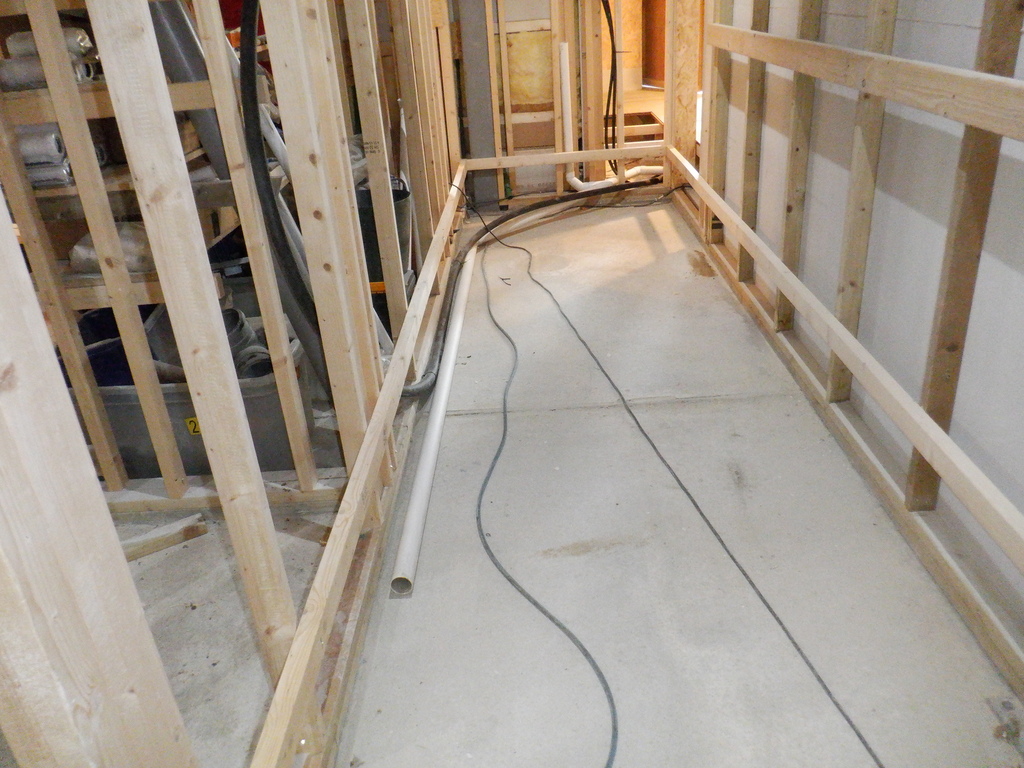
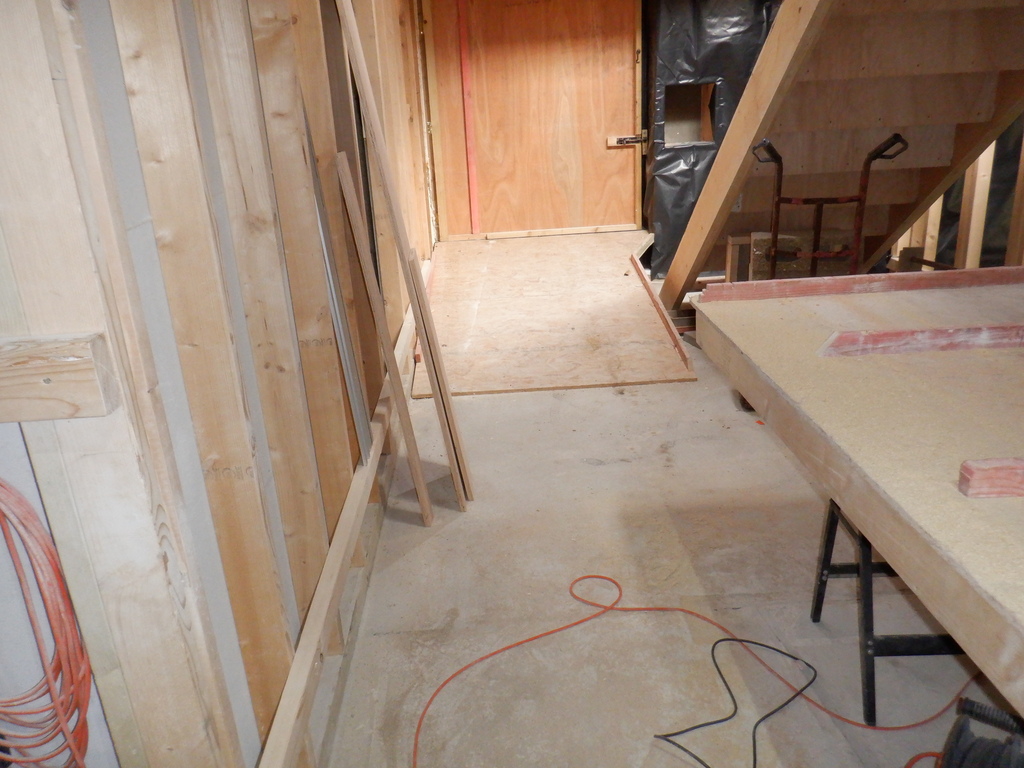
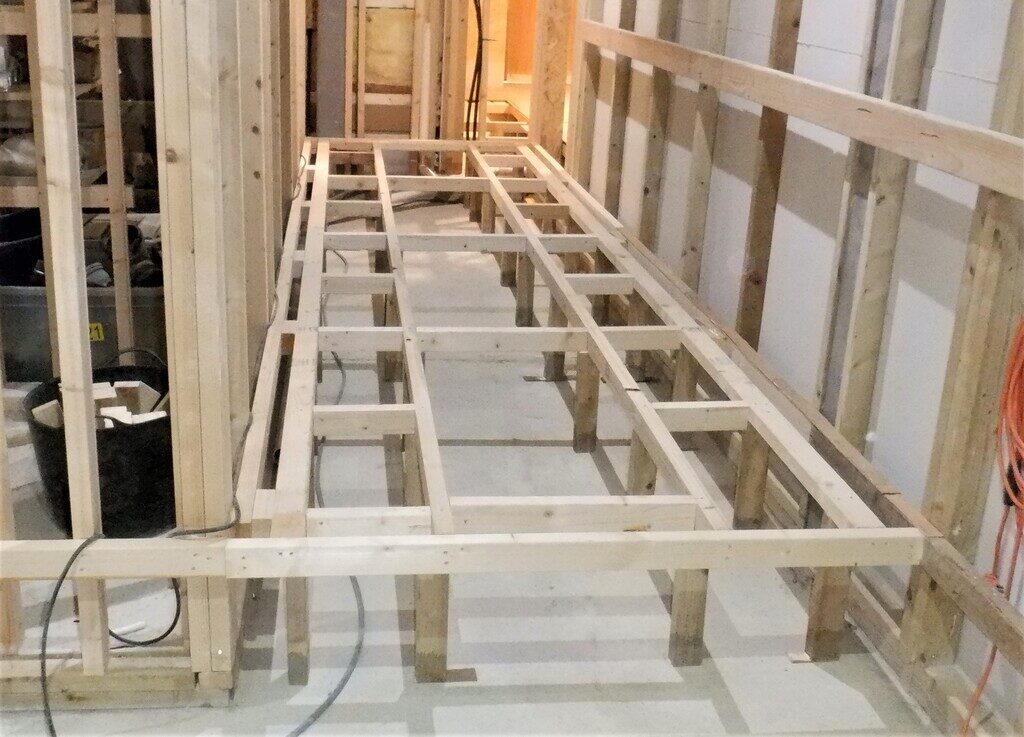
    In the meantime, between waiting for the black resin to harden, we proceeded in building the flooring in our hallways. We started outside the Utility Room and Bedroom Three and after much discussing, we wanted to have a middle section to take the large air duct which is 440mm wide and 150mm high, plus also, we need to break up the floorboards into modules so we can lift up an access panel to do any servicing or additions that the house might need in the future. This led us to have four long rails running down the length of the hall, positioned across the width at 440mm and 1100mm apart. In the other direction, down the length of the hallway, we then had noggings every 1200mm and this will be our trap door dimensions. It was quite fiddly getting in the four rails, using 63mm CLS timber, two of them laid flat that will form the outer edge of the liftable panel zones, and two vertically mounted CLS pieces down the middle to support the air ducting. The laser was used to guide us in cutting the legs, every 600mm down all four rails, and then a whole series of horizontal noggings to brace the framework together. Every joint was glued, as well as being nailed, so to avoid any annoying creaking noises if any old timber joint warps or dry out and start making noises in the future. We had to do quite a bit of adjustment in putting in wedges under some of the legs as we discovered that the original horizontal rail we had mounted on the Entertainment wall was ever so slightly lower than it should have been. So we had to “fill” in the gap with thin layers of hardboard (3mm thick) and very thin sheet of veneer 3ply sheet we inherited from one of our deliveries (1.5mm thick), to get it ready for the floorboards to be glued and screwed down.
    Worktop Plus Sink Installed and Started on Flooring for Hallways

    Bedroom-3-Utility-hall-framed


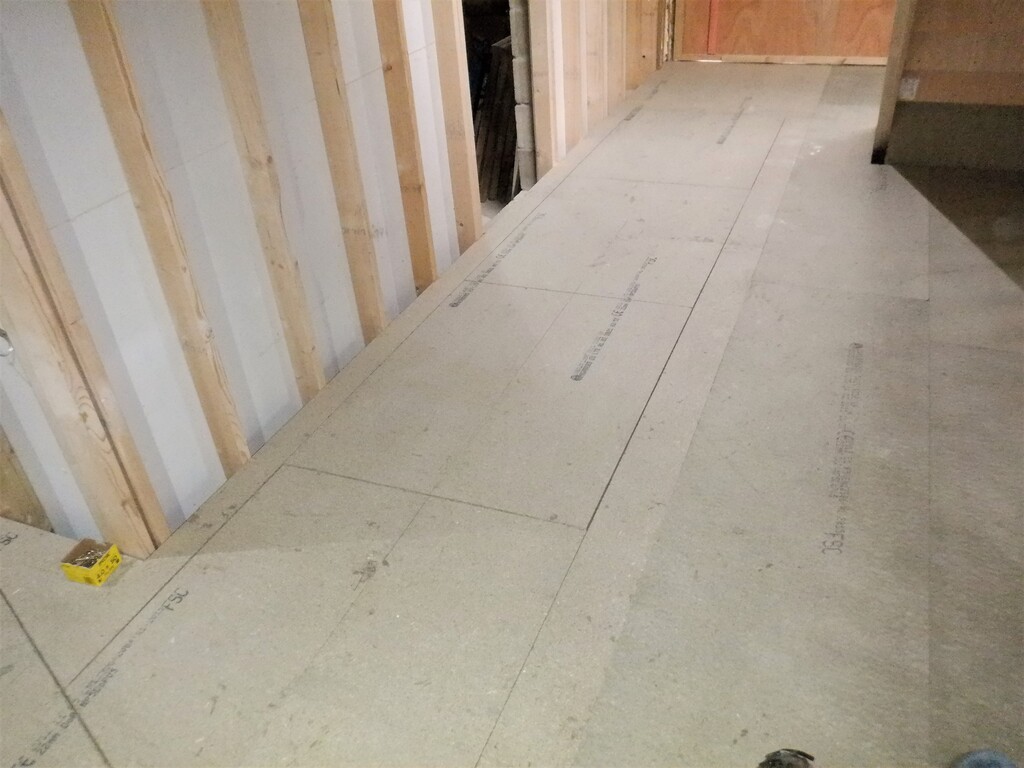
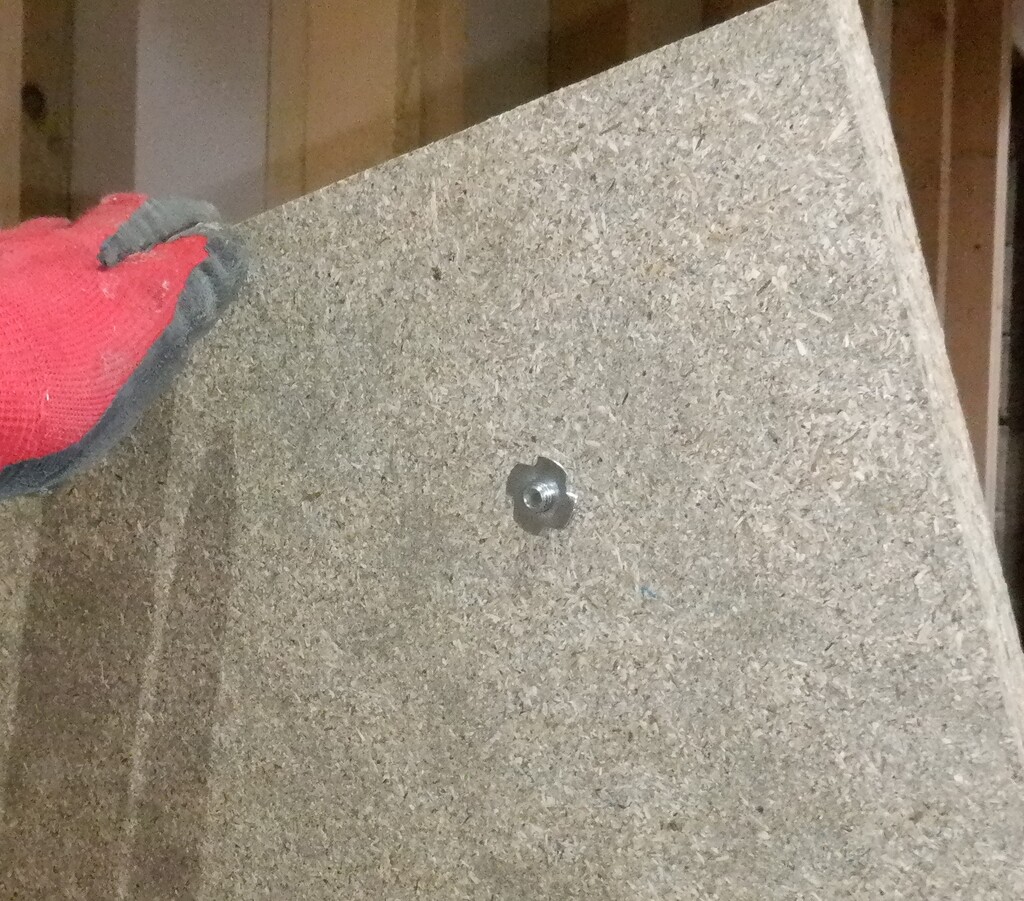
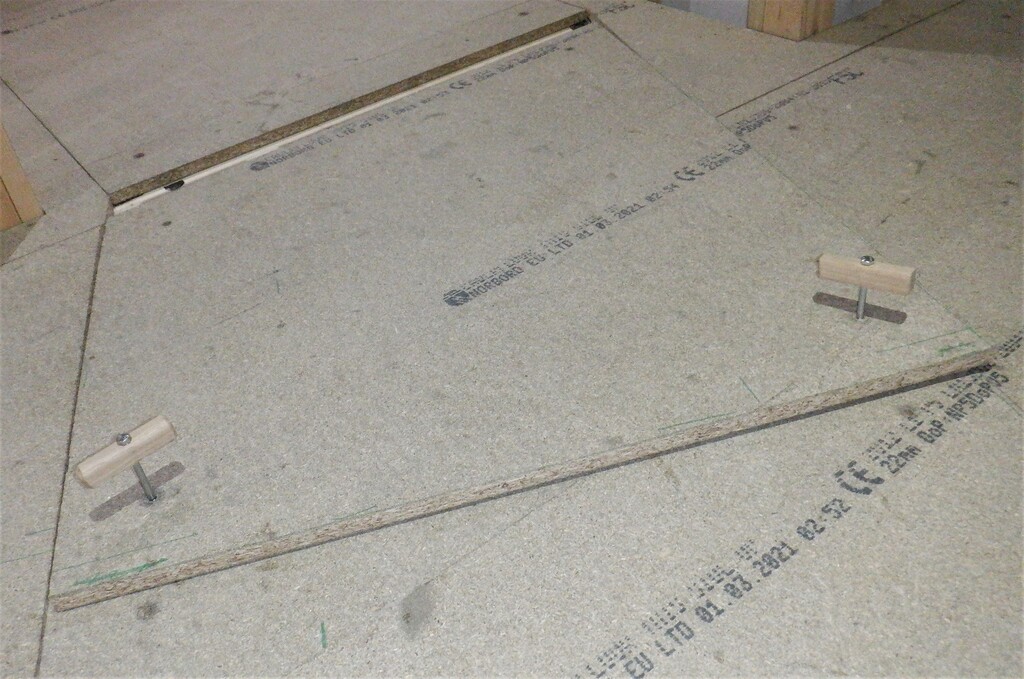
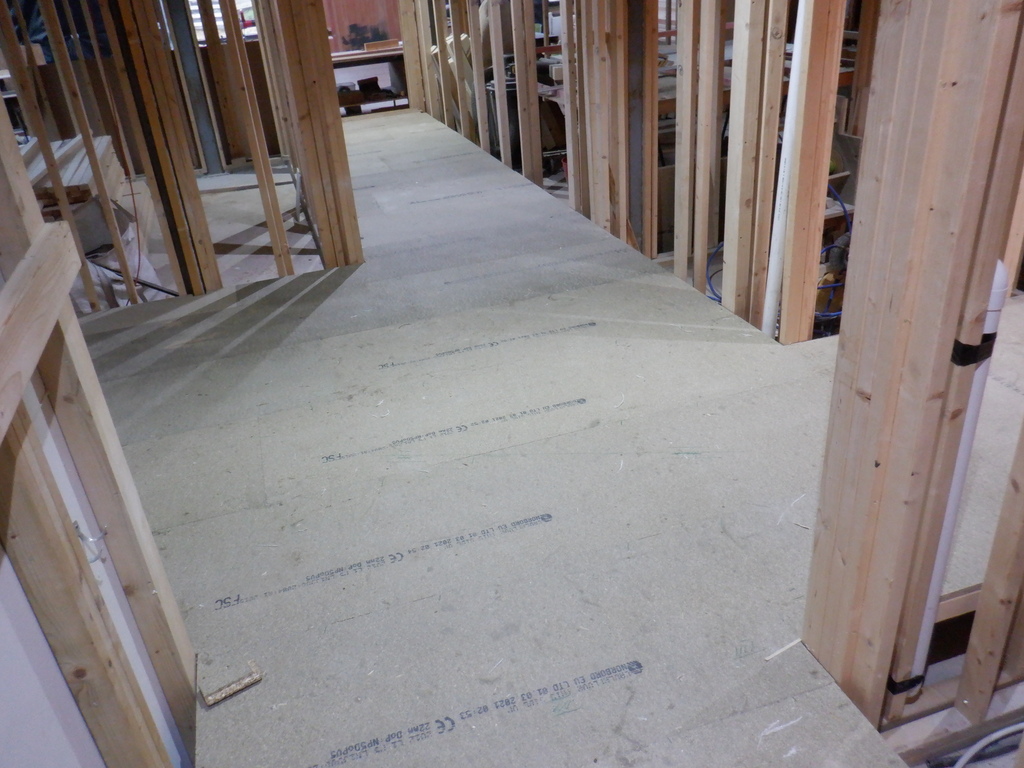
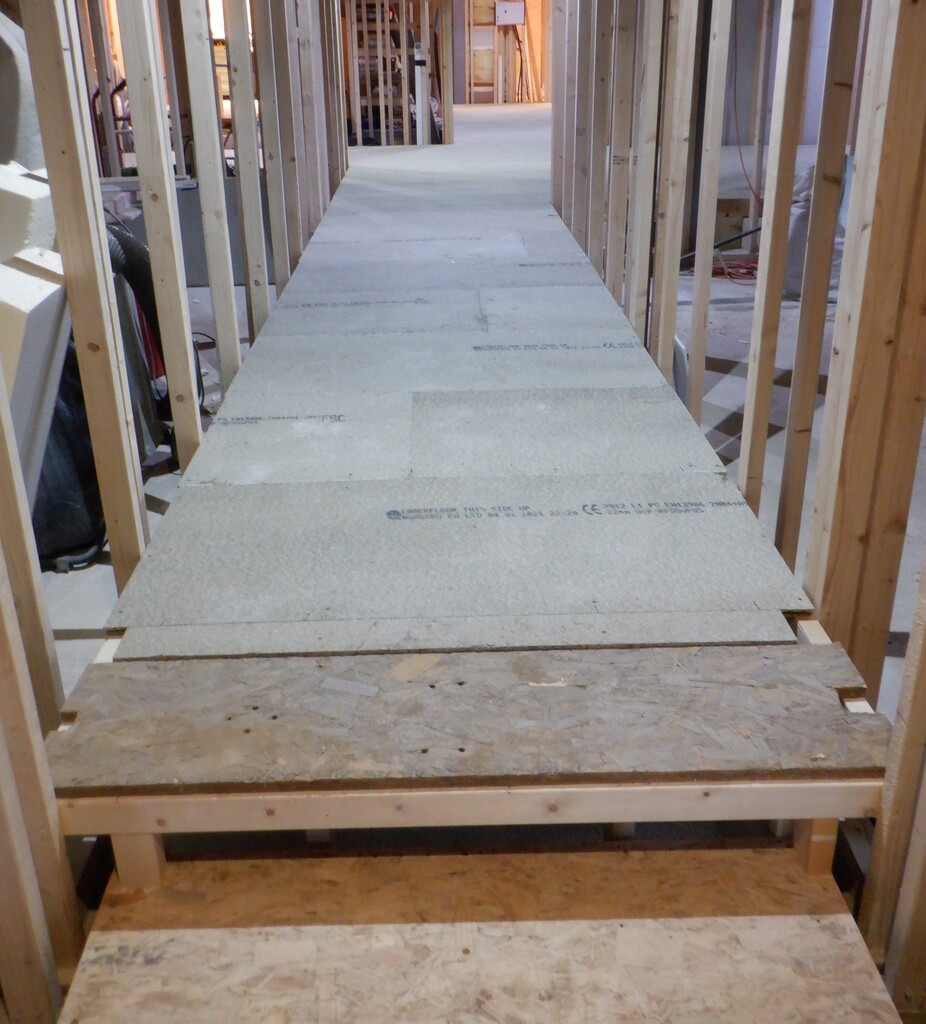
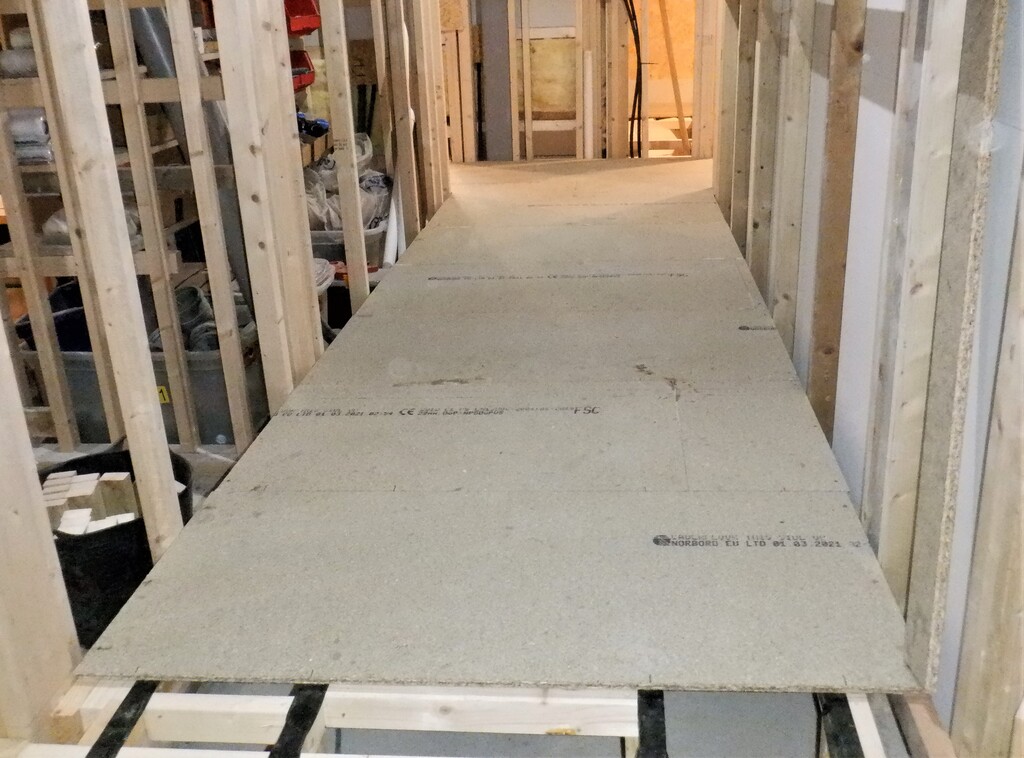
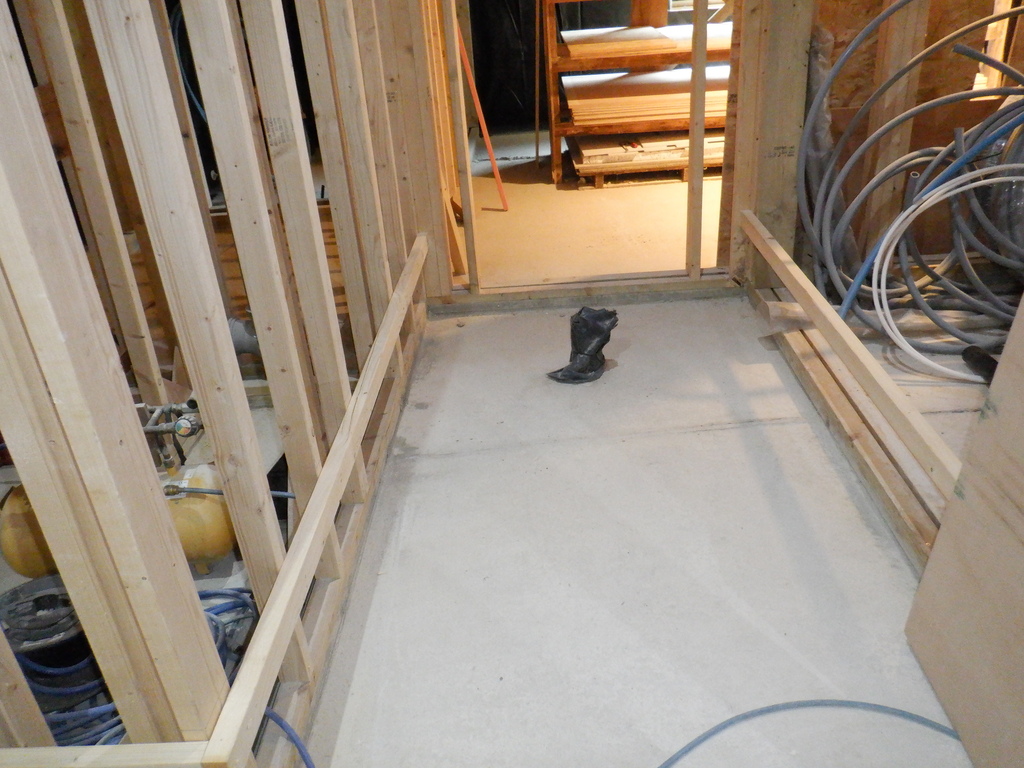
    Next, we could then, and did, lay down the floorboards, more of our 22mm thick tongue and groove chipboard material, down the first leg of our four hallways. We went across both doorways of the Utility Room and Bedroom Three, we had to insert extra pieces of CLS timber to support the cut edge of the floorboard at the start of the rooms. We shaped this first and second boards to fit around the two doorways but after that, it was easier in just putting down a row at a time, measuring 1335mm wide (getting slightly wider as we went along the hall) and used our PU construction glue to join the tongue and groove joints together. Oh yes, we also glued the outer edges of the framework but not the middle rails and we also stuck down lines of cheap tape to isolate the glue from the timber so we can free our “doors” when we cut through the floorboards at the correct positions. To this goal, we carefully marked the positions of the rails and noggings, up on to the floorboard surface, ready for that slicing task later on.
    Worktop Plus Sink Installed and Started on Flooring for Hallways

    Bedroom-3-Utility-hall-boarded


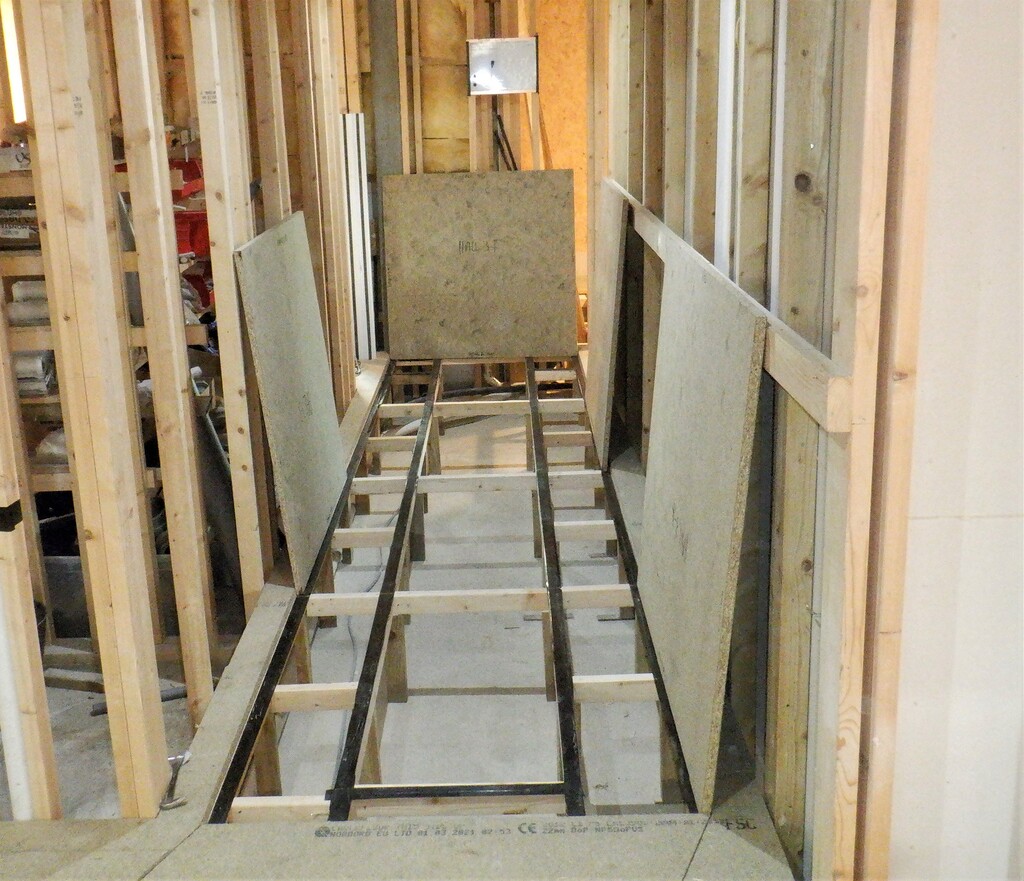
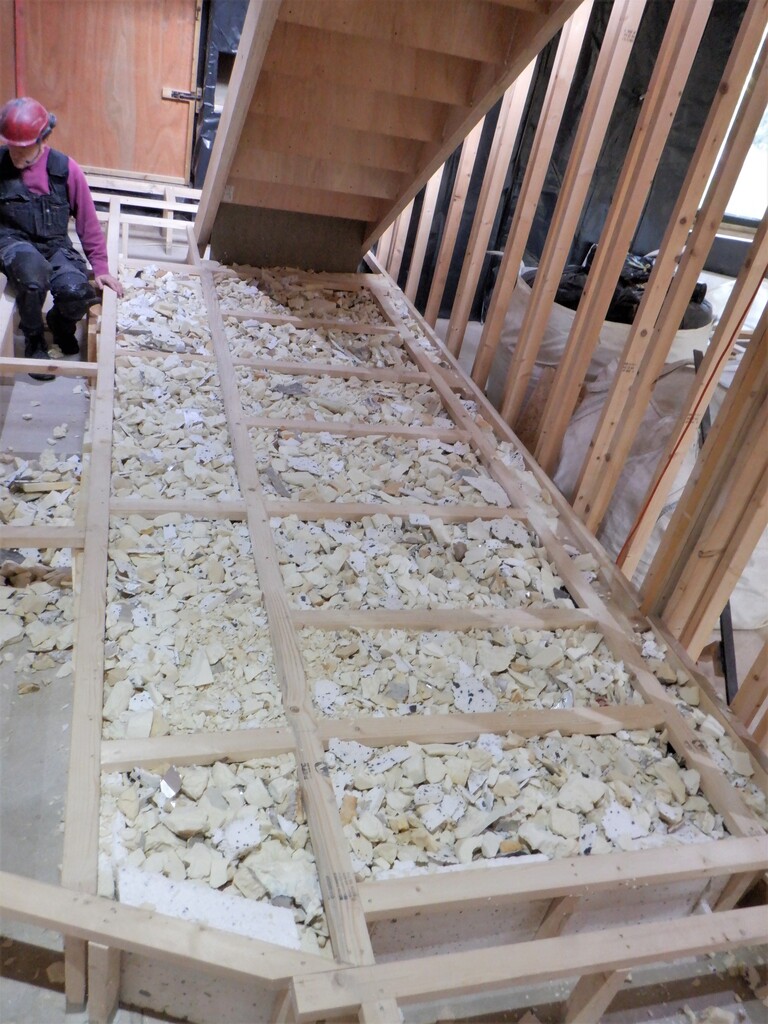
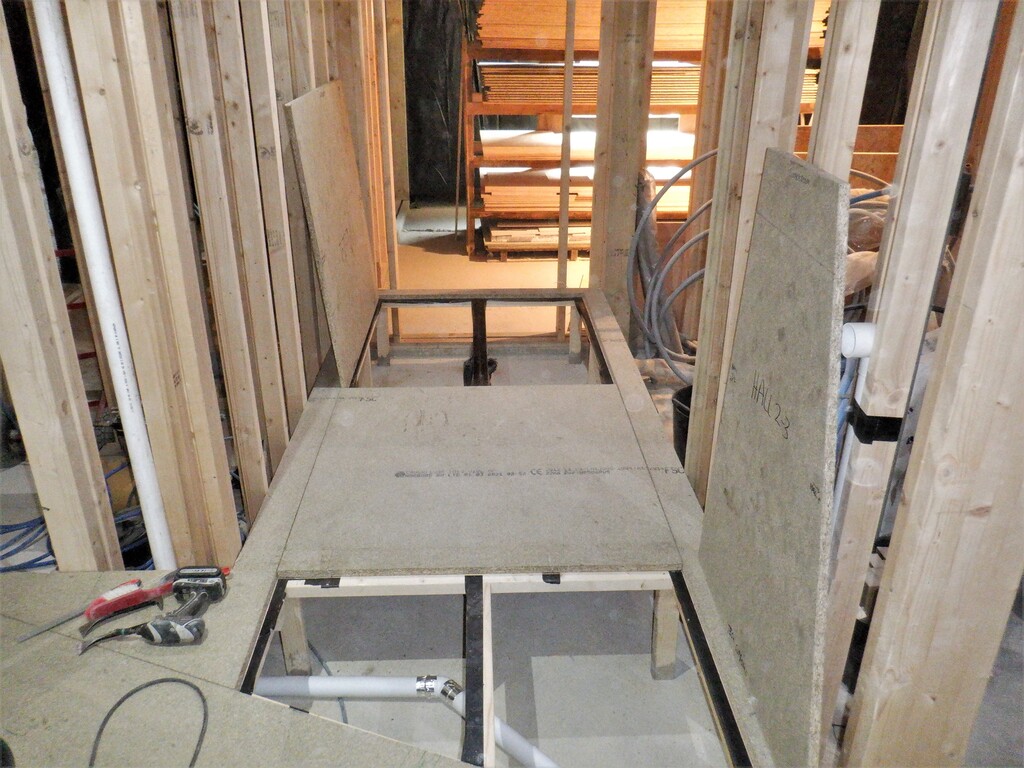
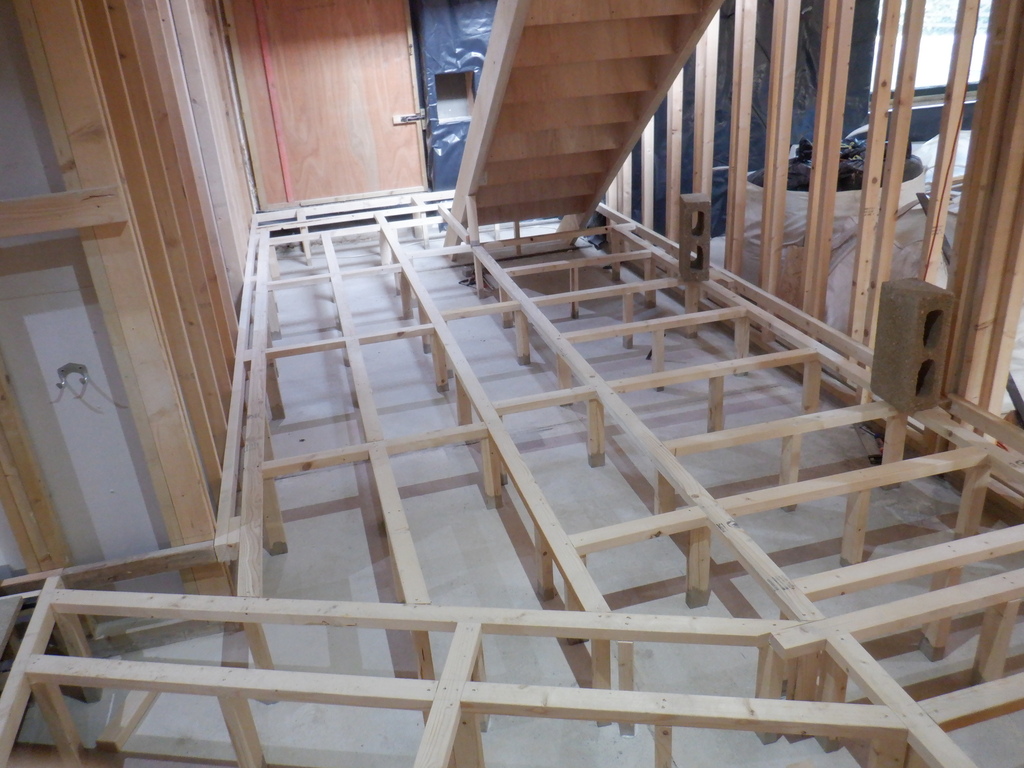
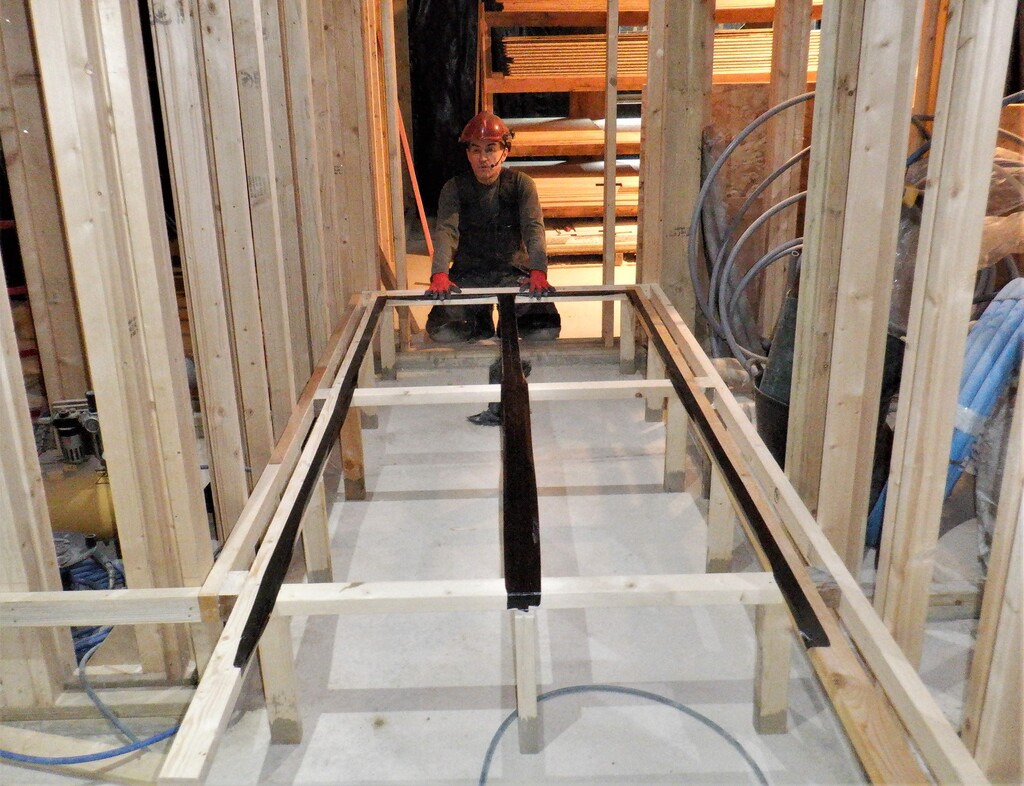
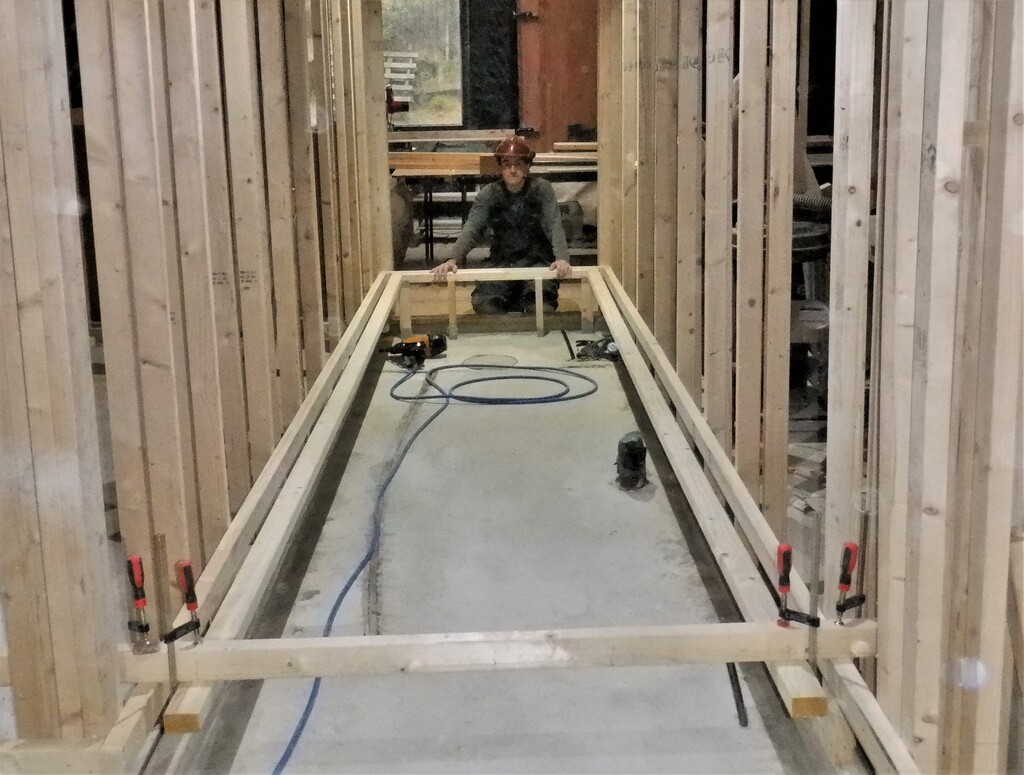
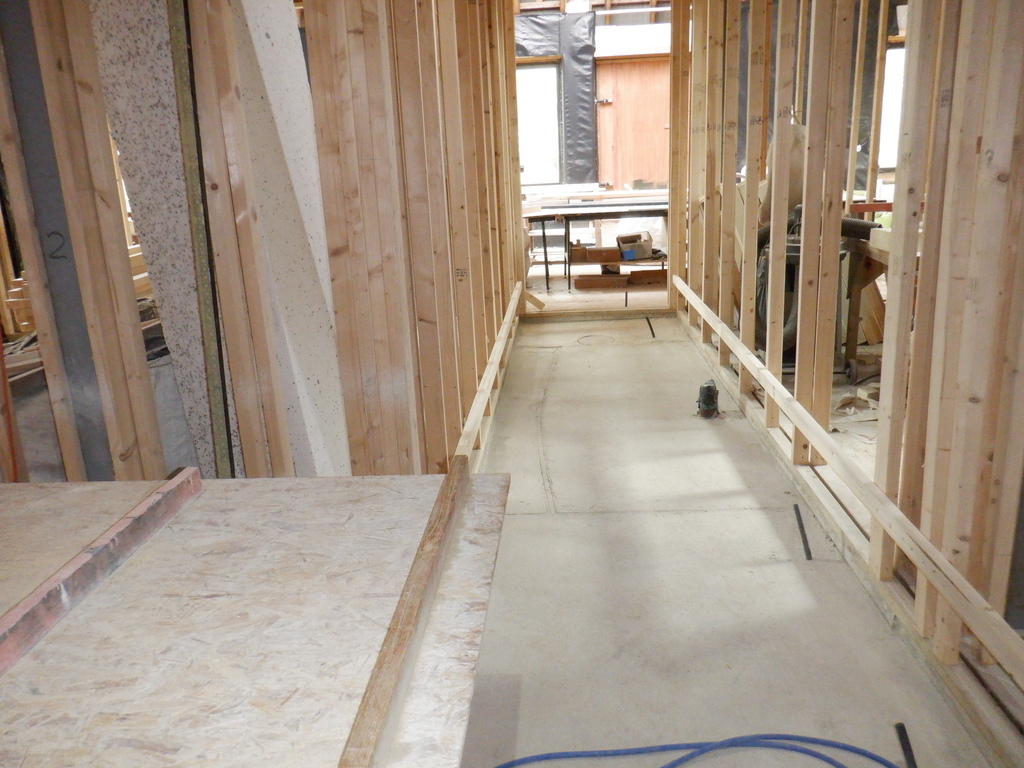
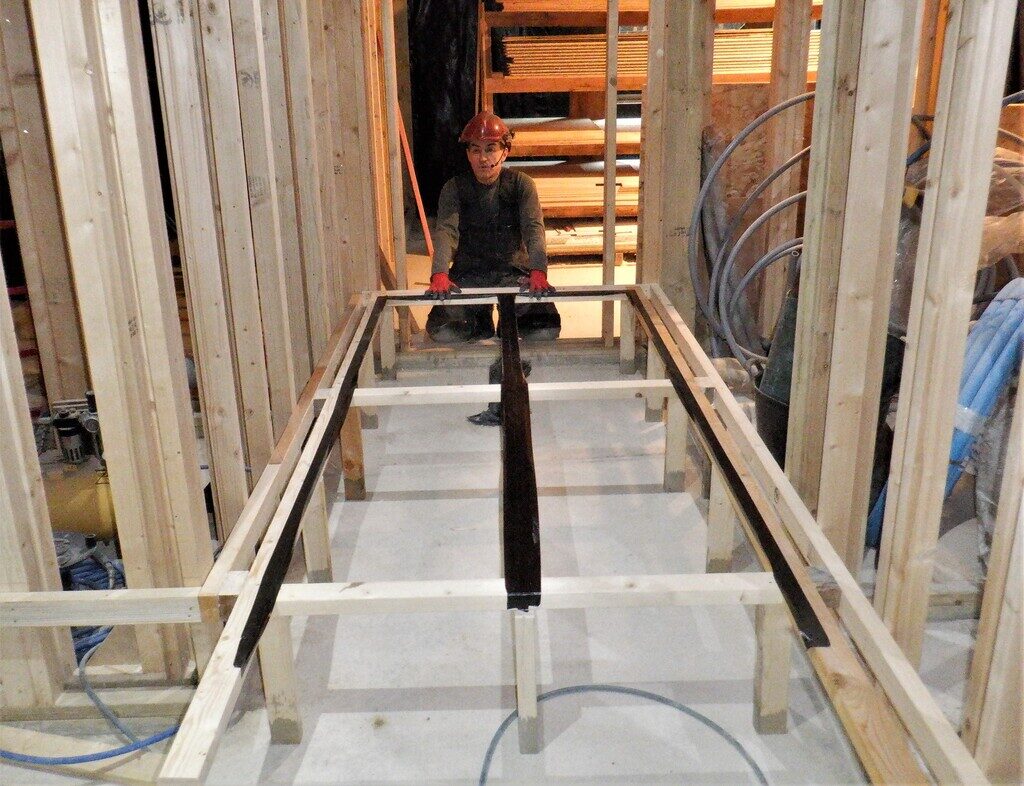
    The next section of hallway we decided to tackle, was the shorter one going down to Bedroom Two. This leg is a little simpler as it doesn’t have a full size air duct so we reduced the number of rails to just three, but with a difference. We would still have the tow outside flat rails that defines the outer edges of the removeable door panels but this time, have a flat set of noggings going down the exact middle of the hall. This middle line was made up of a series of 1137mm length pieces but interrupted every 1200mm to put in a full flat nogging going across the width to join the two outer rails together. It was much easier to deal with the cutting of the individual legs, which are still placed at every 600mm point, putting the outer set of legs on first and then put in a middle segment, one by one. Another trick we realised, was to mount a piece of CLS timber across the open end of the hallway, mounted on the side walls with clamps and in turn, clamped the two outer flat rails underneath this supportive bar, while we worked from Bedroom Two end of the hall, towards the open area where all four arms all meet together, at what we call the crossroads. This method allowed us to continue using the laser to highlight the height of the framework, without being blocked by other legs etc.
    Worktop Plus Sink Installed and Started on Flooring for Hallways

    Bedroom-2-Hall-Framing


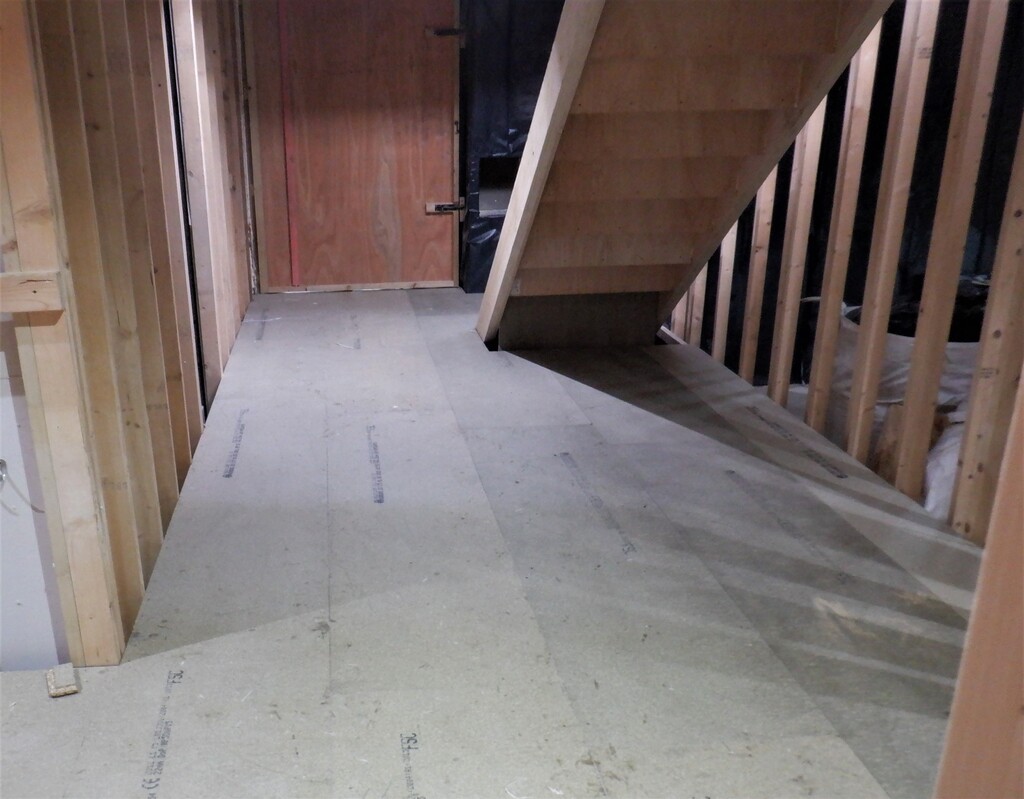
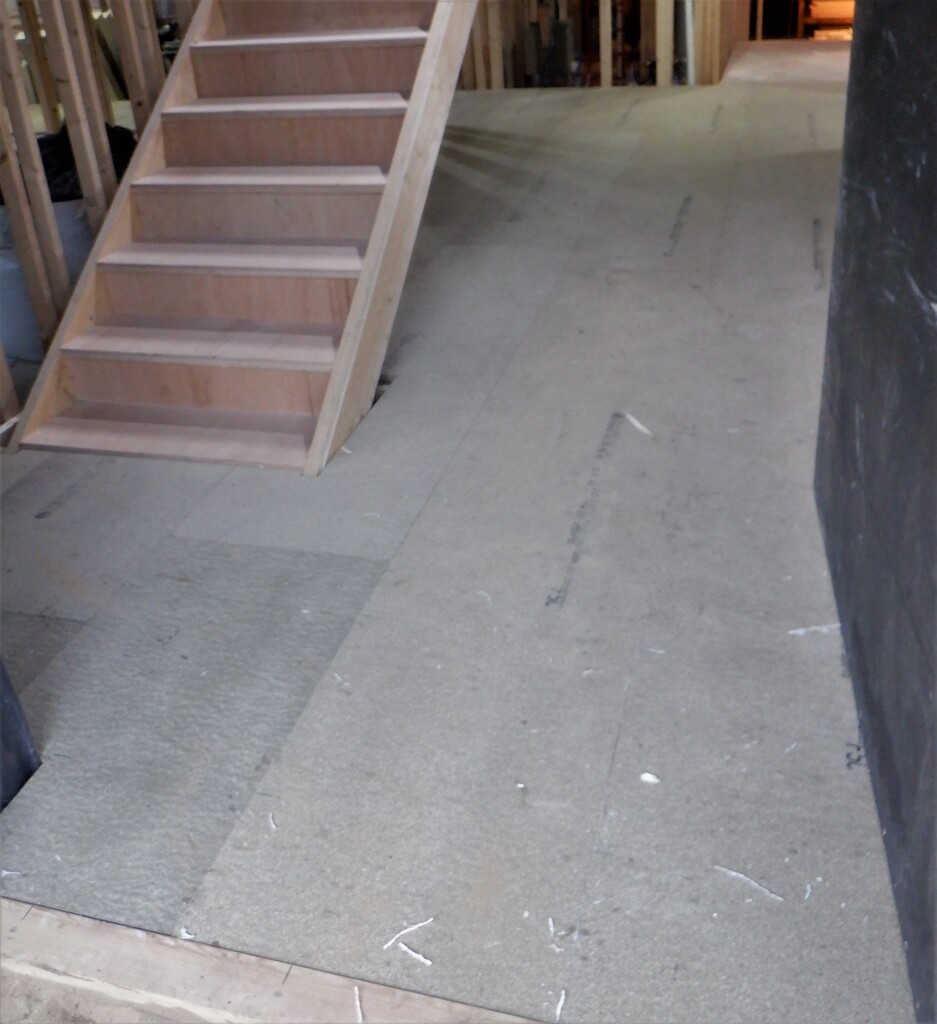
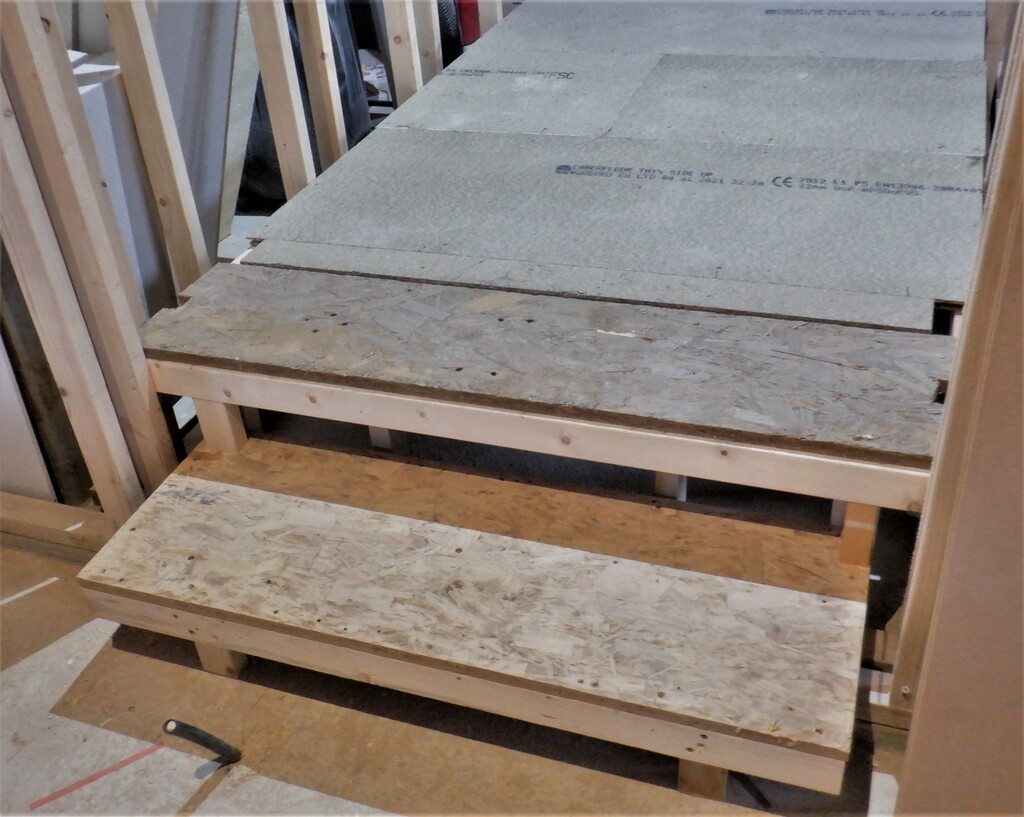
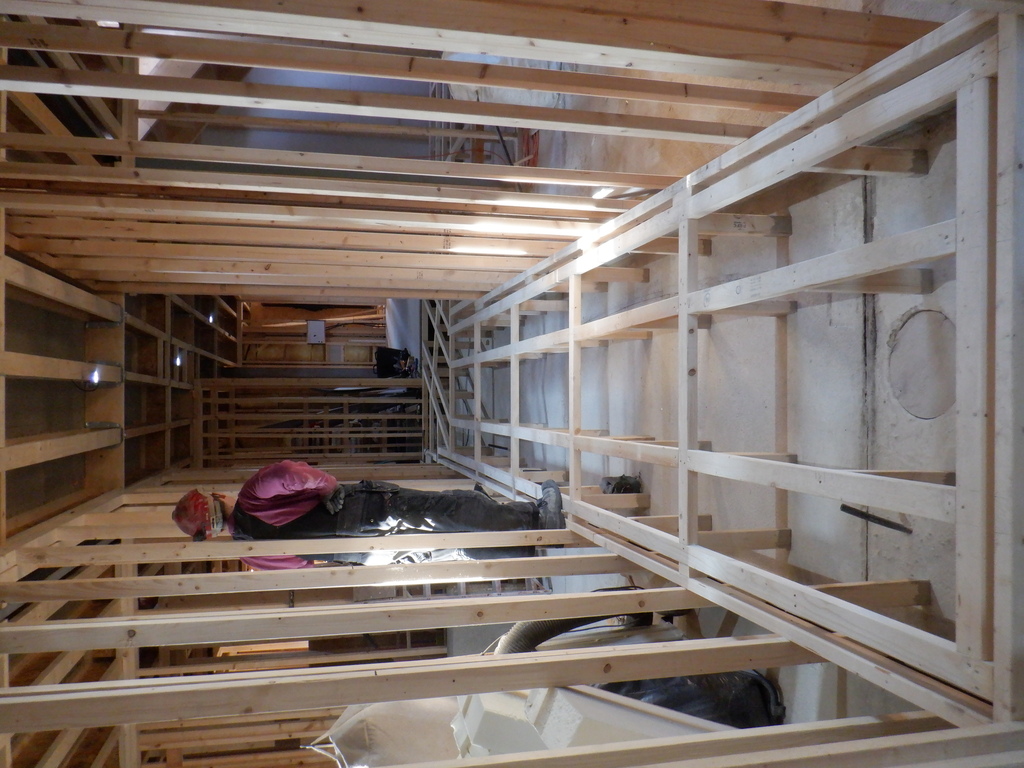
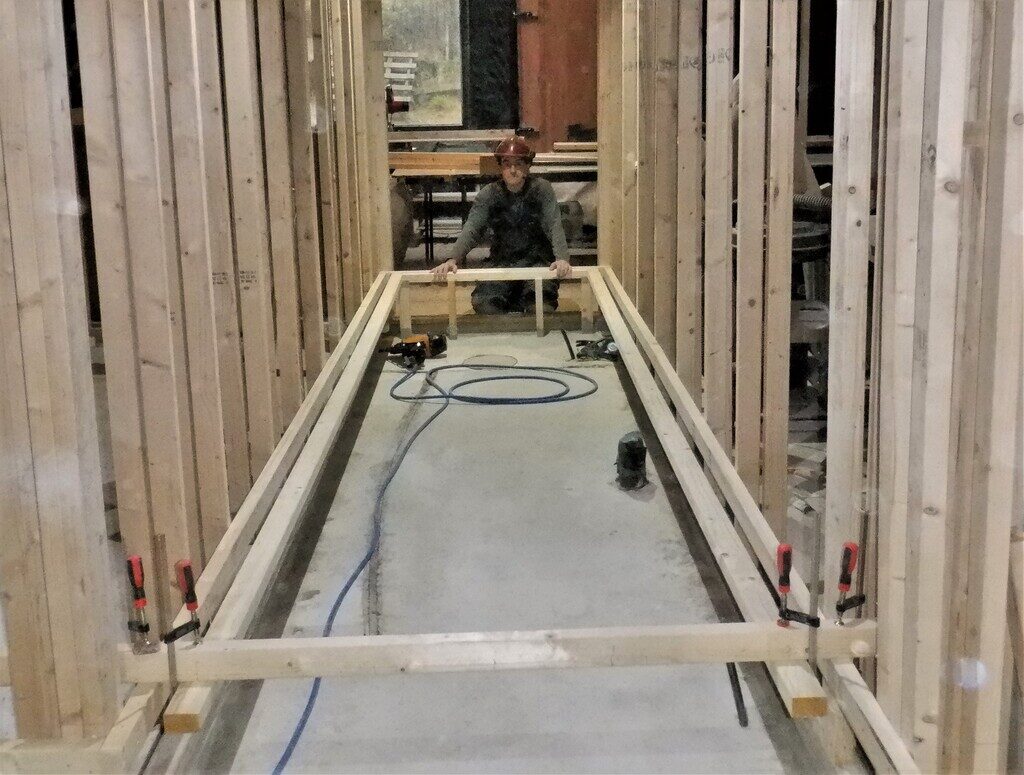
    It worked out quite well, covering about 2.5metres of hallway, which we proceeded to cover over with six rows of the floorboards.
    Worktop Plus Sink Installed and Started on Flooring for Hallways

    Bedroom-2-Hall-boarded


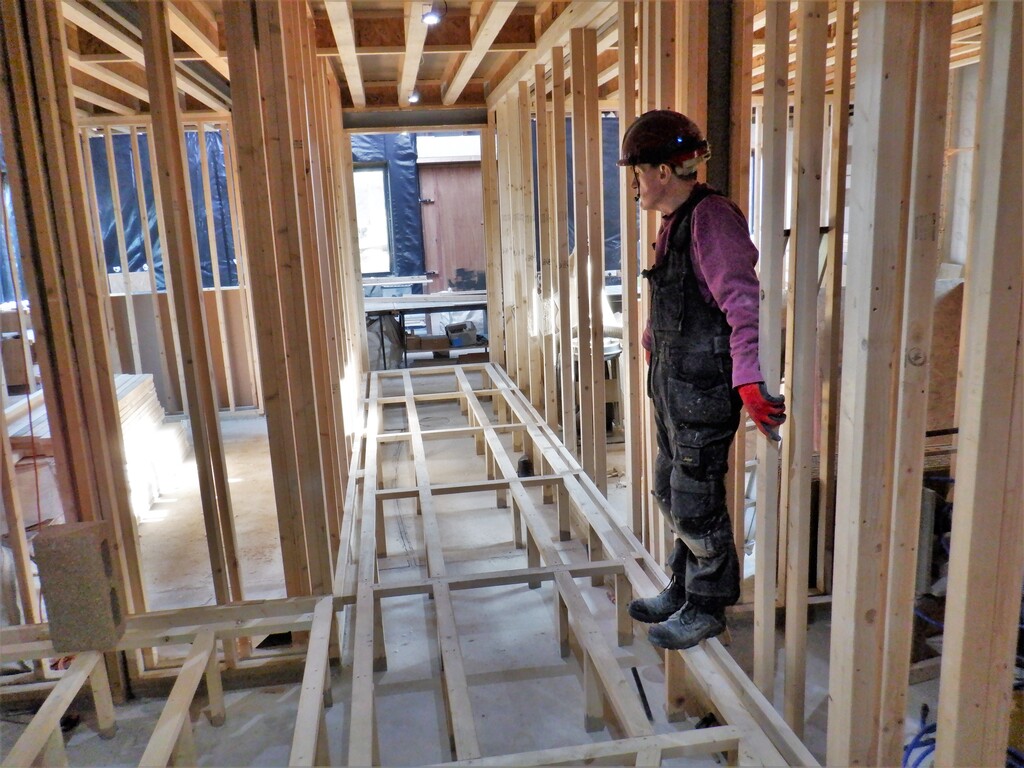
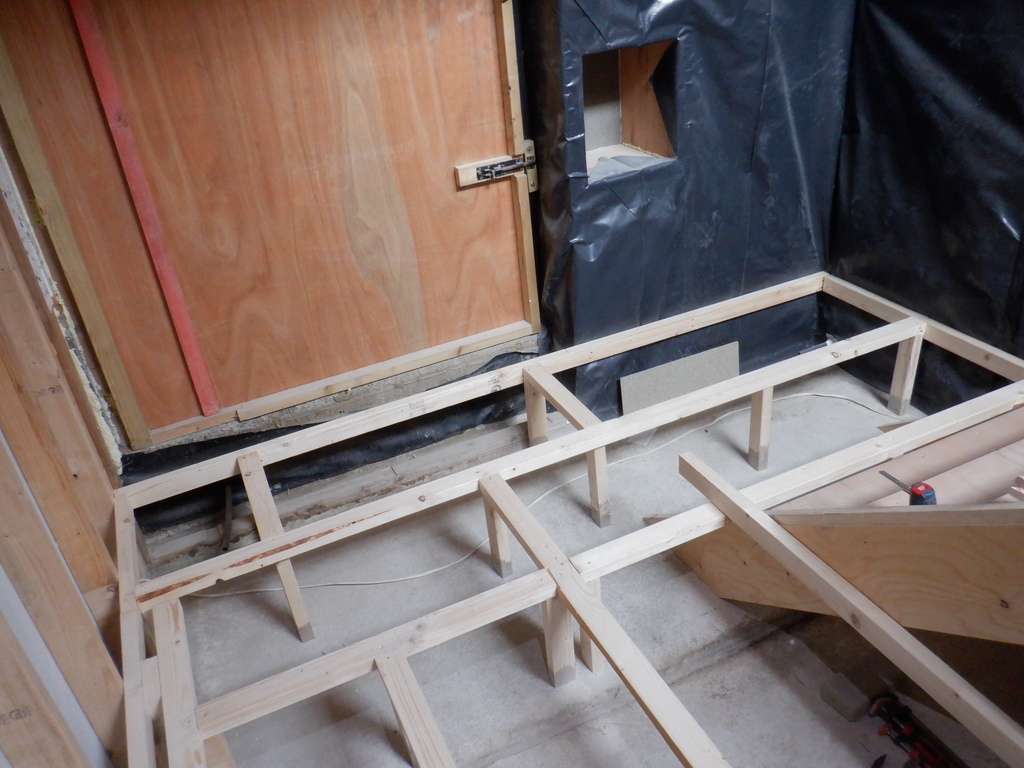
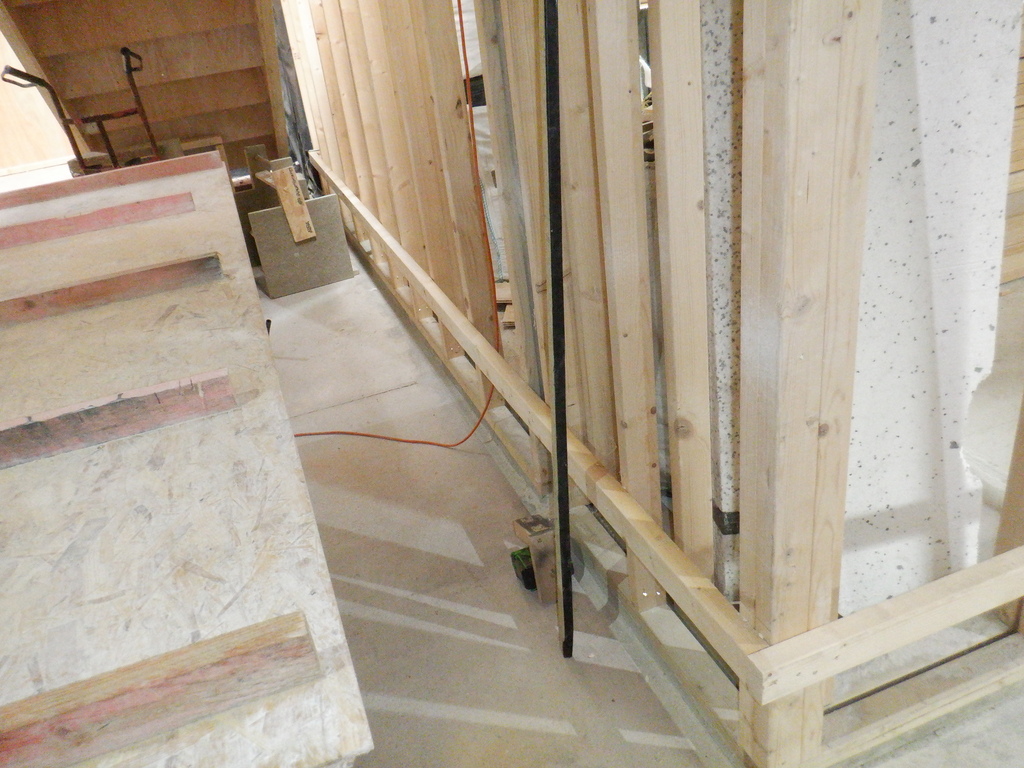
    Finally, we finished off the week by getting the first set of the framework up for the third arm, the section coming from the Great Room, passing the Kitchen and Bedroom One. This arm is just over 4.8metres long so we clamped two more flat outer rails, just like the other section we have done and got those glued and nailed into place, with one cross nogging in place down at the Great room end of the hallway, along with their four legs holding that end up and everything.
    Worktop Plus Sink Installed and Started on Flooring for Hallways

    Great-room-hall-framing-started


    Next week, we will carry on with that arm and then design the framework for the Crossroads and even perhaps the framework going up to the Front door region, all before we put down any more floorboards. We will see!

  • Another order from China

    After buying the valves last week, we started looking for some of the other things needed for automating the house.
    The next things are

    1. Flow sensors – to measure how much water the motorised valve are letting through.
    2. Servo motors – To control how much air is supplied/extracted from each room.
    3. Push button switches – Needed for control panels

    I actually used Alibaba’s request for quote to get prices for the flow sensors and received 10 quotes from $5 to $1.79 each. After looking at a few and asking for shipping costs a settled on a supplier. Luckily they were also able to supply the Servo’s and Samples of  various switches at a good price. This time the order was just under $500 including $160 of shipping.

    We now have to wait for the 2 order to arrive and then we will have to pay import duty and VAT.

  • Completed First Stage of Plumbing Plus Also Flooring

    The week started with the autumn’s annual task of the Sun Shield Taken Down and Thrown Away which occupied Monday morning. Then, it was a case of continuing on with sorting out the water pipes stretching across the Utility Room and finish putting three layers of insulation boards around the hot water pipes themselves, making sure they sweep under the worktop area for the sink and washing machine to have supplies of hot and cold water, before turning away and heading towards the Equipment Cupboard.
    We put in two more CLS support noggings to provide support for the floorboards but also to support the vertical plywood sections of the carcass that will form the stack of drawers and two cupboards under the worktop.

    Cupboard-side-supports

    Cupboard-side-supports


    Then we put down one and half strips of the flooring grade chipboard 22mm thick floorboards but only screwed it down just in case we needed to dismantle this and gain access to that area again, but it will be an unlikely event as all the plumbing and conduits bits and pieces are all done and fully accessible via the three new “trap” doors we also created in the floorboards. They are for the main sewage waste pipe that is under the stack of drawers, then the middle one under the sink section which is also the biggest one and the third trap door at the back in the left most section where the washing machine will live eventually, this access panel will provide the ability to work with the remaining conduits and pipes coming up from the concrete.
    Laid-floor-under-cupboards-and-cut-hatches

    Laid-floor-under-cupboards-and-cut-hatches


    We put down a loose set of more floorboards to make it easier to walk in and across the room to the hallway and beyond, they are loose so we can quickly move them out of the way to install the next set of pipes or conduits plus the main air duct that will come soon.
    The next step we decided to do is to mount a complete ring of floorboard support rails along on all the walls in all our four Hallways.
    Hall-Floor-Support-Rails-1

    Hall-Floor-Support-Rails-1

    Hall-Floor-Support-Rails-2

    Hall-Floor-Support-Rails-2

    Hall-Floor-Support-Rails-3

    Hall-Floor-Support-Rails-3

    Hall-Floor-Support-Rails-4

    Hall-Floor-Support-Rails-4

    Hall-Floor-Support-Rails-5

    Hall-Floor-Support-Rails-5


    This will provide the basic level and framework for the rest of the grid of support joists and posts to be installed next week, but first, before we can do that, we needed to make sure we have laid down any rigid pipework and conduits before all this fixed structure is in place. So we installed an electricity conduit, a 40mm wide plastic that we had left-over from when we were installing conduits from the Loke. This conduit will hold the 90Amps mains 230V AC lines to the Tech Cupboard where we will have the main consumer unit that will serve the rest of the house. The second rigid pipe we installed is the connection to our Central Vacuum System, a 50mm smooth pipework which will be solvent welded together and create a network to allow you to perform cleaning jobs across the house without carrying around a noisy machine, just a length of flexible hose that will connect to a nearest vacuum point. The 50mm pipe we installed was one going across the Utility room from the Hall to a T-junction and a side branch going off to one of the conduits coming up through the concrete that connects to the Garage.
    Vacuum-pipe-and-Electric-duct-1

    Vacuum-pipe-and-Electric-duct-1

    Vacuum-pipe-and-Electric-duct-2

    Vacuum-pipe-and-Electric-duct-2


    Friday morning we were sorting out more plumbing bits and pieces to order We had Friday afternoon off which made a change.
    On the last day we then got down to creating the carcass for cupboard units under the window and created a temporary worktop now so we can have access to some water in a sink, the first time we will have such provision in our new house. We always wanted to have worktops that are deeper than the standard 600mm so we have gone for a depth of 775mm which will allow us to fit in a washing machine inside the cupboard, including fitting a plinth that is inset a bit along the floor level. The carcass is made of four vertical plywood pieces, using 18mm thick top quality plywood that we used to make our staircase from, to form 725mm wide and 870mm high pieces. We cut out a notch measuring 100mm high and 40mm deep at the bottom front edge to provide that recessed area for our toes to fit in and the plinth to cover up the internal parts of the cupboards.
    Then we put in five pocket screw points on each vertical piece, two along the bottom edge to fix into the floor, one half way up the back edge to fix to the wall and finally, two more upwards to fix the worktop down. The carcass is now assembled so we have a 600mm space for the washing machine that will live nearest to the Equipment Cupboard, then another 600mm wide cupboard that is the position for the sink and all the associated bits and pieces that goes with sinks and the third section nearest to the outside door which is 500mm wide and will be a stack of drawers of various sizes, height wise but all being 600mm or even 700mm deep, to provide plenty of storage space.
    Utiltiy-cupboard-1-hatch

    Utiltiy-cupboard-1-hatch

    Utiltiy-cupboard-2-hatch

    Utiltiy-cupboard-2-hatch

    Utiltiy-cupboard-3-hatch

    Utiltiy-cupboard-3-hatch


    The last thing we did was to slice out of a sheet of 18mm OSB material, a single piece that will become our temporary worktop, measuring 775mm deep and 1810mm long. We added two narrow strips that will go along the back and right side of the worktop to provide one of those upstand protective features, to stop one losing items off the back and into the window area plus also keep the water from spilling over the back edge onto the wall or into the window area again.
    Utility-cupboard-bases-and-temp-worktop

    Utility-cupboard-bases-and-temp-worktop


    Next week, we will cut the sink hole into the worktop, and then paint the whole thing to colour it up and water proof the surface too. Then we can install a tap and have running water at last in our house!!

  • Sun Shield Taken Down and Thrown Away

    Today, the first thing of the new week, we went up on our roof of our temporary living quarters to take down the Sun Shield from over our long corridor transparent roof “window”. It was falling apart and splitting in lots of places, we could just tug at the material and it would rip quite easily, so we undid all the clamping piece of wood and unthreaded the rope, folded it up and dumped it into our bin. Looking back in our records, it seems that we created this version of the shield back in April 2018, see Sun Shield Over Corridor Created and Mounted for details of us doing sewing, so it has done just about three and half years of service, coping with the powerful radiation coming from our Sun.
    Next year, we will repeat the job of buying a new tarpaulin and making a new sun shield.