Category: Utilities

  • Main Electricity board Upgraded and House Connected

    Today, Tuesday, we had our local professional electrician come around to upgrade our main Electricity Supply Board, first to install a fused cut-off switch immediately after the meter. The original installation ten years ago, the people who came, didn’t install a cut-off switch so we were left without the ability to shut off the Main supply to connect to house to the supply. For the last few years the house connection was routed via plug connected to the existing RCD Consumer Unit. So with the switch installed the wiring to the house was insulation tested and connected directly to the main supply.
    So, our connection to our main house is now properly integrated into the main body of the Control Board and we can now look forward to installing our Solar Panels and Batteries, plus also our various water pumps and stair-lift motors without accidentally tripping the RCD for rest of the household.

    Main Electricity board Upgraded and House Connected

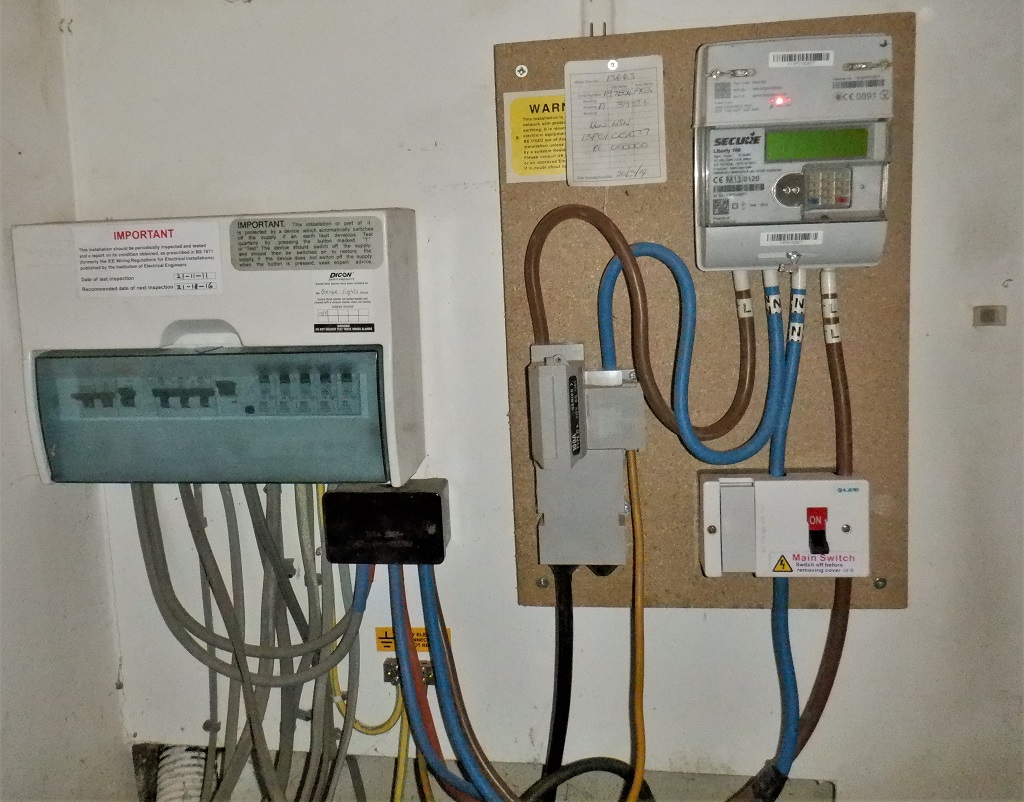
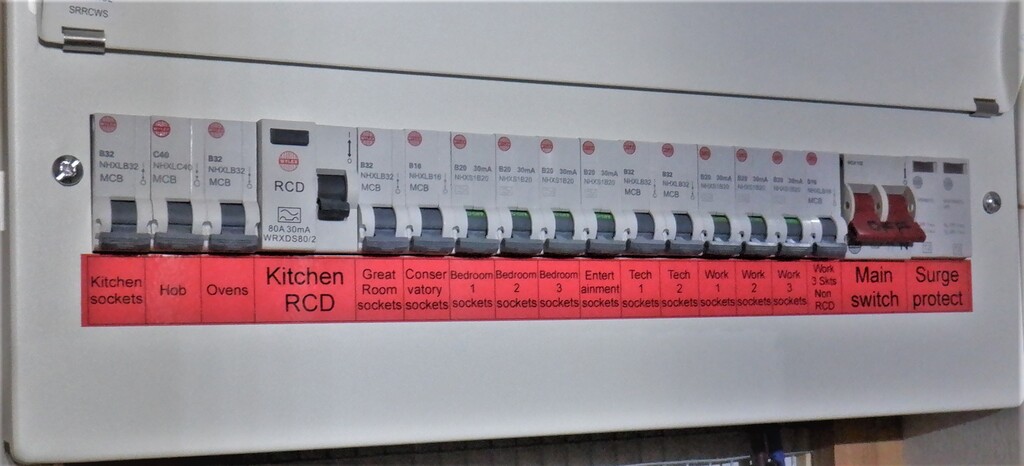
    New-Fused-Switch-for-Incoming-Mains-Supply


    He said that he can come back if we need him again, plus also, he would be willing to do further tests and inspections and issue a certificate for us to present to the Council building control inspectors.

  • Started on Technology cupboard and Electrical panel.

    Stephen wanted a solo project whilst Shaun in resting, so he started on the Tech cupboard.
    First the two walls next to the bathroom and Storage cupboard where boarded with OSB (using up a lot of small pieces to make solo handling easier and using up the accumulated offcuts). Then Fermacell was stapled and glued up on the wall next the storage cupboard. This was enough to start working on the main Electricity switch panel (consumer unit).
    The panel was mounted about 1.2m above the floor and two cable trunks were constructed to manage the cables going down under the floors and up to the first floor. Then the 16mm² supply wires were pushed though the duct to the utility room, they were then connected to the main switch on the panel and the distribution block in the utility.

    All the switches were installed in the panel and all the fixed internal wiring was installed. Labels have been added to RCBO neutrals to help with testing.

    Started on Technology cupboard and Electrical panel.

    Tech-Cupboard-Switch-Panel-closed

    Started on Technology cupboard and Electrical panel.

    Tech-Cupboard-Switch-Panel-open

    Front-panel-circuit-labels

    Front-panel-circuit-labels

    Started on Technology cupboard and Electrical panel.

    RCBO-Neutrals-labeled


    Tech Cupboard Panel circuits

    Kitchen sockets RCD ring Shared RCD
    Hob RCD radial Shared RCD
    Ovens RCD radial Shared RCD
    Great room Sockets RCBO radial
    Conservatory Sockets RCBO radial
    Bed 1 Sockets RCBO radial
    Bed 2 Sockets RCBO radial
    Bed 3 Sockets RCBO radial
    Entertainment Sockets RCBO radial
    Tech cupboard 1 Non RCD radial Computers & backup DC
    Tech cupboard 2 Non RCD radial Primary DC PSUs
    Work 1 Sockets RCBO radial
    Work 2 Sockets RCBO radial
    Work 3 Sockets RCBO radial General use
    Work 3 Special Sockets Non RCD radial For Experimental use

    Tech Panel also has a Surge Protection Device fitted.


  • Organised The Utility Conduits and Pipes

     Today, we tackled the task of digging and loosening all the various pipes and conduits that run from the Garage to the House, and get them all laid out to come up in the Utility Room in a neat pattern.

    Utilities-Tidy-Up-Before-A-long-time

    Utilities-Tidy-Up-Before-A-long-time

    There are conduits for the Mains Electricity, data / telephone, for the vacuum system and spare empty one. Then, there are the water pipes for things like the thermal solar heated water (there and back again), 6 pipes that run under the garage for pumping heat out of the ground, supply from underground rainwater tank located under the Garage, cold water feed from house to Garage and finally, the mains water supply from the Loke. Oh yes, I nearly forgot the compressed air supply from the Garage!!

    It is a pretty network of criss-crossing pipes and conduits down in the hole

    Utilities-Tidy-Up-All-dug-up

    Utilities-Tidy-Up-All-dug-up

    We used the edge of the foundation to screw an steel strap and used that to cable tie each pipe and conduit into a neat line.

    Utilities-Tidy-Up-Ready-for-reburial

    Utilities-Tidy-Up-Ready-for-reburial

    We also used some wooden strips to create a framework higher up as well, to help to keep everything straighter up. Then, we stamped and thumped the soil back into the hole and make sure it was well and truly compacted hard down.

    Utilities-Tidy-Up-Finished

    Utilities-Tidy-Up-Finished

    It is rather neat and tidy now, at long last, since this bunch of these pipes has been sticking out of the ground for 6 years!! Phew!

  • Phone Line Moved

    BT Openreach came and moved the phone line today, from the old house to the garage. The old line was overhead and the new line is underground. Engineer cut off the old overhead line at the top of the pole and connected to a new cable which was pulled through the duct using the string we sucked through ealier (at the second attemp, the string broke on the first try and had to be sucked through again). New master socket fitted under the counter in the kitchen.

  • Walls are going UP!

    We have started putting up the OSB wall boards at last! We have inserted all the conduit pipework inside the walls down from the Utility Rail (and one upwards!). we were making sure we have everything in place as planned before we permanently nail on the OSB sheets!

    The Light Channel is made of 150mm wide 9mm thick hardwood plywood, screwed down on top of the OSB boards to create a flange and a gap for the fluorescent lamps and controller to slide into.

    GR - OSB cladding started

    GR – OSB cladding started

  • Electric man visit

    Having paid the kings ransom on Monday, the man from EDF energy came this morning. Looked at the site and old meter and approved the route for the new cable. But he said we were using the wrong ducting!, apparently we should be using a solid duct not a twinwall. Luckily the new duct will fit inside the old so we will just have to buy some of the new and thread it though the old…

    He said there is a 4-5 week lead time on work so we will have to work out when they will be needed.

  • High high cost of utilitys …

    We received the quote for moving the electricity supply today. £1132.70 !!! We all think this is a very high price for very little work. This is what they need to do.

    1. Pull new 35m cable through pre-installed duct.
    2. Cut existing supply cable
    3. Join to new cable
    4. Move electricity meter from old house to new meter box.

    that’s all…. But its a near monopoly situation (There a very few companies licenced to connect to the mains) so we will just have to grin and bear it!

  • Service trench completed

    Service trench completed

    Thursday 30th

    Installed all the pipes and conduits into the trench after sliding 2 x 22mm plastic plumbing pipe with foam insulation (25mm on flow and 19mm on return) into the large conduit (tried insulating with rockwool and gave it up as a bad job!).

    Service Trench All conduits in place

    They are from left to right :- Data, rainwater1, compressed air, rainwater2, mains water, central vac, spare, solar water & electricity.

    Friday 1st Oct

    Started by filling trench to approx 300mm above conduits then placed warning tapes (100mm wide polythene printed with warning messages about water & electricity below) along the trench. We then filled the trench to the top.

    Service Trench Filled

  • Service trench

    Digging initial trench from the garage to the loke and along the loke a few meters. On Tuesday we dug most of it and finished it off Wednesday morning. The trench is mostly about 1.5m deep (gets shallower towards the garage).

    Installed the power & telephone ducts and the water pipe from the garage to the loke and round the corner, leaving the rest of the coils wating for the trench to be extended.

    service trench with main utilities in

    We then ran most of the connections from garage to house.

    trench with most pipes and conduits in

  • Service connections

    We need to connect the new house to the services (Electricity, Water & Phone). Currently these all come to the old house and will need to be diverted. The phone is overhead and will need to be routed underground as the overhead path intersects the new house so is not practical.

    We will take all of them to the garage to use while living there, and the power and phone will be connected back to the main house later. A T junction in the water main will supply water for the house.

    A trench will be cut just inside the boundary with Smiths Loke from the current pedestrian entrance (water meter), past the telegraph pole (opposite side loke via a side trench), then pick up the power and run down the plot to before the corner of the new house then turn crossing the corner of the utility room and then to the garage.

    All the connections will be in conduits except cold water which is just laid in the trench.

    We will install these connections between the garage and the house.

    Connection Pipe / Cables Conduit Notes
    1. Mains electricity 25mm2 cables 50mm Placed opposite side of trench from data cables
    2. Rain water pumped from tank under garage 32mm Polythene pipe Submerged pump in bottom of tank rated up to 7000litres per hour and 8m of head
    3. Rain water back from header tank in house 32mm polythene pipe Header tank will automatically be topped up with mains water if lack of rain
    4. Insulated pipes (two) for solar heat transfer 22mm PEX Barrier pipes Inside the 150mm pipes rolled in ordinary glass fibre wool insulation (just enough for minimal heat loss during the 5 minutes transfer
    5. Compressed Air 22mm PEX Barrier pipe inside the 150mm 8bar (maximum) Compresser in Garage
    6. Low voltage cables CAT 5e cables 50mm Network, Telephone and other signal lines
    7. Central Vacuum System 50mm Cleaning Tasks in the Garage and Garden Room
    8. Nothing 50mm Future Expansion