We spent the last week or so, constructing a cabinet to hold all our Lithium Iron Sulphate cells, grouped into battery packs. We went for a drawer design so we can access the individual cells but have them safely tucked away from fingers or metal objects.
The basic overall dimensions of this cabinet is 900mm wide and 400mm deep, with the top outer “lid” about 1300mm off the floor. There are four drawers all together, three being 295mm tall to store the 50Volt battery packs and one drawer being 165mm tall to store the 12Volt pack. Then a 250mm tall shelf with a front panel that will have the display modules to show the status of the battery packs, mains powered chargers with their own cut-off switches and finally a master cut-off switch for the whole cabinet.
We used a complete sheet and a narrow strip off another second one of our 12mm thick posh plywood material, to slice all the parts for the four drawers, we put all the dimensions of each piece into an optimiser and it told us where to slice, to minimise wastage. We used a combination of our track saw plus also our table top circular saw, to slice the sheet up into consistent size pieces. We then cut a groove in the four vertical sides of each drawer so the base board will be well supported and take the weight of the battery cells, as the sixteen cells that makes up the 50Volt packs will weigh almost 100kg in total. We had to order heavy duty drawer runners to cope with that kind of load.
We then started drilling and cutting out the various air holes and cut-outs for the switch on the front panel, and then cable access at the rear of the drawers including installing metal bolts and metal brackets to hold the computer etc.
Next, we put on the drawer runners themselves, three heavy duty ones for the big drawers and a single medium duty runner for the 12Volt drawer which has only four cells in it weighing just over 20kg.
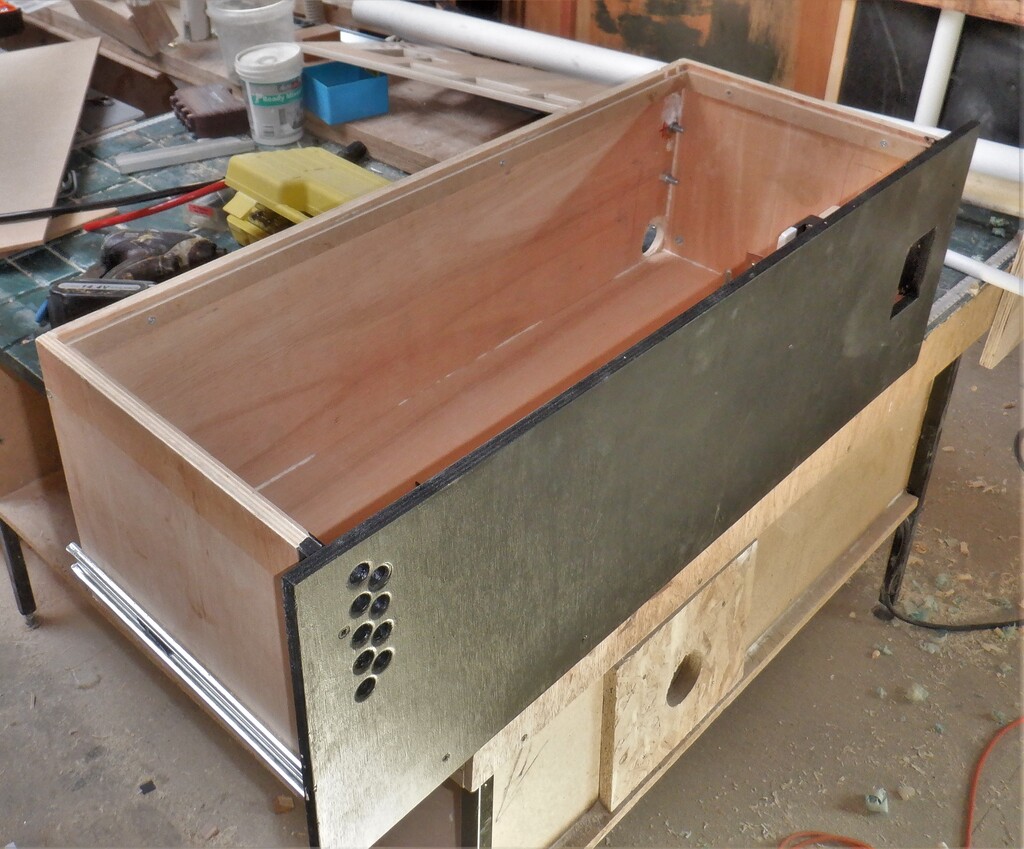
A-Draw-
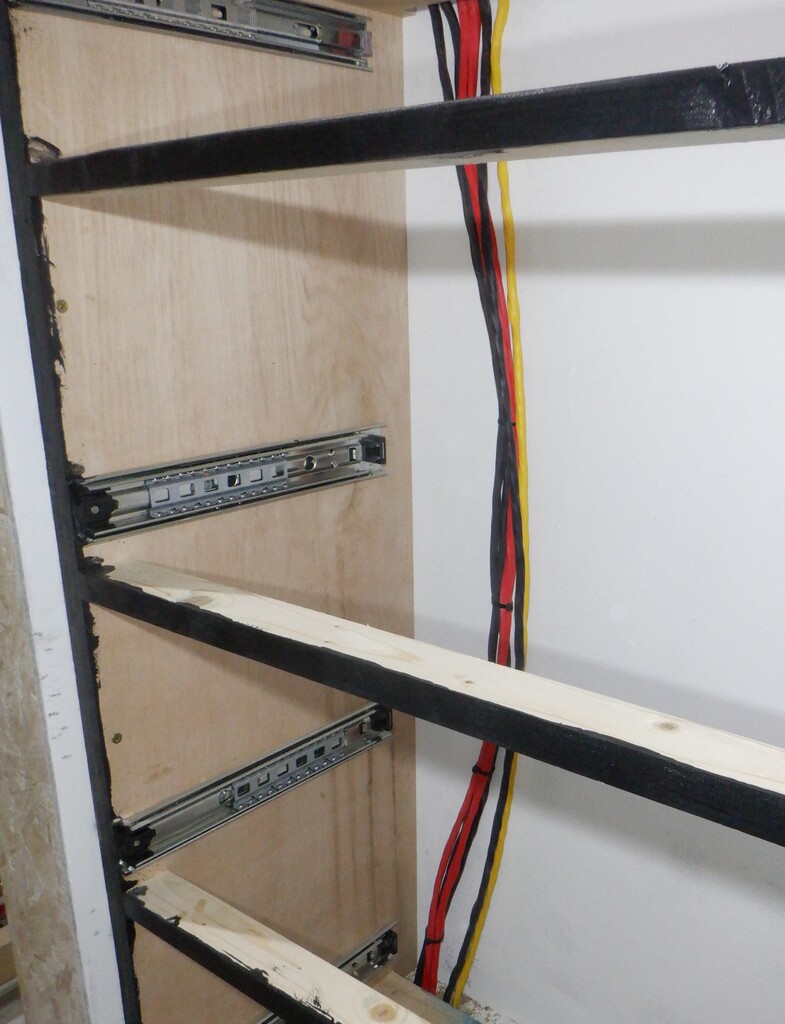
Now we got a sheet of 18mm thick plywood out of our sheet storage room and proceeded to slice that up into 400mm wide strips to create the cabinet itself. We needed to make sure that one piece is long enough to bridge right across the Tech Cupboard, this forming the top surface of the cabinet, which measures 1085mm wide. This means that the remainders can form the vertical sides where we then installed the other half of the runners in their assigned positions so that the bottom drawer is 30mm off the floor surface and then a gap of 5mm between drawers plus another 5mm gap to the top shelf that will have a fixed front panel that has other equipment and modules including computers and master isolating switches too.
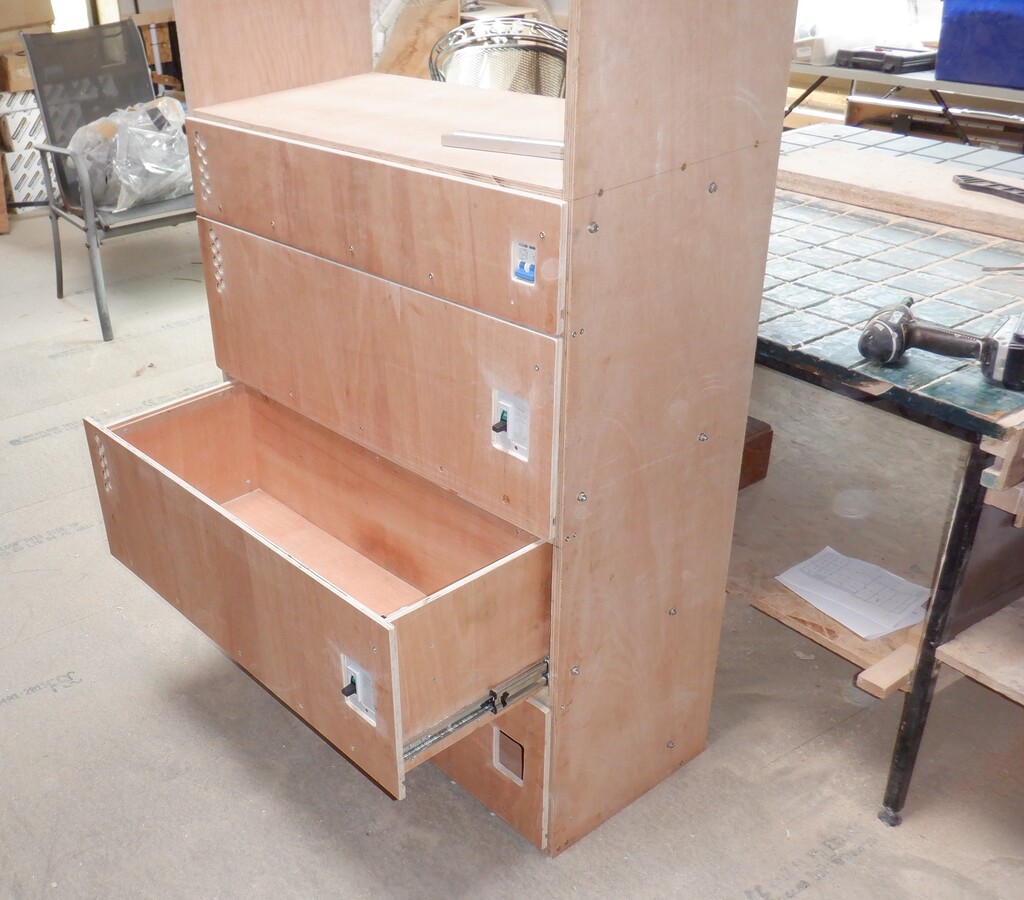
All-draws-fitted
Now that we have the drawers in place, we could put in reinforcing horizontal bars to help stabilise the sides and also provide a visual and physical blockage between the drawers, so we used pieces of 50mm by 25mm battens which we planed down to make them smoother. We put two at the bottom, one at the front to complete that blockage strip, but a second one near the back to lock the back edge together. Finally, we took the fourth piece of our 18mm plywood 400mm wide left-over strip and cut that down to the internal dimensions, 862mm, and fitted that in place so that it provides the same blocking function as the other battens. We now have a rigid and fairly robust cabinet with a shelf which forms the complete storage for holding our battery packs and all the electronics for charging and monitoring everything.

Cabinet-built
We then turned the cabinet around so we could work on fitting an air duct to each drawer, to provide active cooling to make sure the system runs cool. We installed a vertical stack of 50mm wide plastic pipes with a series of T-junctions pieces with adapters fitted so we can have 32mm plastic pipes coming out sideways and have a sweep bends to enter into the back of each drawer. We got it just in the correct position so that a drawer can open and shut so that the ends of the pipes fits neatly in place and blow air inside the drawer. We assembled the pieces and then test fitted the whole cabinet into the Tech Cupboard, to make sure we could move it through the doorway and into the correct location on the left side of the cupboard which includes going around the metal Skylight leg too. It was successful so we proceeded to permanently glue the plastic into place using our PU construction glue which forms a very tough solid bonds.
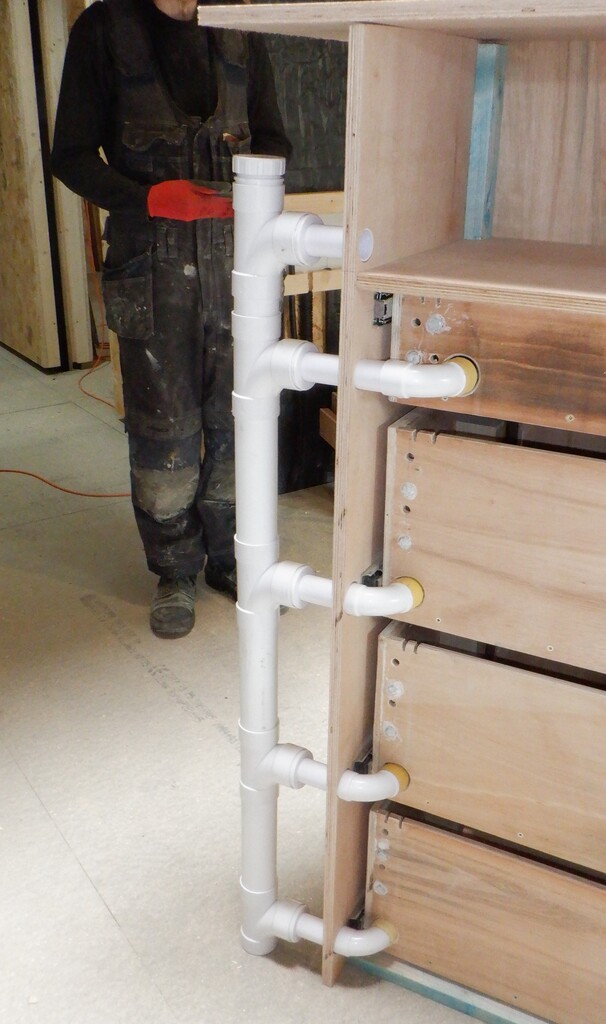
Air-supply-yo-the-draws
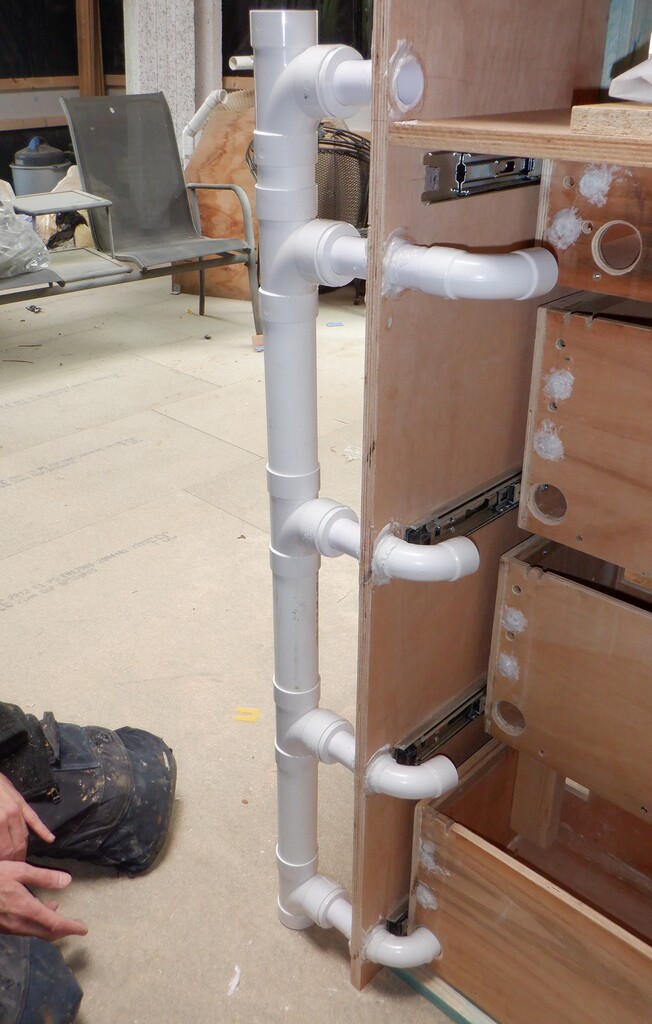
Air-ducts-glued-in-place
Next, we started mapping out the electronic equipment that will live on the shelf, including creating another front panel to cover the whole shelf. This being the fifth front panel move, above the four drawers. It had cut-outs for two master switches on the left hand side, a row of four rectangular cut-outs for the mains powered 50Volts chargers along the bottom (they are sitting on the shelf itself) and a display panel that will have four individual little displays showing the status of the four battery packs, this panel is located on the right side. then, each of the chargers will also have their own little display showing the voltage and current measurements of each charger. Finally, there is the usual air holes on the left side to allow the waste air to escape back into the Tech Cupboard and drawn away up in the ceiling.
One of the other jobs we did for this shelf, was to make bus bars and terminal blocks so that we could bolt on our heavy duty electrical wires and manage the connections inside the cabinet. We made four solid copper terminal blocks, measuring 100mm long by 25mm wide, and then drilled various holes into this 8mm thick bar which we then tapped a screw thread into the material so we could bolt down the tags that are crimped on to the ends of the various wires. We put a vertical small piece of plywood between each copper block so that they are isolated from each other, to avoid accidental shortages etc.
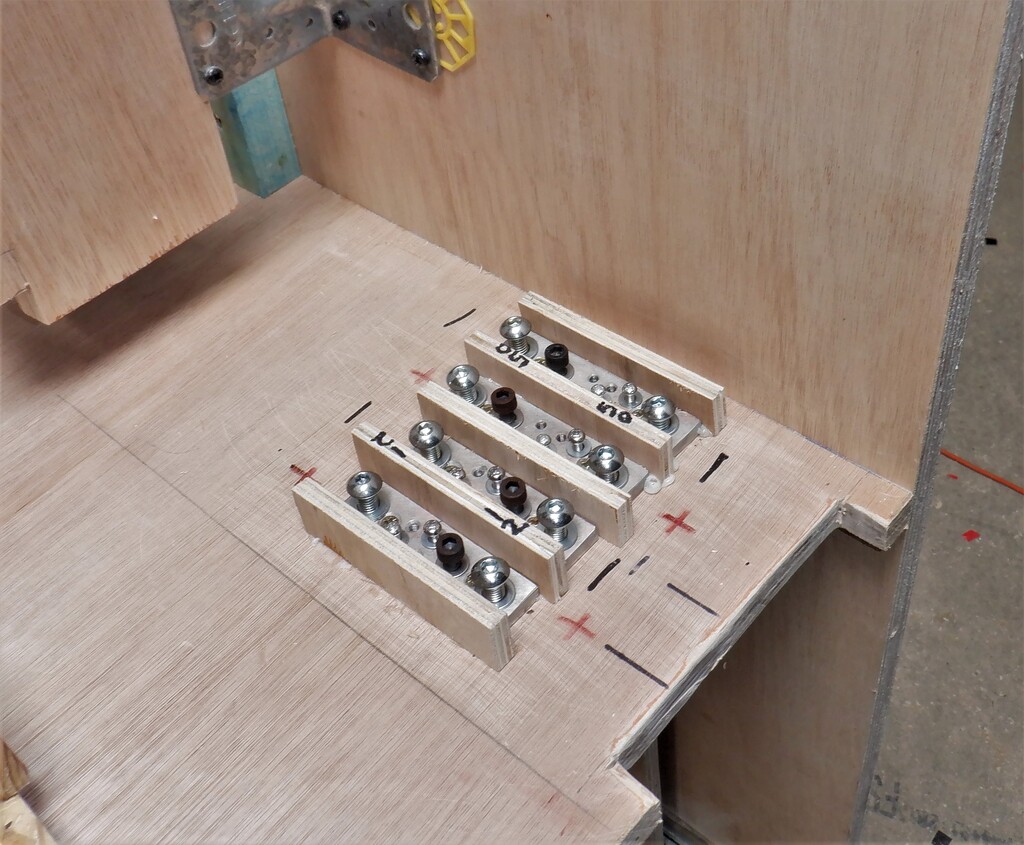
Internal-distribution-blocks
Then we took two length of our aluminium bars 1700mm long, and drilled a whole collection of holes to provide more connection points, to and from, various chargers and to each 50Volt battery packs in their drawers. We bent the bar at the 600mm point so that it can be screwed to the wall of the Tech Cupboard where the cabinet is located and provide a high powered transfer of the 50Volts supplies inside the cabinet and send it out to the wider world via the master cut-off switch.
We wrapped them up in red and black tapes but also slid on some giant heat-shrink tubing to provide a robust protection against electrical shorts on top.
Next, we carried the cabinet into the Tech Cupboard for a test fit and then measured the spacings on the right and left side of the cabinet and the wall. We ripped sawn a length of 2by1 timber to make a filling in piece, the right side being 32mm wide tapering down to 23mm at the top of the gap. The other side was much thinner, only 10mm at the bottom and about 7mm at the top. We also screwed a couple of fixing battens at the top of the cabinet, at the rear, to provide an anchorage mechanism to secure the whole cabinet against the wall and prevent it tipping over when one of the battery drawers, containing 100kg of weight, is opened.
Then, we screwed on the two bus bars onto the wall behind the cabinet, to get that ready.
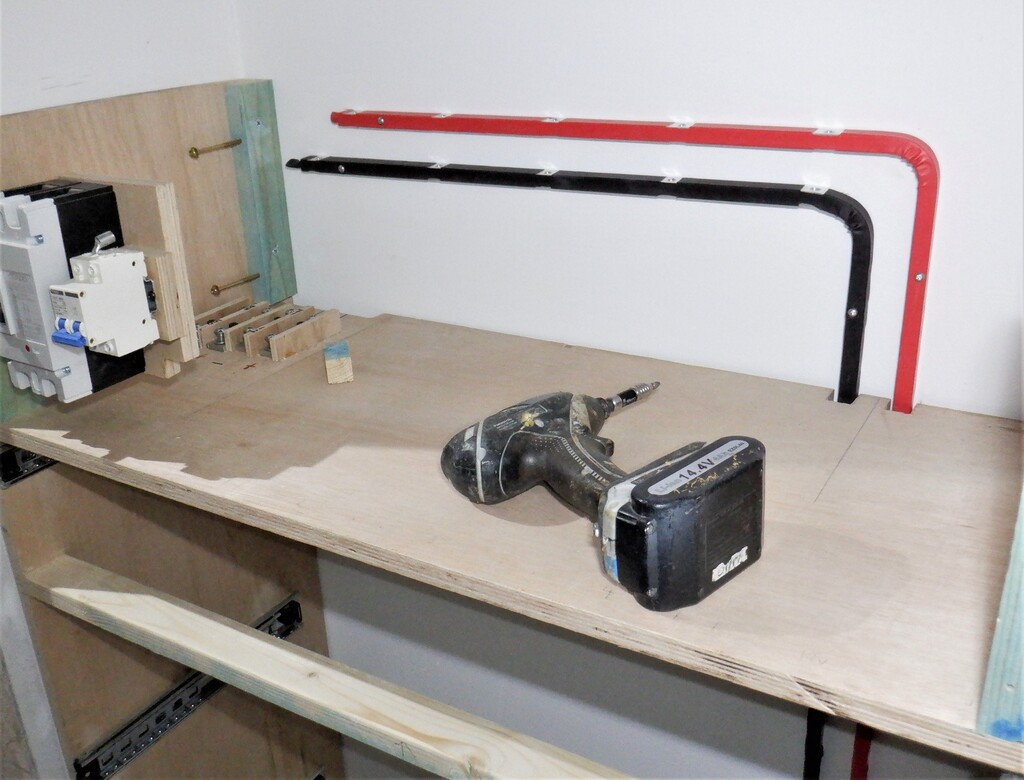
Internal-Bus-bars-1
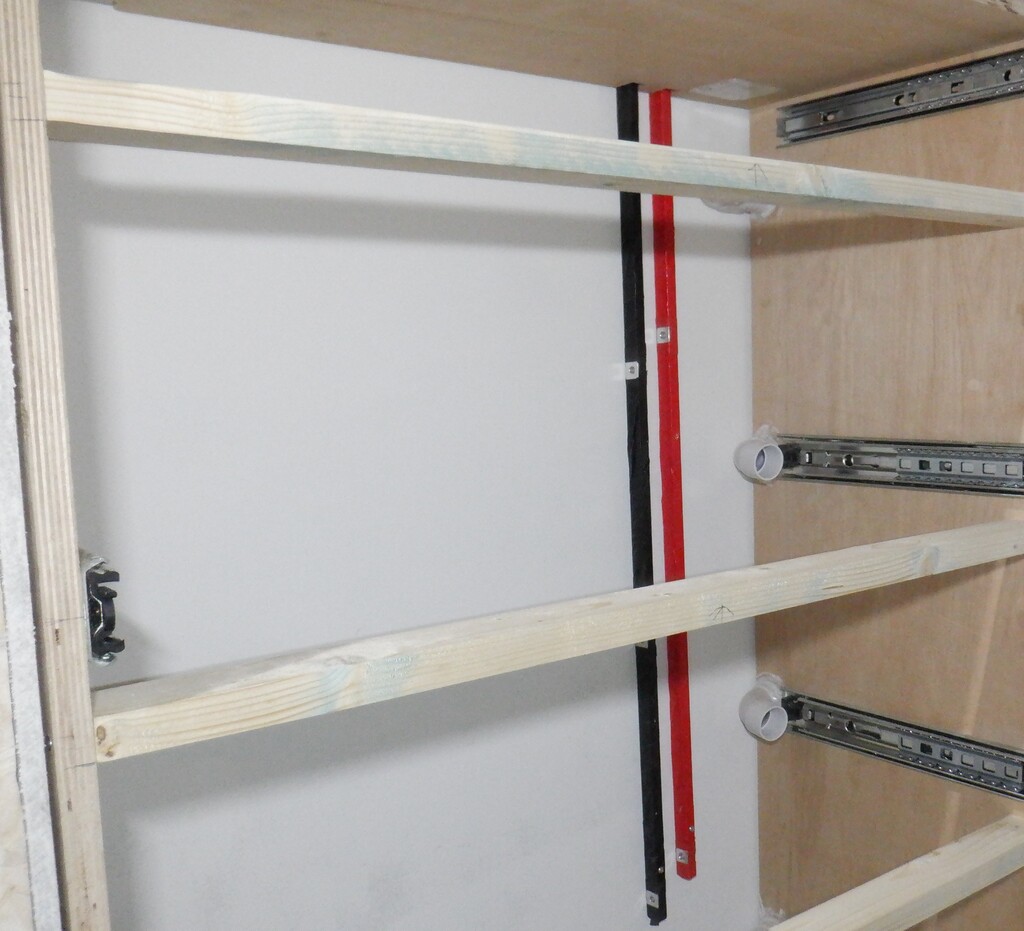
Internal-Bus-bars-2
We painted it plain black, all the drawer front panels and the front facing edges of the cabinet itself too. We didn’t bother in doing anywhere else as it will be all hidden.
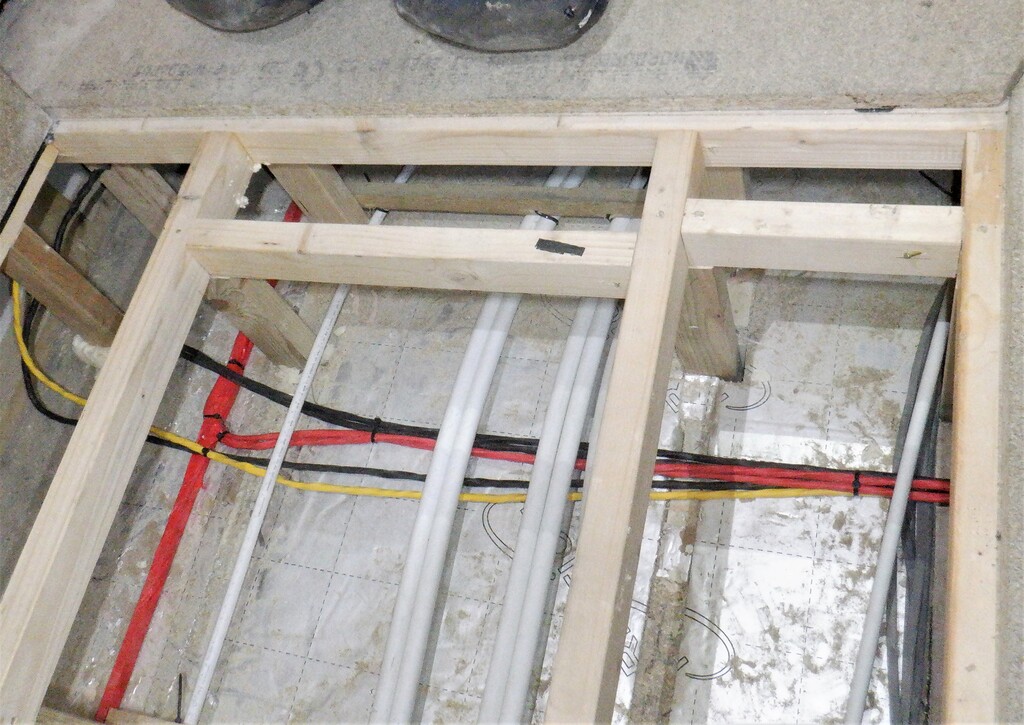
Next, we drilled a series of extra conduit holes into the top of the right side of the cabinet to allow input and output of more cables and wires, some going upstairs to serve the rooms up there, but also, a smaller conduit going down to allow a data cable to be routed to and from the solar inverter box we have running in the Utility Cupboard, plus also this small conduit can have a 12Volt power cable threaded through to provide power for the network hubs and switches that we will have. Finally, we cut several holes into the floorboards to allow the 50mm air duct to be routed from underneath the flooring, that will be eventually connected to the main air duct out in our hallway.
We were then ready at last, to install the cabinet into place, permanently. It got screwed tight to the wall, then some extra screws on both left and right sides and finally, a couple downwards into the floorboards, along the front rail. We inserted a 20mm conduit into the cabinet and down into the floor and connected a right angle adapter to the 50mm air pipe underneath the flooring too.
The next job was to run some heavy duty electrical cables from the cabinet, down underneath the flooring and out to the hall and connect to our aluminium bus bars that we installed a couple of weeks ago. These cables we had made ourselves by stripping off the insulation off sixteen square millimetres (16mm²) copper cables, unwound the strands and joined two of them back together again to make a single thirty-two square millimetres (32mm2) single core which we slid on a replacement coloured heat shrink tubing. We made two of these for each half of the circuit, making a total of sixty-four square millimetres (64mm2) copper wires, capable to handle well over 200Amps of power without overheating or stressing the cables. We bolted the ends to the bus bar out in the hall and the other ends inside our battery cabinet, to our distribution terminal blocks up on the fifth layer. We also did a similar thing for our 12Volts line but only using a single home-made 32mm2 cable because we are only expecting and supplying a maximum of 100Amps.
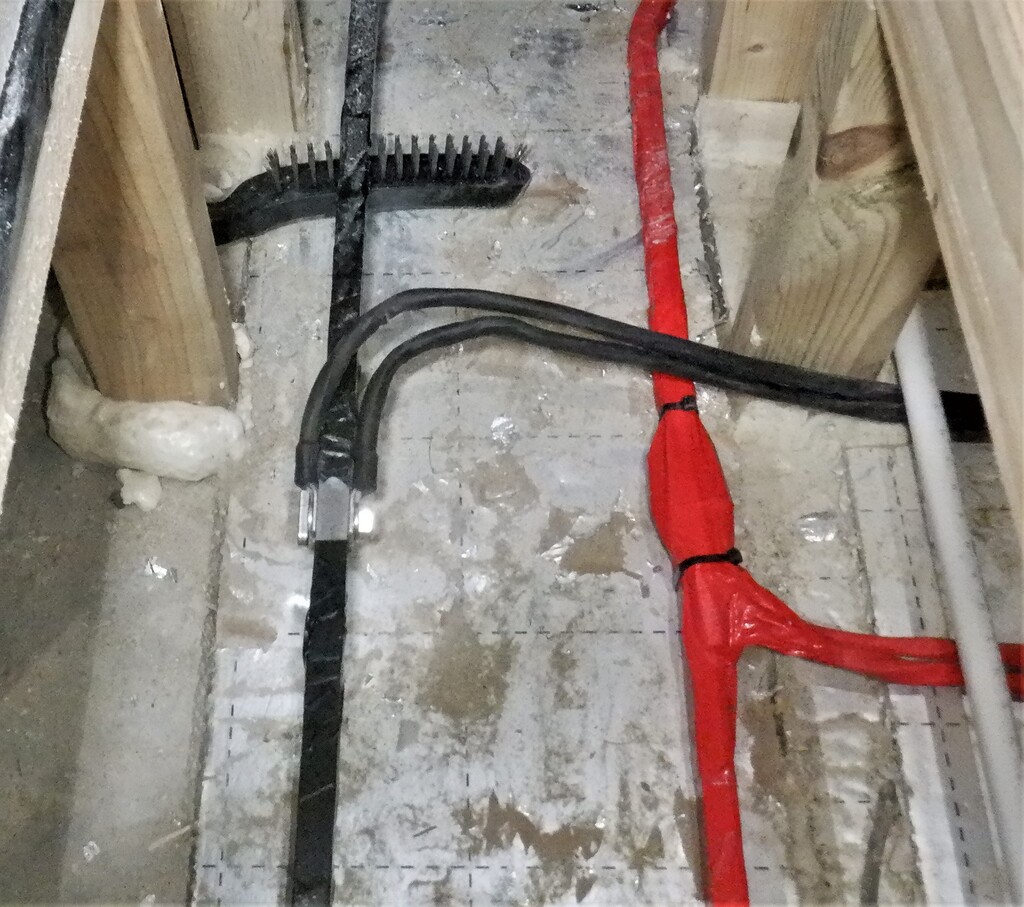
Connected-to-the-bus-bars
From-bus-bar-across-the-hall
Up-the-wall-to
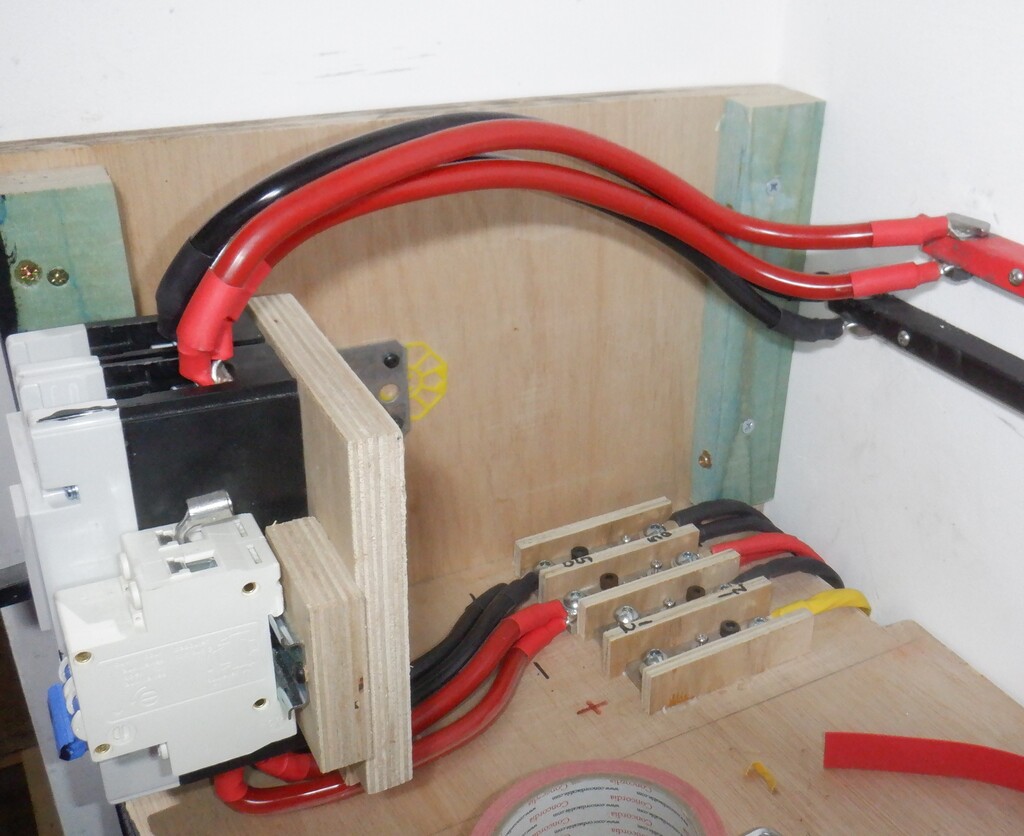
Main-breaker-connected-from-internal-bus-bars-to-the-main-bus-bars
We also threaded in a couple of heavy duty mains 230V wires from our Consumer Unit, across under the floor and up at the back of the cabinet, ready to be distributed inside to our five mains powered chargers plus providing a electrical socket for any other pieces of equipment going up that side of the Tech Cupboard.
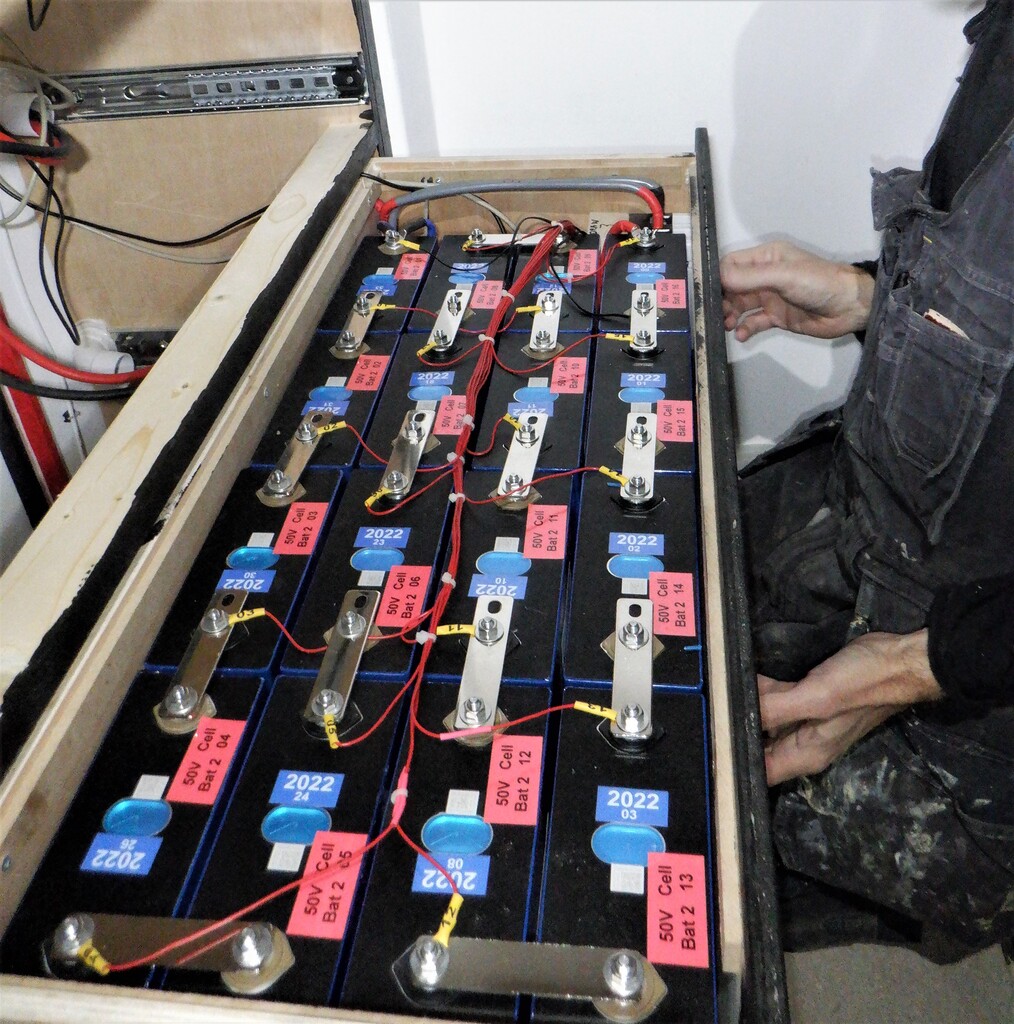
Having done all the tasks that needed us to have access to install these various wires and cables, we could proceed to assemble an actual battery pack into a drawer. This meant that we needed to make up lots of thick heavy duty connecting electrical cables, ready to go into a drawer from the bus bar, connecting the switches, the computer and several data cables too. It took all day just to do one drawer! The sixteen individual cells all needed to be arranged so that we maximised getting them into the space inside the drawer, but have both the negative and positive terminals both at the right side of the drawer, ready to be connected to the computer and the isolating switch. We had to drill an extra hole into the solid copper bars so that we could pack the battery cells closer together. Also, the computer has monitoring wires attached to each of the sixteen cells so it can both measure what is going on, on each individual cell level, but also, transfer small amount of energy from one cell to another, to balance everything up. It is a very clever battery computer!
Battery-50-2
We repeated the whole thing over again to assemble our second battery 50Volt pack and got that one going as well.
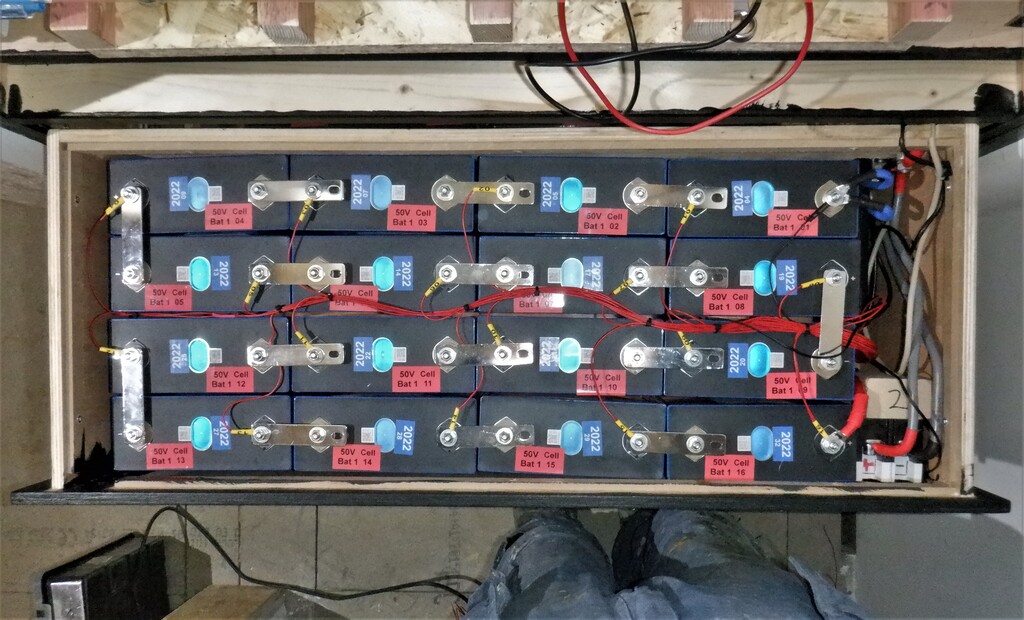
Battery-50-1
We did all the proper safety checks, electrical tests before we switched on these drawers full of batteries. All is working just fine! Both battery packs are working and connects to the wider world of our house etc.
This pretty much means that we got our battery cabinet finished, with only the 12Volt drawer to assemble and also to put the chargers into the fifth shelf which we will do later. The final test was to enable the Solar Panel system to deliver any excess solar energy and route it to the battery packs. But, unfortunately, our Inverter magic box doesn’t seems to want to do that. We thought we had configured it to reroute any excess Solar energy to charge the batteries but it kept wanting to use grid electricity instead. We eventually realised that we had enabled the battery on the inverter with the battery switched off which made the inverter think the battery was flat and need emergency charging! We solved this by turning the battery on first then enabling it in the inverter and all was well, lovely solar energy charging the battery…
Leave a Reply
You must be logged in to post a comment.