Author: Shaun

  • Rafter Joint Squeezer Tool Created

    We made our first tool today! It is a joint compressor for squeezing the webbing (the plywood layers) hard onto the flanges (89mm or 63mm CLS timber planks) and making sure the glue is spread as thinly as possible to gain the maximum strength in the joint.
    It is made using steel angle iron pieces with side arms and little upright piece and then a long “handle” with a couple of holes to provide the pivot point. A wooden footplate and sturdy short pillar to hold the bolt that is holding the metal part of this tool at the correct height to squeeze the rafters, first with just one plywood layer and then again when the second layer goes on later.

    Joint clamp - The machine

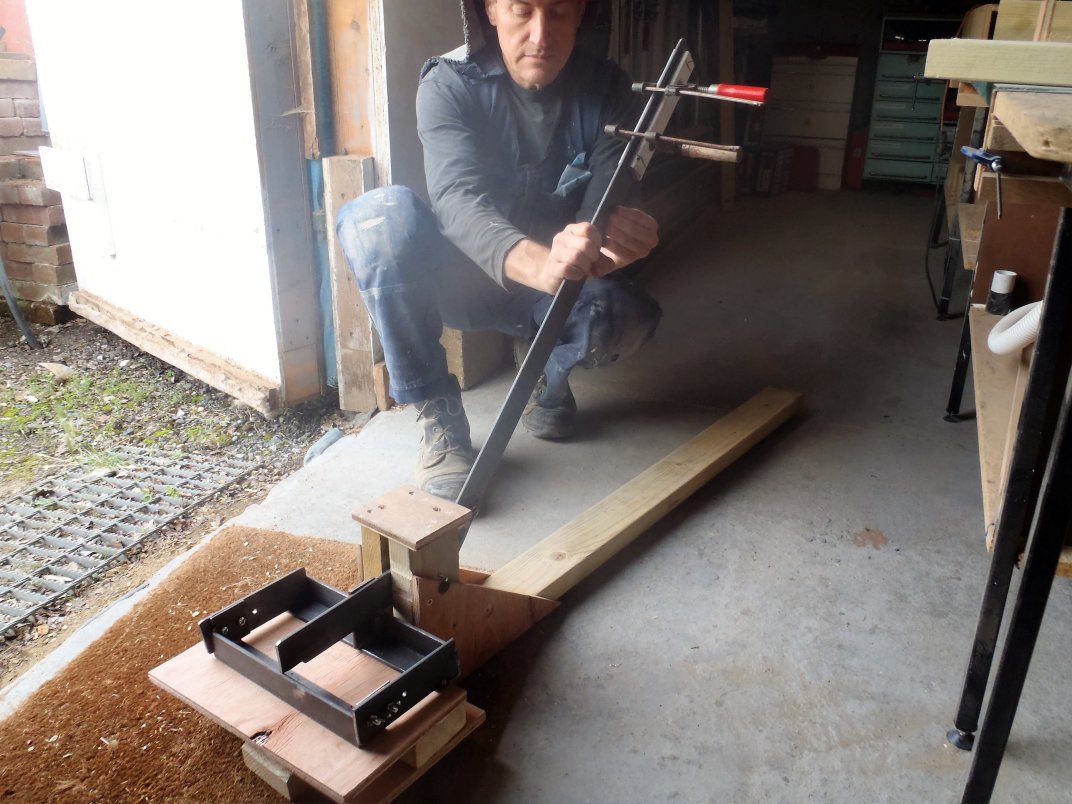
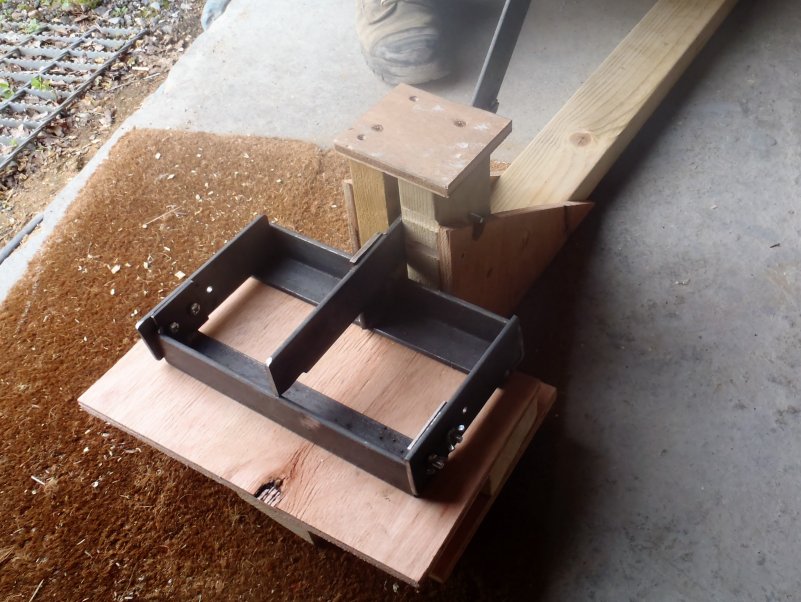
    Joint clamp – The machine

    Joint clamp - First Apply glue

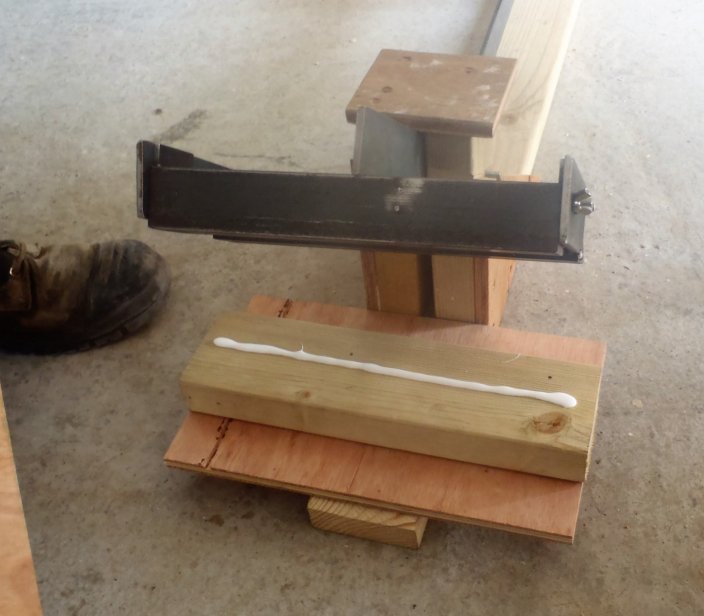
    Joint clamp – First Apply glue


    Joint Clamp - close and apply pressure

    Joint Clamp – close and apply pressure

    Joint clamp - Open and move to next position

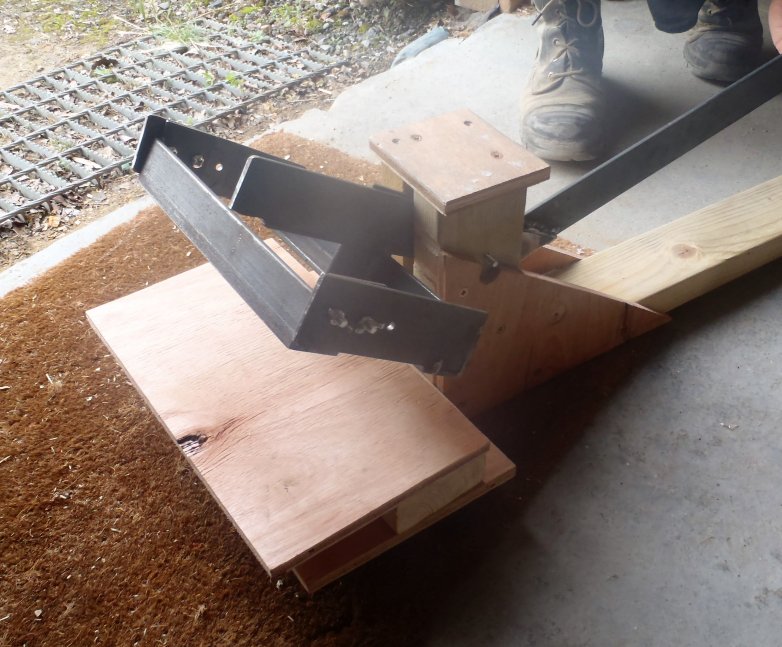
    Joint clamp – Open and move to next position


    This tool will slide under the edge of the template that will hold the component parts of the rafter and squash the joint and hold it tight while the nail gun comes along and puts in four or five nails to lock things together while the glue dries and make it good and permanent.
    Tomorrow, we will work on the next tool and template, probably the Bird Mouth and “end of Eve’s” template!

  • Massive Tidy-Up in Workshop to Set It Ready for the Production of Roof Rafters

    For the start of the week, we did a massive tidy up operation in our workshop today! It was very necessary as the finished rafters are very long and we needed the room to have a stack of ready-to-go materials, a working assembly area and finally, a stack of completed pieces. For example, the largest rafter is 5.5metres long and 400mm wide. And in total, we will be making just about 200 of them in all sizes!! So This meant having one major spring clean (in the middle of Summer!) of the whole workshop, moving out pieces of equipment and bits and pieces we did not need at this precise moment in time to our other storage rooms and then rearranging everything on the side workbench so we could clear away the middle part of the workshop, collapse down a line of storage tables and swept the place clean!

    Floor-cleared-for-Rafter-making

    Floor-cleared-for-Rafter-making


    We are one very dusty individuals at the end of the day! But at least, we are now in the position to get a production line going once we have designed and set up the equipment, tools and templates which we will start doing tomorrow!!

  • Tidying Up and Planning the Next Stage of Work

    We did some miscellaneous tasks around the building site this afternoon, at the same time, talking about what we needed in terms of tools, jigs and templates to help us with the manufacturing of our roof rafters.
    The tasks were as follows:
    • Fixed and cleaned out the water pump non-return valve.
    • Tidy up the workshop of all the polystyrene foam waste bits and the tools
    • Sprayed weed killer around different areas of the building site
    • Trimmed back the old hedge along the Loke
    • Repaired the Sabre Saw where the blade wouldn’t hold in place anymore(a little spring clip has been knocked out of position).
    • Emptied Rubbish

    The tools and templates we talked about are as follows:
    • A squashing tool to ensure a tight joints between the plywood webbing and the flange of all the rafters
    • A measuring jig that hooks up on the steel I-Beams and the outer walls to allow us to check the distance down to the outside walls.
    • A rafter template to hold the long lengths of the timber and plywood in place, ready for gluing and nailing.
    • A birds mouth jig for making the notch in the flange
    • A jig to create an nibbed scarf joint (long diagonal joint with stepped ends) to join up two CLS pieces together making the required stronger lengths.
    • Planning the logistics of materials and workshop layout for supply of parts and placement of finished items.

    On Monday, we can start in earnest with all those items of action points above!! Grin!

  • Final Section of the Kerb Framework of Skylight is Completed

    This morning, we finished off the last final section of the Kerb framework of the Skylight. The long side facing the Loke is now done.

    Kerb-finished

    Kerb-finished


    We now have a complete loop of a framework structure sitting on top of the steel I-Beams, ready for the roof rafters to bump up to and also ready for the Skylight glazing framework to be installed on top as well.

  • Enhanced Sump Drainage Hole For Rainwater Extraction

    This afternoon, we did a small job while we had other family commitments to attend to, and enhanced the depth of the existing sump drainage hole in the middle of our concrete floor slab for removing rainwater falling inside our building.
    We used our SDS drill machine to drill down another inch at the bottom of the hole and then chisel the lumps away to make a reasonable smooth bottom. But while trying to remove the buried original plastic foot (this held up the bucket during the floor slab pourings), the rest of the concrete down below started to break away so we had to remove all the concrete all the way down to the DPM layer.
    We then mixed some fresh concrete with a high cement ratio and made it very dry so we could mould it into a neat flat bottom with vertical sides to fill in all the sides and hollows and make it waterproof again.

    Upgraded-pump-sump

    Upgraded-pump-sump


    Now the water pump with its built-in automatic liquid level sensor will operate at a lower level in the sump hole and drain more water away from our concrete slab. We Hope! Grin!

  • Final Stage of Building the Ker Around Skylight Continues

    Today, we carried on with the last stage of putting together the Kerb Framework around the Skylight. We Came along the long side of the Skylight (nearer side to the swimming lane) working from the Great Room end towards the Garage.

    One-side-of-Kerb-finished

    One-side-of-Kerb-finished


    We just about managed to get that done before lunch, stopping just short of the Chimney Support Arm. After lunch, we resume our way around and finished the day about half way along the other long side, this time the side nearer the Loke!
    Nearly-halfway-along-the-other-side

    Nearly-halfway-along-the-other-side


    All is going in ok, with the glue, screws and water protection skim on the top edges of the plywood and OSB boards. We have just about 8 metres to go and then we are finished completely. The next job is to start building the special diagonal rafters for the 12 corners and get them installed on their special wall legs and get everything positioned and fixed into place.

  • Half Day on Building Kerb Framework

    We carried on with building up the Kerb Framework around the Skylight today, finishing off putting on the top planks of timber, the 89mm CLS pieces around on the narrower sections.
    Then, after a nice interruption by some family visitors arriving coming to see our work etc, we then started putting in the final layers of the polystyrene foam boards and covering the whole lot up with the 18mm OSB boards to make a strong outer skin to the Kerb and provide a good solid structure to fix the roof rafters, the various roofing components like the copper flashing to etc.
    We completed one section down at the Great Room end of the Skylight.

    First-part-of-kerb-finished

    First-part-of-kerb-finished


    Tomorrow, we will carry on up the two long sides, inserting the 38mm thick foam boards and gluing and screwing down the 18mm OSB covers.

  • LVL Planks Sliced in Half

    This morning, we sliced up the LVL timber while we waited for the overnight rain to dry off the woodwork. The Laminated Veneer Lumber arrived as 220mm wide long planks and we needed to slice it in half down the middle to make the timber pieces we wanted.
    We set up four trestle legs to support the long lengths and use our mains powered circular saw and vacuum cleaner to stuck up the sawdust, and went through the dozen planks.

    Sawing-the-LVLs-in-Half

    Sawing-the-LVLs-in-Half


    We were on the last plank when our vacuum cleaner became blocked up and we discovered that we generated so much sawdust that it filled the cleaner right up to the rim!!

    Generates-a-lot-of-sawdust

    Generates-a-lot-of-sawdust


    We now have 34 lengths of LVL timber, all 110mm wide by various lengths from 4metres to 7metres, ready for creating the diagonal rafters that goes into the corners of the roof plus a couple of specialised ones for our back extension roof structures.

    The-sliced-up-LVLs

    The-sliced-up-LVLs

  • Polystyrene Foam Inserted and Long Top Planks Put On

    Today, we worked on the Kerb framework of the Skylight, starting early at 9am and worked until 4pm when the rain (as predicted) came in quite hard. We got a bit wet at the end there – grin!
    First of all, we cut up the thin 30mm thick polystyrene foam pieces and slid them into the gaps along the wider steel I-Beams sections as this is enclosed and can only be done before putting the timber piece on the top of the framework.

    Insulation-inserted-in-gaps

    Insulation-inserted-in-gaps


    Then, we put on the 69mm wide pieces of timber along these sections, gluing and screwing the plank down and squeezing in the plywood coverings to make it all flat and neat.
    We worked our way around the wider steel I-Beams and then carried on onto the narrower I-Beams which has a vertical timber piece as the top plate. It is a 89mm CLS timber and we managed to do one side of the steel I-Beam (on the Loke side) before the rain came.
    Top-pieces-added

    Top-pieces-added


    Tomorrow, we will carry on around the end with these 89mm CLS timber and back up the other side plus the final piece at the end over in the Great Room. After that lot, we then can put on the outer 18mm OSB boards to cover up all the framework and present a neat clean facia, ready for our roof rafters to press up against it etc.

  • Sliced Up Polystyrene Boards

    Then this afternoon, while the rain came sprinkling down, we were in the workshop slicing up lots and lots of polystyrene foam boards into narrow strips of various thickness, in order to fill up the gap inside the Kerb framework of the Skylight.
    We used up lots of old left-over pieces to make the following items:

    • 9 x 277 mm high by 38mm thick strips
    • 6 x 327 mm high by 38mm strips
    • 6 x 327 mm high by 30mm thick strips.

    All strips 2.4m long.

    Sliced-up-insulation

    Sliced-up-insulation


    We had to widen our Hot-Wire cutting machine to accommodate the wider pieces, as we had not originally envisioned making these sizes of insulation strips. That took about an hour to disassemble and reassemble the machine onto a wider base board!! But we managed to slice all what we needed before the end of the day!

    Tomorrow, we will get back out there and start putting these strips in place up on the Kerb framework, hopefully weather permitting!